1 基础知识
1.1 瀑布开发
1.1.1 瀑布开发的简介
瀑布开发是一种老旧的正在过时的开发方法
瀑布开发最开始普遍应用于软件行业
瀑布开发套用传统工业生产方法,不能适用于计算机软件开发的实际情况
1.1.2 瀑布式开发的技术原理
基于预见性方法而计划需求
基于计划的需求而分析需求
基于分析的需求而设计程序架构
基于设计程序架构而创建编码
基于创建的编码而测试程序
1.1.3 瀑布式开发的缺点
严格的分级导致自由度降低
项目早期的承诺导致后期需求变化难以调整或代价高昂
严重不适应用于需求不明确且项目进行过程中的可能变化情况
1.2 迭代式开发
1.2.1 迭代式开发的简介
迭代式开发别称迭代增量式开发或迭代进化式开发
迭代式开发与传统瀑布式开发相反的软件开发过程
1.2.2 迭代式的技术原理
迭代式开发方法中,整个开发工作被组织成一系列短小的、固定长度的小项目
小项目被称为一系列的迭代
每一次迭代都包括定义、需求分析、设计、实现和测试
注:
采用以上方法项目需求可以在完整确定之前启动
每一次迭代中完成系统的一部分功能或业务逻辑开发工作
然后再通过客户反馈来细化需求并开始新一轮的迭代
1.2.3 迭代式开发的特点
降低风险
项目早期就可收集到用户反馈
持续的测试和集成
根据需用变更
提高复用性
1.3 敏捷开发
1.3.1 敏捷开发的介绍
敏捷开发是一种1990年逐渐引起广泛关注的软件开发方法
敏捷开发能应对快速变化的需求
敏捷开发相对非敏捷开发更注重程序员与业务专家之间的紧密合作、面对面沟通(认为比书面文档更有效)
1.3.2 敏捷式开发的推行条件
团队中需要三名以上的研发工程师
团队中需要一名合适的Scrum Master
注:Scrum Master意思是敏捷专家,要求熟悉开发模式及实施流程,一般由敏捷团队的开发负责人担当、部分能力很强且懂技术的产品经理也可担当(需要完成工作评估和分配等工作)。
1.3.3 敏捷式开发的特点
敏捷开发频繁地交付软件版本
紧凑而自我组织型团队
紧跟需求变化的代码编写团队和组织方法
更加软件开发中人的作用
1.4 DevOps的介绍
1.4.1 DevOps概念
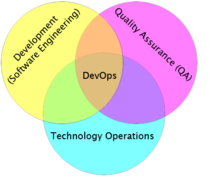
DevOps由Development(开发)与Operations(运维)两个词组合而来
DevOps是一组过程、方法与系统的统称
DevOps用于促进开发(应用程序/软件工程)、技术运行和质量保障(QA)部门之间的沟通、协作与整合
注:DevOps可以看作是开发、技术运营和质量保障三者的交集
1.4.2 DevOps的适用场景
使用敏捷或其他软件开发过程或方法
业务负责人要求加快产品交付的效率
虚拟化和云计算基础设施日益普遍
数据中心自动化技术和配置管理工具的普及
1.4.2 DevOps的作用
减少变更范围,频繁的更新发布使得变化更小从而使得部署不会对系统产生巨大影响且应用程序以平滑的方式逐渐生长
加强发布协调,依赖强有力的发布协调人来弥合开发与运营之间的技术和沟通鸿沟(电子数据表、电话会议、即时消息等沟通工具)
自动化,强有力的自动化部署手段确保部署任务的可重复性、减少部署出错
1.5 Bonita的介绍
1.5.1 Bonita的简介
Bonita支持专业开发人员和普通开发人员之间协同工作
Bonita使用一流的DevOps方法和工具快速自动化交付项目和应用程序
1.5.2 Bonita stack
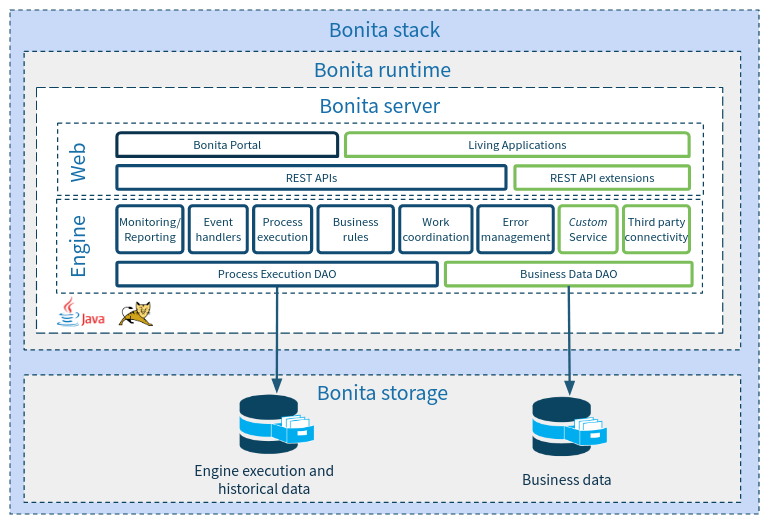
Bonita stack(即Bonita堆栈),用于部署终端用户所需程序的所有程序工具组件的合称
Bonita堆栈包括Bonita runtime(Bonita运行时)和Bonita Storage(database schemas)两部分
Bonita运行时包含一个或多个Bonita Srever(Bonita Community Edition一个,Bonita Enterprise Edition多个且可集群)
Bonita服务包含管理流程执行的Bonita Engine(Bonita引擎)和用于为最终用户提供管理的Web界面
注:Bonita服务运行于Java环境
1.5.3 Bonita Studio的简介
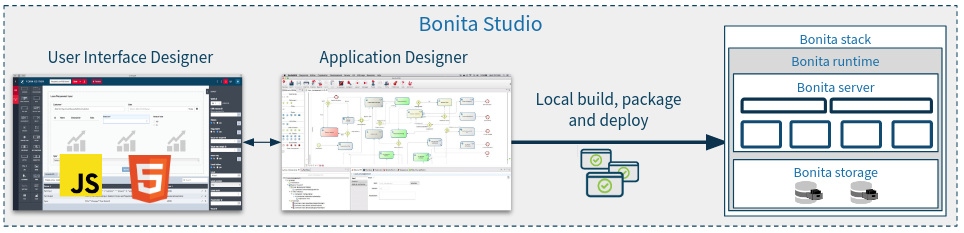
Bonita Studio是基于Eclipse构建的桌面应用程序
Bonita Studio使用可视化拖放的方式来设计基本的业务逻辑
Bonita Studio使用所见即所得的Bonita UI Designer创建响应式用户界面
Bonita Studio使用连接器和REST API与企业技术堆栈集成
Bonita Studio利用可扩展和可嵌入的开源Bonita来协调人、系统和机器人之间互动
1.5.4 Bonita Studio的功能
BPMN(Business Process Modeling Notation)建模,即业务流程建模与标注模型建立
BDM(Business Data Model)建模,即业务数据模型建立
用户界面(UI Designer)建模,即UI设计模型建立
应用程序建模
嵌入式Bonital堆栈(适用于应用程序开发人员执行本地应用程序测试)
1.5.5 Bonital的版本
Community
Teamwork
Efficiency
Performance
Enterprise
1.6 Bonita的安装要求
1.6.1 硬件要求
| Type | Minimum | Recommended |
|---|---|---|
| Processors | 4 CPU cores | 4 CPU cores or more |
| Memory (RAM) | 4 GB | 8 GB or more |
| Disk space | 10 GB | 30 GB or more, depending on usage |
1.6.2 软件要求
| Version | |
|---|---|
| Operating system | |
| Microsoft Windows Server | 2016 64 bits |
| Red Hat Enterprise Linux | 7.6 64 bits |
| Ubuntu | 18.04 LTS 64 bits |
| Java Virtual Machine | |
| Oracle Java SE Runtime Environment | 8 or 11 (see note 1) |
| OpenJDK | 8 or 11 (see note 1) |
| Application Server | |
| Apache Tomcat | 8.5.x (x > 40) |
| Database | (see note 2) |
| MySQL | 8.0.14 and higher in the 8.0.x line (see note 3) |
| PostgreSQL | 11.2 and higher in the 11.x line |
| SQL Server | 2017 |
| Oracle | 19c (19.3.0.0.0) (see note 5) |
| Browser | |
| Mozilla Firefox | latest version |
| Google Chrome | latest version (see note 6) |
| Microsoft Edge | latest version |
| Internet Explorer | 11.0.x |
2 最佳实践
2.1 部署Docker集群
如果你尚未部署Docker集群环境,请参阅如下章节部署,
2.2 部署前的准备
In docker01
2.2.1 准备postgress镜像
In docker01
cd /data/docker/images/
docker load -i postgres_11.2.tar
docker tag postgres:11.2 docker01.cmdschool.org:5000/postgres:11.2
docker push docker01.cmdschool.org:5000/postgres:11.2
docker image rm postgres:11.2
另外,安装包的离线下载请在能上网的docker环境的机器上使用如下命令,
docker pull postgres:11.2
docker save postgres:11.2 -o postgres_11.2.tar
另外,其他版本请从以下链接下载,
https://hub.docker.com/_/postgres
2.2.2 准备bonita镜像
In docker01
cd /data/docker/images/
docker load -i bonita_7.11.tar
docker tag bonita:7.11 docker01.cmdschool.org:5000/bonita:7.11
docker push docker01.cmdschool.org:5000/bonita:7.11
docker image rm bonita:7.11
另外,安装包的离线下载请在能上网的docker环境的机器上使用如下命令,
docker pull bonita_7.11.tar
docker save bonita:7.11 -o bonita_7.11.tar
另外,其他版本请从以下链接下载,
https://hub.docker.com/_/bonita
2.3 部署Bonita
In docker01
2.3.1 创建服务配置文件
vim /data/docker/yml/bonita-stack.yml
加入如下配置,
# Use tech_user/secret as user/password credentials
version: '3'

services:
  db:
    image: docker01.cmdschool.org:5000/postgres:11.2
    ports:
      - 5432:5432
    volumes:
      - /data/docker/bonita_postgres/data:/var/lib/postgresql/data
    environment:
      TZ: Asia/Shanghai
      POSTGRES_USER: postgres
      POSTGRES_PASSWORD: postgrespwd
    deploy:
      replicas: 1
      placement:
        constraints: [node.labels.bonita_postgres == true]
    restart: always
    command:
      - -c
      - max_prepared_transactions=100
    logging:
      driver: "json-file"
      options:
        max-size: "100m"
        max-file: "5"
  bonita:
    image: docker01.cmdschool.org:5000/bonita:7.11
    ports:
      - 8080:8080
    environment:
      - TZ=Asia/Shanghai
      - POSTGRES_ENV_POSTGRES_PASSWORD=postgrespwd
      - DB_VENDOR=postgres
      - DB_HOST=db
      - TENANT_LOGIN=tech_user
      - TENANT_PASSWORD=secret
      - PLATFORM_LOGIN=pfadmin
      - PLATFORM_PASSWORD=pfsecret
    deploy:
      replicas: 1
      placement:
        constraints: [node.labels.bonita_bonita == true]
    restart: on-failure:2
    depends_on:
      - db
    entrypoint:
      - bash
      - -c
      - |
        set -e
        echo 'Waiting for Postgres to be available'
        export PGPASSWORD="$$POSTGRES_ENV_POSTGRES_PASSWORD"
        maxTries=10
        while [ "$$maxTries" -gt 0 ] && ! psql -h "$$DB_HOST" -U 'postgres' -c '\l'; do
            let maxTries--
            sleep 1
        done
        echo
        if [ "$$maxTries" -le 0 ]; then
            echo >&2 'error: unable to contact Postgres after 10 tries'
            exit 1
        fi
        exec /opt/files/startup.sh
根据配置需求创建数据存放目录,
In docker02
mkdir /data/docker/bonita_postgres/data
根据配置的需求设置运行标记,
In docker01
docker node update --label-add bonita_postgres=true docker02.cmdschool.org
docker node update --label-add bonita_bonita=true docker01.cmdschool.org
2.3.2 部署服务
docker stack deploy -c /data/docker/yml/bonita-stack.yml bonita
2.3.3 登录测试
http://docker01.cmdschool.org:8080/bonita/
可使用如下账号密码登录,
TENANT_LOGIN=tech_user
TENANT_PASSWORD=secret
以上账号登陆后可创建管理员,请按如下步骤操作,
https://documentation.bonitasoft.com/bonita/7.11/first-steps-after-setup#toc4
2.4 其他管理(可选)
2.4.1 管理程序目录
docker exec -it `docker container ls | grep bonita_bonita | cut -d" " -f1` bash
ls /opt/bonita/BonitaCommunity-7.11.0/
目录的详细功能如下,
setup/tomcat-templates/setenv.bat:配置Windows JVM系统属性的脚本。
setup/tomcat-templates/setenv.sh:配置Linux JVM系统属性的脚本。
setup/tomcat-templates/bonita.xml:配置Bonita Web应用的Tomcat上下文且定义Bonita Engine使用的数据源。
server/conf/catalina.properties:配置lib/bonita的类文件夹包含到Tomcat类路径中。
server/conf/context.xml:修改为使用Narayana库添加JTA支持。
server/conf/logging.properties:修改以创建专用于Bonita的日志文件。
server/conf/server.xml:已修改以添加Narayana和h2的侦听器
server/conf/jbossts-properties.xml:Narayana事务管理器的配置文件。
server/lib/bonita:Bonita需要的额外库。包括以下库:Narayana JTA事务管理器,h2,SLF4J。
server/webapps/bonita.war:Bonita Web应用程序。
setup/:管理Bonita Platform配置,存储在数据库而不是文件系统中。提供Tomcat捆绑包配置工具。
tools/request_key_utils:包含用于生成许可证请求密钥的脚本的文件夹(仅适用于订购版本)。
tools/BonitaSubscription-x.y.z- LDAP-Synchronizer:用于将Bonita中的组织与LDAP同步工具(仅订阅版本)。
tools/cas-cas.version-module:文件夹,其中包含模块文件和描述,以使CAS依赖于bonita EAR(仅订购版本)。
start-bonita.bat:在Windows上启动捆绑软件的脚本。
start-bonita.sh:在Linux上启动捆绑软件的脚本。
stop-bonita.bat:在Windows上停止捆绑销售的脚本。
stop-bonita.sh:在Linux上停止捆绑销售的脚本。
2.4.2 管理数据库
ssh docker02
docker exec --user postgres -it `docker container ls | grep bonita_db | cut -d" " -f1` bash
psql
登录数据库后,可使用如下命令查看当前的数据库,
\l
可见如下输出,
                                   List of databases
    Name    |    Owner     | Encoding |  Collate   |   Ctype    |   Access privileges
------------+--------------+----------+------------+------------+-----------------------
 bonitadb   | bonitauser   | UTF8     | en_US.utf8 | en_US.utf8 |
 businessdb | businessuser | UTF8     | en_US.utf8 | en_US.utf8 |
 […]
(5 rows)
2.4.4 查看数据库连接配置
docker exec -it `docker container ls | grep bonita_bonita | cut -d" " -f1` bash
egrep -v "^#|^$" /opt/bonita/BonitaCommunity-7.11.0/setup/database.properties
添加如下平台管理员配置,
db.vendor=postgres
db.server.name=db
db.server.port=5432
db.database.name=bonitadb
db.user=bonitauser
db.password=bonitapass
bdm.db.vendor=postgres
bdm.db.server.name=db
bdm.db.server.port=5432
bdm.db.database.name=businessdb
bdm.db.user=businessuser
bdm.db.password=businesspass
h2.database.dir=../h2_database
2.4.5 平台配置工具使用
docker exec --user bonita -it `docker container ls | grep bonita_bonita | cut -d" " -f1` bash
cd /opt/bonita/BonitaCommunity-7.11.0/setup
./setup.sh help
可见如下输出,
usage: setup ( init | configure | pull | push ) [-D ] [-f]

Available options:
 -D    specify system property to override configuration
                       from database.properties
 -f,--force            Force push even if critical folders will be deleted
use `setup help` or `setup help ` for more details

Important:
For basic bundle installations and starts, launch the `bonita-start`(.bat|.sh) script, at top level of Bonita bundles.
It will create the database tables, configure the server using information from `database.properties`, and then start the server for you.
So you normally don't need to run this `setup` script manually.

However, for specific needs, here are the details of use:

Available commands:

 init  --  Initialise the database so that Bonita is ready to run with this database
 configure  --  Configure a Bonita bundle to use your specific database configuration (defined in database.properties or via command line parameters)
 pull  --  Pull configuration from the database
 push  --  Push configuration to the database
 help  --  Display the help

All commands here interact with the database configured in the file database.properties.
By default, the bundle is configured with an embedded H2 database, suitable for development and testing, not suitable for production purposes.
To switch to another database vendor, change values in the file database.properties or use system properties.
You can specify system properties directly from the command line, using `-Dproperty=value`.
For example, to change the database name and initialize the database, use:
  `setup.bat init -Ddb.database.name=myDatabase`

Here is the list of available properties:
 * db.vendor
 * db.server.name
 * db.server.port
 * db.database.name
 * db.user
 * db.password
 * bdm.db.vendor
 * bdm.db.server.name
 * bdm.db.server.port
 * bdm.db.database.name
 * bdm.db.user
 * bdm.db.password

To know more about the setup tool, go to the Documentation web site, and search with the keywords "platform setup"
2.4.6 管理后台数据库
In docker02
vim /data/docker/bonita_postgres/data/postgresql.conf
修改如下配置,
listen_addresses = '*'
port = 5432
password_encryption = md5
max_prepared_transactions = 100
修改以下配置文件允许链接,
vim /data/docker/bonita_postgres/data/pg_hba.conf
加入如下配置,
host all all 0.0.0.0/0 md5
重启服务使配置生效,
docker stack deploy -c /data/docker/yml/bonita-stack.yml bonita
测试数据库连接,
docker exec -it `docker ps | grep  bonita_db | cut -d" " -f1` bash
su - postgres -c "psql -U agendav -h 127.0.0.1 -p 5432 -d agendav -W -c '\l'"
参阅文档
================================
安装教程
——————
https://hub.docker.com/_/bonita
https://documentation.bonitasoft.com/bonita//bonita-docker-installation
https://documentation.bonitasoft.com/bonita/7.11/custom-deployment
https://documentation.bonitasoft.com/bonita/7.11/
下载地址
—————–
https://github.com/bonitasoft/bonita-platform-releases/releases/tag/7.11.0
https://github.com/bonitasoft/bonita-platform-releases/releases
https://www.bonitasoft.com/downloads
官方站点
——————
https://www.bonitasoft.com/
Bonita Studio与Bonita Portal的连接(手动)
—————————————–
https://community.bonitasoft.com/questions-and-answers/connect-bonita-studio-bonita-server
DevOps的介绍
——————
https://hub.docker.com/_/bonita
https://baike.baidu.com/item/devops/2613029?fr=aladdin
瀑布式开发的介绍
——————-
https://baike.baidu.com/item/%E7%80%91%E5%B8%83%E5%BC%8F%E5%BC%80%E5%8F%91
迭代式开发的介绍
https://baike.baidu.com/item/%E8%BF%AD%E4%BB%A3%E5%BC%8F%E5%BC%80%E5%8F%91
敏捷开发的介绍
—————–
https://baike.baidu.com/item/%E6%95%8F%E6%8D%B7%E5%BC%80%E5%8F%91%E6%A8%A1%E5%BC%8F/8395733?fr=aladdin
Scrum Master的介绍
———————
https://baike.baidu.com/item/sm/13978027?fr=aladdin
没有评论