1 基础知识
1.1 Apache Ignite简介
Apache Ignite是一个分布式数据库
Apache Ignite运行于内存并利用内存速度进行高性能计算
1.2 Apache Ignite的特点
1.2.1 运行模式
– 内存(Memory)模式,整个数据库仅在内存中运行
— 纯内存模式下性能最好
— 建议集群中至少保留一份数据备份以避免故障
– 内存缓存(Memory Cache)加外部数据库(External Database)模式
— 作为缓存为外部磁盘数据库加速
— 支持RDBMS、NoSQL或Hadoop的缓存层
— 该模式下查询到的后端数据库被缓存到内存中
– 内存缓存(Memory Cache)加本地持久化(Native Persistence)模式
— 作为缓存为本地数据库加速
— 数据和索引保留到本机磁盘实现数据持久化
— 数据尽可能多缓存于内存中用于加速
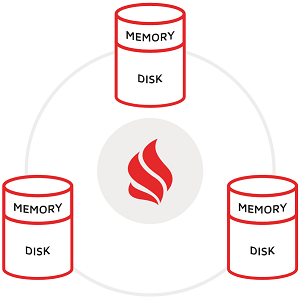
1.2.2 跨集群分区
– Apache Ignite支持跨集群分区
– 数据将均匀分布到集群的所有节点(比单节点存储的数据更多)
1.2.3 跨集群复制
– Apache Ignite支持跨集群复制
– 每个集群节点都保留完整的数据副本,复制缓存大小受节点可用内存限制
1.2.4 全局ACID事务
![]()
– Ignite集群提供全局ACID实物功能
— Atomicity(原子性)事务中的所有操作,要么全部完成,要么全部不完成
— Consistency(一致性)事务开始之前与结束之后,数据库完整性没有被破坏
— Isolation(隔离性)事务隔离性可防止多事务并发交叉执行导致数据不一致
— Durability(持久性)事务结束后数据被永久修改,即便系统故障也不会丢失
– Apache Ignite可保持高度一致的模式运行,完全支持ACID事务(内存缓存于磁盘均可满足一致性要求)
– Apache Ignite分布式事务支持跨多集群节点、缓存表或分区
– Apache Ignite支持应用程序悲观锁与乐观锁
– Apache Ignite使用2PC协议确保集群各节点数据的强一致性
– Apache Ignite集群遇到系统失败可保留提交的事务
– Apache Ignite集群可确保集群恢复到最近成功的事务状态
1.2.5 数据的持久化
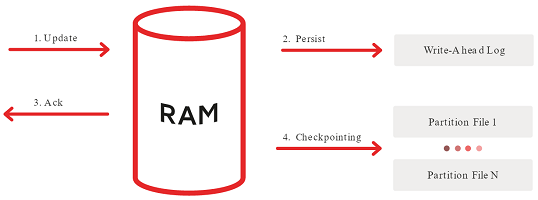
– 启用持久性后,数据在内存中缓存满后,多余的数据会被写到磁盘中
– 在内存缓存加本地持久化模式下,内存中新增记录都会添加到预读写日志(WAL)
– 预读写日志的目的是实现以最快速度更新到磁盘并提供完整的集群故障数据一致性恢复机制
– 预读写日志增长到一定程度会定期在主存储中设置检查点
– 检查点是实现将脏页(写有数据内存缓存页)中的数据写入磁盘的过程
1.2.6 分布式ANSI SQL
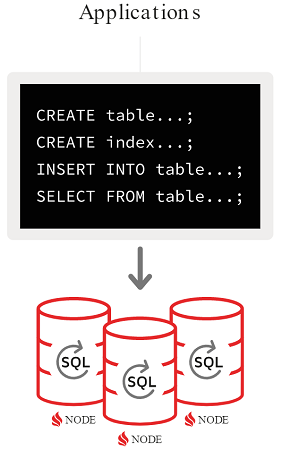
– Apache Ignite SQL引擎符合ANSI-99标准且支持水平可扩展和容错
– Apache Ignite支持JDBC、ODBC驱动
– Apache Ignite支持Java、C#、C++的本机SQL API
– Apache Ignite支持常规的SQL数据库交互
– Apache Ignite支持Python等编程语言
– Apache Ignite支持所有DML命令,包括SELECT、UPDATE、INSERT和DELETE查询
– Apache Ignite支持分布式DDL命令子集
1.2.7 分布式键值存储
– Apache Ignite支持分布式键值存储模式且数据可存于内存与磁盘
– Apache Ignite支持分布式分区哈市映射部署模式,数据被分布到集群的各个节点
– Apache Ignite支持使用键值或独有API访问集群数据
– Apache Ignite支持分布式ACID事务、SQL、协同定位计算和机器学习
1.2.8 低网络利用率
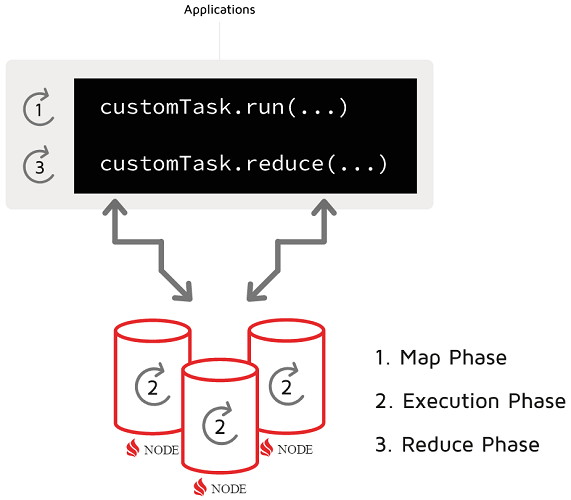
Apache Ignite支持计算密集型、数据密集型和机器学习协同定位处理技术(消除网络延迟)
Apache Ignite通过直接在节点上运行JOIN提高附加计算或SQL性能,避免增加网络负荷
1.2.9 机器学习
Apache Ignite机器学习可构建预测性机器学习模型
Apache Iginte支持机器学习和深度学习(DL)
1.3 Apache Ignite安装环境
– JDK,Oracle JDK 8 及更高版本、Open JDK 8 及更高版本、IBM JDK 8 及更高版本
– 操作系统,Linux、Mac OSX 10.6 及以上、Windows XP 及以上、Windows Server 2008 及以上、Oracle Solaris
– ISA,x86、x64、SPARC、PowerPC
– 网络,无限制(推荐10G)
1.4 Apache Ignite配置文件
1.4.1 加载配置文件
ignite.sh ignite-config.xml
注:以上通过启动脚本传参加载配置文件
1.4.2 加载默认配置文件
ignite.sh
注:不带参数将加载默认配置文件“default-config.xml”
最佳实践
1.1 安装前的准备
1.1.1 环境信息
OS = CentOS 7.3 x86_64
Host Name = any.cmdschool.org
IP Address = any
1.1.2 系统基本配置
请参阅以下文档完成系统的基础配置,
1.3 部署Apache Ignite
1.3.1 配置安装源
vim /etc/yum.repos.d/ignite.repo
加入如下配置,
[ignite]
name=ignite
baseurl=https://dl.bintray.com/apache/ignite-rpm/
gpgcheck=0
1.3.2 安装软件包
yum install -y apache-ignite-2.9.1
1.3.3 部署配置文件
cp /usr/share/doc/apache-ignite-2.9.1/examples/config/example-ignite.xml /etc/apache-ignite/ignite.xml
cp /usr/share/doc/apache-ignite-2.9.1/examples/config/example-default.xml /etc/apache-ignite/default-config.xml
可以使用如下命令查看配置文件,
vim /etc/apache-ignite/ignite.xml
将配置文件修改如下,
<?xml version="1.0" encoding="UTF-8"?>

<!--
  Licensed to the Apache Software Foundation (ASF) under one or more
  contributor license agreements.  See the NOTICE file distributed with
  this work for additional information regarding copyright ownership.
  The ASF licenses this file to You under the Apache License, Version 2.0
  (the "License"); you may not use this file except in compliance with
  the License.  You may obtain a copy of the License at

       http://www.apache.org/licenses/LICENSE-2.0

  Unless required by applicable law or agreed to in writing, software
  distributed under the License is distributed on an "AS IS" BASIS,
  WITHOUT WARRANTIES OR CONDITIONS OF ANY KIND, either express or implied.
  See the License for the specific language governing permissions and
  limitations under the License.
-->

<!--
    Ignite configuration with all defaults and enabled p2p deployment and enabled events.
-->
<beans xmlns="http://www.springframework.org/schema/beans"
       xmlns:xsi="http://www.w3.org/2001/XMLSchema-instance"
       xsi:schemaLocation="http://www.springframework.org/schema/beans
        http://www.springframework.org/schema/beans/spring-beans.xsd">
    <!-- Imports default Ignite configuration -->
    <import resource="default-config.xml"/>

    <bean parent="ignite.cfg"/>
</beans>
以上修改“import”属性指定导入“default-config.xml”文件的配置,然后使用如下命令查看被导入的配置,
cat /etc/apache-ignite/default-config.xml
可见如下配置,
<?xml version="1.0" encoding="UTF-8"?>

<!--
  Licensed to the Apache Software Foundation (ASF) under one or more
  contributor license agreements.  See the NOTICE file distributed with
  this work for additional information regarding copyright ownership.
  The ASF licenses this file to You under the Apache License, Version 2.0
  (the "License"); you may not use this file except in compliance with
  the License.  You may obtain a copy of the License at

       http://www.apache.org/licenses/LICENSE-2.0

  Unless required by applicable law or agreed to in writing, software
  distributed under the License is distributed on an "AS IS" BASIS,
  WITHOUT WARRANTIES OR CONDITIONS OF ANY KIND, either express or implied.
  See the License for the specific language governing permissions and
  limitations under the License.
-->

<!--
    Ignite configuration with all defaults and enabled p2p deployment and enabled events.
-->
<beans xmlns="http://www.springframework.org/schema/beans"
       xmlns:xsi="http://www.w3.org/2001/XMLSchema-instance"
       xmlns:util="http://www.springframework.org/schema/util"
       xsi:schemaLocation="
        http://www.springframework.org/schema/beans
        http://www.springframework.org/schema/beans/spring-beans.xsd
        http://www.springframework.org/schema/util
        http://www.springframework.org/schema/util/spring-util.xsd">
    <bean abstract="true" id="ignite.cfg" class="org.apache.ignite.configuration.IgniteConfiguration">
        <!-- Set to true to enable distributed class loading for examples, default is false. -->
        <property name="peerClassLoadingEnabled" value="true"/>

        <!-- Enable task execution events for examples. -->
        <property name="includeEventTypes">
            <list>
                <!--Task execution events-->
                <util:constant static-field="org.apache.ignite.events.EventType.EVT_TASK_STARTED"/>
                <util:constant static-field="org.apache.ignite.events.EventType.EVT_TASK_FINISHED"/>
                <util:constant static-field="org.apache.ignite.events.EventType.EVT_TASK_FAILED"/>
                <util:constant static-field="org.apache.ignite.events.EventType.EVT_TASK_TIMEDOUT"/>
                <util:constant static-field="org.apache.ignite.events.EventType.EVT_TASK_SESSION_ATTR_SET"/>
                <util:constant static-field="org.apache.ignite.events.EventType.EVT_TASK_REDUCED"/>

                <!--Cache events-->
                <util:constant static-field="org.apache.ignite.events.EventType.EVT_CACHE_OBJECT_PUT"/>
                <util:constant static-field="org.apache.ignite.events.EventType.EVT_CACHE_OBJECT_READ"/>
                <util:constant static-field="org.apache.ignite.events.EventType.EVT_CACHE_OBJECT_REMOVED"/>
            </list>
        </property>

        <!-- Explicitly configure TCP discovery SPI to provide list of initial nodes. -->
        <property name="discoverySpi">
            <bean class="org.apache.ignite.spi.discovery.tcp.TcpDiscoverySpi">
                <property name="ipFinder">
                    <!--
                        Ignite provides several options for automatic discovery that can be used
                        instead os static IP based discovery. For information on all options refer
                        to our documentation: http://apacheignite.readme.io/docs/cluster-config
                    -->
                    <!-- Uncomment static IP finder to enable static-based discovery of initial nodes. -->
                    <!--<bean class="org.apache.ignite.spi.discovery.tcp.ipfinder.vm.TcpDiscoveryVmIpFinder">-->
                    <bean class="org.apache.ignite.spi.discovery.tcp.ipfinder.multicast.TcpDiscoveryMulticastIpFinder">
                        <property name="addresses">
                            <list>
                                <!-- In distributed environment, replace with actual host IP address. -->
                                <value>127.0.0.1:47500..47509</value>
                            </list>
                        </property>
                    </bean>
                </property>
            </bean>
        </property>
    </bean>
</beans>
1.3.7 测试服务启动
sudo -u ignite /usr/share/apache-ignite/bin/ignite.sh /etc/apache-ignite/ignite.xml
按下【CTRL + C】即可退出进程,另外可使用如下命令查看启动的进程,
pgrep -u ignite java -a
可见如下显示,
2632 /bin/java -XX:+AggressiveOpts -Dfile.encoding=UTF-8 -DIGNITE_QUIET=true -DIGNITE_SUCCESS_FILE=/usr/share/apache-ignite/work/ignite_success_a1b2233b-2ec5-415e-86ce-354f4d04ae49 -Dcom.sun.management.jmxremote -Dcom.sun.management.jmxremote.port=49116 -Dcom.sun.management.jmxremote.authenticate=false -Dcom.sun.management.jmxremote.ssl=false -DIGNITE_HOME=/usr/share/apache-ignite -DIGNITE_PROG_NAME=/usr/share/apache-ignite/bin/ignite.sh -cp /usr/share/apache-ignite/libs/*:/usr/share/apache-ignite/libs/ignite-indexing/*:/usr/share/apache-ignite/libs/ignite-spring/*:/usr/share/apache-ignite/libs/licenses/* org.apache.ignite.startup.cmdline.CommandLineStartup /etc/apache-ignite/ignite.xml
从以上信息可知,程序调用默认配置文件“config/default-config.xml”启动,然后,可以使用如下命令查看倾听端口,
netstat -antp | grep `pgrep -u ignite java`
可见如下显示,
tcp6       0      0 :::11211                :::*                    LISTEN      2632/java
tcp6       0      0 :::47500                :::*                    LISTEN      2632/java
tcp6       0      0 :::10800                :::*                    LISTEN      2632/java
tcp6       0      0 :::47100                :::*                    LISTEN      2632/java
tcp6       0      0 :::49116                :::*                    LISTEN      2632/java
tcp6       0      0 :::40937                :::*                    LISTEN      2632/java
tcp6       0      0 :::38121                :::*                    LISTEN      2632/java
1.3.5 使用服务脚本启动服务
systemctl start apache-ignite@ignite.xml
以上“@”后面指定加载“/etc/apache-ignite/”路径下的配置文件名称,然后,可以使用如下命令查看服务状态,
systemctl status apache-ignite@ignite.xml
当然,你很容器猜到停止命令如下,
systemctl stop apache-ignite@ignite.xml
然后,可以使用如下命令设置服务开机启动,
systemctl enable apache-ignite@ignite.xml
如果需要反向操作,可以使用如下命令,
systemctl disable apache-ignite@ignite.xml
1.3.6 简化复杂的启动脚本
systemctl stop apache-ignite@ignite.xml
systemctl disable apache-ignite@ignite.xml
执行以上命令停止并取消默认启动,然后使用如下命令修改启动脚本,
cp /etc/systemd/system/apache-ignite@.service /etc/systemd/system/apache-ignite.service
vim /etc/systemd/system/apache-ignite.service
脚本修改如下,
[Unit]
Description=Apache Ignite In-Memory Computing Platform Service
After=syslog.target network.target

[Service]
Type=forking
User=ignite
WorkingDirectory=/usr/share/apache-ignite/work
PermissionsStartOnly=true
ExecStartPre=-/usr/bin/mkdir -p /var/run/apache-ignite
ExecStartPre=-/usr/bin/chown ignite:ignite /var/run/apache-ignite
ExecStartPre=-/usr/bin/env bash /usr/share/apache-ignite/bin/service.sh set-firewall
ExecStart=/usr/share/apache-ignite/bin/service.sh start ignite.xml
PIDFile=/var/run/apache-ignite/ignite.xml.pid

[Install]
WantedBy=multi-user.target
以上脚本参数“ExecStart”指定加载默认配置“default-config.xml”,修改完成后需要使用如下命令重载服务使配置生效,
systemctl daemon-reload
然后,可以使用不带参数的命令控制服务,
systemctl start apache-ignite.service
systemctl status apache-ignite.service
systemctl enable apache-ignite.service
systemctl disable apache-ignite.service
systemctl stop apache-ignite.service
1.3.7 自定义最大堆栈内存
vim /usr/share/apache-ignite/bin/service.sh
加入如下配置,
#!/usr/bin/env bash

firewallCmd="firewall-cmd --permanent --direct --add-rule ipv4 filter INPUT 0"

# Define function to check whether firewalld is present and started and apply firewall rules for grid nodes
setFirewall ()
{
        if [[ "$(type firewall-cmd &>/dev/null; echo $?)" -eq 0 && "$(systemctl is-active firewalld)" == "active" ]]
        then
            for port in s d
            do
                ${firewallCmd} -p tcp -m multiport --${port}ports 11211:11220,47500:47509,47100:47109 -j ACCEPT &>/dev/null
                ${firewallCmd} -p udp -m multiport --${port}ports 47400:47409 -j ACCEPT &>/dev/null
            done
            ${firewallCmd} -m pkttype --pkt-type multicast -j ACCEPT &>/dev/null

            systemctl restart firewalld
        fi
}

case $1 in
        start)
                /usr/share/apache-ignite/bin/ignite.sh -J-Xmx30G /etc/apache-ignite/$2 & echo $! >> /var/run/apache-ignite/$2.pid
                ;;
        set-firewall)
                setFirewall
                ;;
esac
需要注意的是,参数“-J-Xmx”定义最大的堆栈内存(需根据实际的服务器内存定义),配置完成后,需要重启服务使配置生效,
systemctl restart apache-ignite.service
参阅文档
===============
官方主页
————
https://ignite.apache.org/
官方文档
————–
https://www.ignite-service.cn/doc/java/
https://ignite.apache.org/docs/2.9.1/index
软件下载
—————-
https://ignite.apache.org/download.cgi#binaries
事务的ACID特性
—————
https://baike.baidu.com/item/acid/10738?fr=aladdin
两阶段提交协议2PC与三阶段提交协议3PC
—————
https://baike.baidu.com/item/2PC/3245393?fr=aladdin
https://www.cnblogs.com/qdhxhz/p/11167025.html
https://github.com/apache/ignite/tree/master/examples/config
没有评论