如何部署Debian FileZilla Server?
- By : Will
- Category : Debian-Like

Debian-Like
1 前言
一个问题,一篇文章,一出故事。
笔者由于需要体验FileZilla Server,于是整理此文。
2 最佳实践
2.1 安装前的准备
2.1.1 配置桌面环境
2.1.2 下载软件包
cd ~
wget https://dl3.cdn.filezilla-project.org/server/FileZilla_Server_1.7.3_x86_64-linux-gnu.deb
以上只是演示,如果你不能下载或者需要其他版本,请从以下连接部署,
https://filezilla-project.org/download.php?type=server
2.2 安装配置FileZilla服务端
2.2.1 安装软件包
cd ~
apt install -y ./FileZilla_Server_1.7.3_x86_64-linux-gnu.deb
2.2.2 确认服务运行
systemctl status filezilla-server.service
另外,你还可以使用如下命令查看服务倾听的端口,
netstat -antp | grep filezilla-serv
可见如下配置,
tcp        0      0 0.0.0.0:21              0.0.0.0:*               LISTEN      1714/filezilla-serv
tcp        0      0 127.0.0.1:14148         0.0.0.0:*               LISTEN      1714/filezilla-serv
tcp6       0      0 ::1:14148               :::*                    LISTEN      1714/filezilla-serv
tcp6       0      0 :::21                   :::*                    LISTEN      1714/filezilla-serv
你可以使用如下命令确认进程号,
pgrep -u root -f filezilla-server -a
可见如下显示,
498 /opt/filezilla-server/bin/filezilla-server --config-dir /opt/filezilla-server/etc
2.2.3 修改密码配置
cp /opt/filezilla-server/etc/settings.xml /opt/filezilla-server/etc/settings.xml.default
vim /opt/filezilla-server/etc/settings.xml
默认文档有如下配合,
        <admin>
                <local_port>14148</local_port>
                <password index="1">
                        <hash>L/oCq/YuBMyo8orYmaX/SAjoSg/wDIpiDldZiVcBSug</hash>
                        <salt>zGBvnU52cyvhAASZwtVsHPtGQz4/FYszmfJjqlZ2AUc</salt>
                        <iterations>100000</iterations>
                </password>
                <tls min_protocol_version="2" index="2">
                        <!--Fingerprint of the autogenerated and selfsigned certificate.-->
                        <fingerprint>43:71:c7:36:ff:85:56:59:f1:d7:ac:01:36:36:4f:9c:e8:c3:30:7f:47:6a:98:be:00:6b:21:50:58:9d:88:3f</fingerprint>
                </tls>
        </admin>
我们将他换成以下配置,
       <admin>
               <local_port>14148</local_port>
               <password index="0" />
       </admin>
修改完成后,你需要重启服务使配置生效,
systemctl restart filezilla-server.service
2.2.4 使用管理器连接到服务端
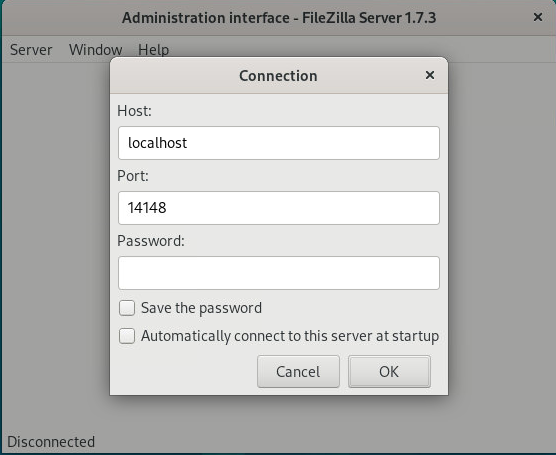
单击【Activities】->【Filezilla Server Administration】启动服务管理器,
界面显示如下,

如上图所示,
单击【Connection】后
直接单击【OK】即可进入管理界面
参阅文档
=================
重置密码
—————-
https://wiki.filezilla-project.org/Password_reset

没有评论