1 基础知识
1.1 DAViCal的简介
– DAViCal是一个日历共享服务器
– DAViCal是CalDAV协议的实现
注:CalDAV协议是用于在远程共享服务器上存储日历资源的协议
1.2 应用场景
– 越来越多的日历客户端支持通过CalDAV维护远程日历
– Mozilla Calendar(Sunbird/Lightning)支持CalDAV协议
– Evolution支持CalDAV协议
– Mulberry支持CalDAV协议
– Chandler支持CalDAV协议
– Apple的iCal和IOS支持CalDAV协议
– 其他各种闭源产品也支持CalDAV协议
1.3 DAViCal的特点
– DAViCal是根据通用公共许可证获得许可的自由软件
– DAViCal使用SQL数据库存储时间数据
– DAViCal支持通过WebDAV协议以只读或读写的方式访问(不推荐)
– DAViCal自理与兼容最广泛的CalDAV客户端
– DAViCal支持日历用户或客户端读取和写入相同的条目
– DAViCal支持条目的读/写访问的基本委派
– DAViCal支持显示空闲/忙碌的会议安排
1.4 安装的条件
1.4.1 软件环境
– 可运行PHP的Web服务器(Apache 2.2或更高版本)
– PostgreSQL 8.1或更高版本
– PHP 5.1或更高版本
1.4.2 系统环境
– Debian GNU/Linux(推荐)
– 各种不同版本的Linux
– FreeBSD
– Mac OSX
– Microsoft Windows(推荐)
1.5 依赖关系
1.5.1 PHP5的依赖关系
– A Webserver
– postgresql
– php5
– php5-pgsql
– php5-imap
– php5-curl
– php5-cgi
– libyaml-perl
– libdbd-pg-perl
– libdbi-perl
1.5.2 PHP 7的依赖关系
– php
– php-pgsql
– php-imap
– php-curl
– php-cgi
– php-xml
2 最佳实践
2.1 系统环境
2.1.1 系统环境信息
HostName = davical.cmdschool.org
OS = CentOS 7.6-x86_64
IP Address = 10.168.0.104
2.1.2 安装常用工具
yum install -y vim git
2.1.3 升级系统
yum -y update
执行完升级之后,重启操作系统,
reboot
2.2 软件环境
2.2.1 部署数据库
请使用yum的方式安装PostgreSQL数据库,
https://www.cmdschool.org/archives/4080
2.2.2 部署基于Apache的PHP环境
请使用编译的方式安装Apache+PHP环境,
https://www.cmdschool.org/archives/3208
2.2.3 增加Apache模块
2.2.3.1 编译所需的模块pgsql
cd ~/php-7.2.11/ext/pgsql
phpize
./configure --with-pgsql=/usr/pgsql-9.6/
make
make install
注:以上选项需要先开启“–with-pdo-pgsql”选项
2.2.3.2 编译所需的模块imap
请根据以下文章编译安装该模块,
https://www.cmdschool.org/archives/3971
2.2.3.3 编译所需的模块curl
cd ~/php-7.2.11/ext/curl
phpize
./configure
make
make install
根据提示安装所需的软件包,
yum install -y libcurl-devel
2.2.3.4 编译所需的模块xml
cd ~/php-7.2.11/ext/xml
phpize
./configure
make
make install
2.2.3.5 编译所需的模块gettext
cd ~/php-7.2.11/ext/gettext/
phpize
./configure
make
make install
2.2.3.6 编译所需的模块calendar
cd ~/php-7.2.11/ext/calendar/
phpize
./configure
make
make install
2.2.3.7 加载所需的模块
echo extension=imap.so >> /etc/php.ini
echo extension=curl.so >> /etc/php.ini
echo extension=pgsql.so >> /etc/php.ini
echo extension=gettext.so >> /etc/php.ini
echo extension=calendar.so >> /etc/php.ini
重启服务使配置生效,
systemctl restart httpd.service
注:由于xml和mbstring是系统默认加载的,所以无需再次加载,可用以下命令验证,
php -m
2.3 安装前的准备
2.3.1 下载软件包
cd ~
wget https://gitlab.com/davical-project/awl/-/archive/r0.59/awl-r0.59.tar.bz2
wget https://gitlab.com/davical-project/davical/-/archive/r1.1.7/davical-r1.1.7.tar.bz2
如需其他版本,请访问以下链接下载,
https://gitlab.com/davical-project/awl/tree/master
https://gitlab.com/davical-project/davical/tags
如果需要使用git协议下载最新版本,请使用如下命令下载并清理历史版本记录,
cd ~
git clone https://gitlab.com/davical-project/awl.git
git clone https://gitlab.com/davical-project/davical.git
rm -rf ~/awl/.git
rm -rf ~/davical/.git
2.3.2 解压软件包
cd ~
tar -xf awl-r0.59.tar.bz2
tar -xf davical-r1.1.7.tar.bz2
2.4 部署软件包
2.4.1 部署源代码
mv awl-r0.59 /usr/share/awl
mv davical-r1.1.7 /usr/share/davical
2.4.2 配置目录权限(可选,暂不配置)
chown -R root:apache /usr/share/davical/
cd /usr/share/davical/
find ./ -type d -exec chmod u=rwx,g=rw,o= {} \;
find ./ -type f -exec chmod u=rw,g=r,o= {} \;

chown -R root:apache /usr/share/awl/
cd /usr/share/awl/
find ./ -type d -exec chmod u=rwx,g=rw,o= {} \;
find ./ -type f -exec chmod u=rw,g=r,o= {} \;
请使用以下命令检查权限,
cd /usr/share/davical/
find ./ -type d -exec ls -ld {} \;
find ./ -type f -exec ls -l {} \;

cd /usr/share/awl/
find ./ -type d -exec ls -ld {} \;
find ./ -type f -exec ls -l {} \;
2.5 配置数据库连接
2.5.1 配置连接权限
vim /var/lib/pgsql/9.6/data/pg_hba.conf
加入如下配置:
# TYPE  DATABASE        USER            ADDRESS                 METHOD
local   davical         davical_app                             trust
local   davical         davical_dba                             trust
修改后的配置如下,
# TYPE  DATABASE        USER            ADDRESS                 METHOD
local   davical         davical_app                             trust
local   davical         davical_dba                             trust

# "local" is for Unix domain socket connections only
local   all             all                                     peer
# IPv4 local connections:
host    all             all             127.0.0.1/32            ident
# IPv6 local connections:
host    all             all             ::1/128                 ident
# Allow replication connections from localhost, by a user with the
# replication privilege.
local   replication     all                                     peer
host    replication     all             127.0.0.1/32            ident
host    replication     all             ::1/128                 ident
注:以上的规则是有优先级别,允许的规则请靠前,否则会被默认规则拒绝。
如果是tcp/ip的方式,请使用如下配置,
host davical davical_app 10.168.0.104/32 trust
host davical davical_dba 10.168.0.104/32 trust
通过加载或重启使配置生效
systemctl reload postgresql-9.6.service
2.5.2 执行数据库脚本创建数据库
su - postgres
cd /usr/share/davical/dba/
./create-database.sh
首次执行肯定会看到如下的错误提示,
Can't locate DBI.pm in @INC (@INC contains: /usr/local/lib64/perl5 /usr/local/share/perl5 /usr/lib64/perl5/vendor_perl /usr/share/perl5/vendor_perl /usr/lib64/perl5 /usr/share/perl5 .) at ./update-davical-database line 10.
BEGIN failed--compilation aborted at ./update-davical-database line 10.
* * * * ERROR * * * *
The database administration utility failed.  This may be due to database
permissions for the davical_dba user, or because the Perl DBD::Pg or YAML
libraries are not available.

Check that your pg_hba.conf allows the davical_dba user to connect to the
database (and make sure you've reloaded PostgreSQL since changing that).

Also see:  https://wiki.davical.org/index.php/Problems_and_Solutions
注:
– 以上过程会创建两个角色,即“davical_app”和“davical_dba”,你可以使用命令“psql postgres postgres -c ‘\du’”确认
– 以上过程会创建一个新的DB,即“davical”,你可以使用命令“psql postgres postgres -c ‘\l’”确认
– 另外,我们还需要根据提示执行一些修复错误的步骤
2.5.3 安装连接数据库所需的包
exit
yum install -y perl-YAML perl-DBD-Pg
2.5.4 测试配置连接权限
su - postgres
psql davical davical_app -c '\l'
psql davical davical_dba -c '\l'
注:如果登录失败,你可以从以下日志找原因,这非常有用,
tail -f /var/lib/pgsql/9.6/data/log/postgresql-*.log
2.5.5 删除已经创建的DB
su - postgres
dropdb davical;
2.5.6 再次执行数据库脚本
su - postgres
cd /usr/share/davical/dba/
./create-database.sh
如果没有意外,你将看到如下提示,
Supported locales updated.
Updated view: dav_principal.sql applied.
CalDAV functions updated.
RRULE functions updated.
Database permissions updated.
NOTE
====
*  The password for the 'admin' user has been set to 'BMo1JimK'

Thanks for trying DAViCal! Check the configuration in /etc/davical/config.php.
For help, look at our website and wiki, or visit #davical on irc.oftc.net.
注:以上包含应用管理员的初试账号和密码,如果你稍后忘记此账号和密码,可通过如下命令查询,
su - postgres
psql davical -c 'select username, password from usr;'
命令行将显示如下,
 username |  password
----------+------------
 admin    | **BMo1JimK
(1 row)
2.6 配置应用
2.6.1 配置应用程序目录
ln -s /usr/share/davical/htdocs/ /var/www/davical
2.6.2 配置虚拟服务器
vim /etc/httpd/conf.d/davical.conf
加入如下配置:
# Virtual Host def for Debian packaged DAViCal
<VirtualHost *:80>
  DocumentRoot /usr/share/davical/htdocs
  DirectoryIndex index.php index.html
  ServerName davical.cmdschool.org
  ServerAlias calendar.cmdschool.org
  Alias /images/ /usr/share/davical/htdocs/images/
  <Directory /usr/share/davical/htdocs/>
    #Order allow,deny
    #Allow from all
    AllowOverride None
    # for Apache from 2.4 use
    Require all granted
    # for Apache before 2.4 use
    #Order allow,deny
    #Allow from all
  </Directory>
  AcceptPathInfo On
  #
  # You probably don't need to enable any of these sorts of things other than in exceptional
  # circumstances. Apart from the include path (which DAViCal will discover if it is anywhere
  # 'normal') they are the default in newer PHP versions.
  #
  # php_value include_path /usr/share/awl/inc
  # php_value magic_quotes_gpc 0
  # php_value register_globals 0
  # php_value error_reporting "E_ALL & ~E_NOTICE"
  # php_value default_charset "utf-8"
</VirtualHost>
你需要通过重启httpd服务是配置生效,
systemctl restart httpd.service
2.6.3 创建配置文件目录
mkdir /etc/davical/
2.6.4 创建配置文件
vim /etc/davical/config.php
加入如下配置:
<?php
  $c->domain_name = "calendar.cmdschool.org";
  $c->sysabbr = 'DAViCal';
  $c->admin_email = 'admin@cmdschool.org';
  $c->system_name = "CMDSCHOOL DAViCal Server";
  $c->pg_connect[] = 'dbname=davical port=5432 user=davical_app';
2.6.5 配置名称解析
In Windows Client
notepad \Windows\System32\drivers\etc\hosts
加入如下配置:
10.168.0.104 davical.cmdschool.org
注:以上只是临时配置,需要使用DNS解析代替
2.6.6 测试应用
In Windows Client,
http://davical.cmdschool.org
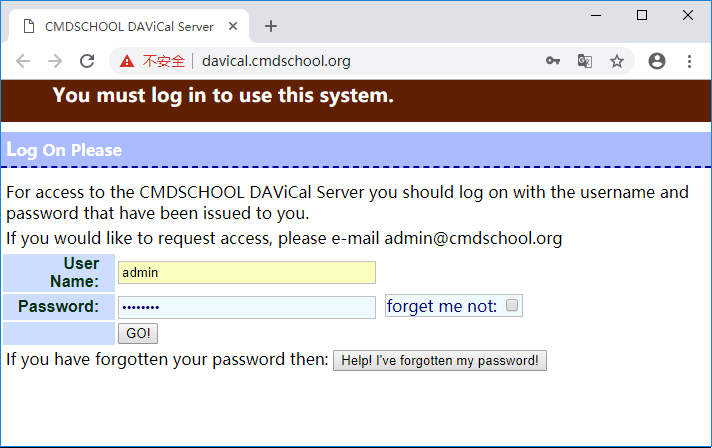
可见如下登录界面,

注:登录密码为之前向导创建的密码“BMo1JimK”(随机生成,请记住或及时修改)
2.7 升级应用
2.7.1 下载最近版本的程序
cd ~
git clone https://gitlab.com/davical-project/awl.git
git clone https://gitlab.com/davical-project/davical.git
rm -rf ~/awl/.git
rm -rf ~/davical/.git
2.7.2 部署程序
cd ~
rm -rf /usr/share/awl/
rm -rf /usr/share/davical/
cp -a awl davical /usr/share/
注:本次更新不建议更新DB
2.8 使用Thunderbird测试
2.8.1 创建账号并授权
– 在服务端使用管理员账号登录
– 选择【User Functions】->【Create Principa】菜单
– 在“Username”中填入新的用户,例如“will”
– 在“Change Password”和“Confirm Password”中填入用户的密码
– 在“Privileges granted ”中选择【Read/Write】按钮配置权限
– 单击【Create】完成用户的创建
2.8.2 下载Thunderbird并安装
可从如下链接下载Mozilla Thunderbird,
https://www.thunderbird.net
安装过程过于简单,此处略过……
2.8.3 连接服务器
– 选择【菜单】->【事件和任务】->【任务】->【新建日历】->【保存在网络中】->【CalDAV】
– 然后输入连接“http://davical.cmdschool.org/caldav.php/will/calendar/”,其中“will”为用户的账号
– 创建后选择【同步日历】,如果浏览器设置得当,则提示你输入之前创建的用户名和密码
– 如果没有错误提示,则你可以根据向导创建你的日历
– 创建日历成功后,可使用另外一部PC读取当前创建的日历,如果能读到则所有配置成功
注:此程序支持LDAP的账号直接登录,由于此非本章重点,详细请参阅官方的文档或关注笔者的博客。
参阅文档:
=============
软件的简介
———–
https://www.davical.org/index.php
软件的安装
———–
https://www.davical.org/installation.php
软件的下载
———–
http://wiki.davical.org/index.php/Downloading
https://www.davical.org/downloads/
问题与解决方案
———–
https://wiki.davical.org/index.php/Problems_and_Solutions
配置与设置
————
http://wiki.davical.org/w/Configuration_settings
https://wiki.davical.org/index.php/Configuration/settings

没有评论