如何配置nginx-plus的HA?
- By : Will
- Category : Highly available, Nginx
- Tags: HA, High Availability, nginx-plus, nginx-sync

1 基础知识
1.1 基本概念
1.1.1 访问限制
– 访问限制分连接限制、请求限制和带宽限制
– 连接限制是指根据定义的键值(例如IP)限制每个键值的链接数量
– 请求限制是指根据定义的键值(例如IP)限制请求的频率(单位时间内超过固定的频率请求将被推迟处理)
– 带宽限制是指根据定义的键值(例如IP)限制请求的带宽
– 连接限制由“http_limit_conn_module”模块实现
– 请求限制由“http_limit_req_module”模块实现
– 带宽限制由“ngx_http_core_module”模块的“limit_rate”指令实现
1.1.2 会话持久
– 会话持久即将NGINX识别的用户会话保持到同一台上游服务器
– 会话持久有三种实现方式,即cookie、route和learn
– Nginx将会话cookie加到上游组的首次响应中并标识响应服务器,后续请求根据客户端cookie值将请求路由到之前的服务器
– Nginx首次请求时为客户端分配“路由”,后续所有请求都与“route”指令参数(cookie或url)比较出之前的服务器并送达
– Nginx首次请求时检查请求和响应来生成会话标识,然后通过学习会话标识与服务器的对应关系并准确送达之前的服务器
1.1.3 键值数据存储
– Nginx支持使用后端数据库存储IP地址的黑白名单
– Nginx的后端数据库存储通过“ngx_http_keyval_module”模块实现
1.2 集群配置同步
1.2.1 集群配置同步的简介
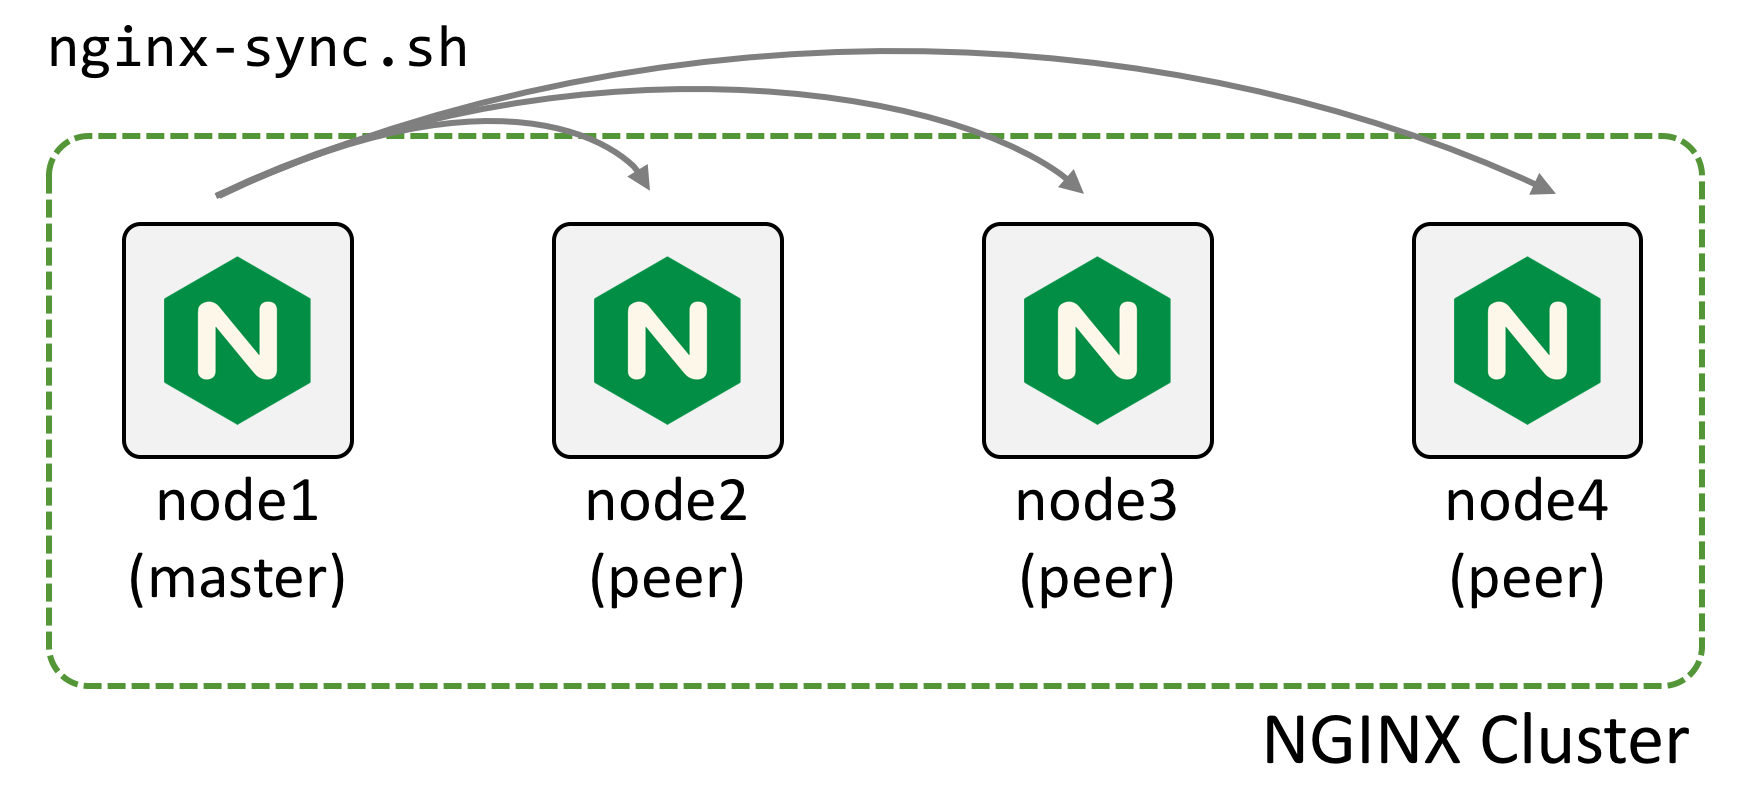
– 集群配置同步适用于部署两台以上NGINX Plus设备的HA集群环境
– 集群配置同步允许管理员将配置从集群中的一台设备推动送到其他设备
1.2.2 部署的步骤
– 集群配置同步通过nginx-sync软件包实现(其实是基于rsync开发的同步脚本)
– 集群配置同步需要配置ssh的公钥认证(免密码访问其他副节点)
1.3 集群状态共享
1.3.1 集群节点的状态数据共享
NGINX Plus允许集群中的节点之间共享一些状态数据
1.3.2 集群状态数据共享功能
– 集群支持节点之间粘性学习会话持久
– 集群支持节点之间访问限制
– 集群支持节点之间键值存储数据
2 最佳实践
2.1 服务器环境
2.1.1 服务器信息
OS = CentOS 7.8 x86_64
hostname = rproxy0[1-3].cmdschool.org
ip address = 10.168.0.8[1-3]
2.1.2 客户端信息
OS = CentOS 7.8 x86_64
hostname = client.cmdschool.org
ip address = 10.168.0.8
2.1.3 安装nginx-plus
In rproxy0[1-3],
如果你的环境尚未部署nginx-plus,你可以参阅如下链接部署,
https://www.cmdschool.org/archives/7931
2.1.4 配置名称解析
In rproxy0[1-3],
echo '10.168.0.81 rproxy01 rproxy01.cmdschool.org' >> /etc/hosts
echo '10.168.0.82 rproxy02 rproxy02.cmdschool.org' >> /etc/hosts
echo '10.168.0.83 rproxy03 rproxy03.cmdschool.org' >> /etc/hosts
2.2 软件环境
In rproxy01,
2.2.1 生成公钥和私钥
ssh-keygen
注:以上一路回车,不需要设置任何参数
2.2.2 复制公钥到群集中的其他机器
ssh-copy-id -i ~/.ssh/id_rsa.pub rproxy02
ssh-copy-id -i ~/.ssh/id_rsa.pub rproxy03
2.2.3 测试公钥认证
ssh root@rproxy02
ssh root@rproxy03
2.3 配置集群配置同步
2.3.1 创建配置文件
In rproxy0[1-3],
yum install -y nginx-sync
2.3.2 创建配置文件
In rproxy01,
vim /etc/nginx-sync.conf
加入如下配置,
NODES="rproxy02 rproxy03"
CONFPATHS="/etc/nginx/nginx.conf /etc/nginx/conf.d"
EXCLUDE="default.conf"
参数解析,
– 参数“NODES”定义接收配置的远程主机(多个主机使用空格分隔)
– 参数“CONFPATHS”定义复制到远程主机的配置文件或目录(多个文件或目录使用空格分隔)
– 参数“EXCLUDE”定义不复制到远程主机的配置文件或目录(多个文件或目录使用空格分隔)
2.3.3 获取命令行帮助
nginx-sync.sh -h
可见如下显示,
nginx-sync.sh  [-h | -c node_address| -C] [-r] [-d] [-u] [-l logfile]
nginx-sync.sh  without arguments synchronizes configs from the master node
to the slave nodes
  -c compares local configs with configs on node_address
  -C compares local configs with configs of other nodes
  -r enables verbose rsync output
  -d enables verbose diff output
  -u run without sudo if started from non root user
  -l saves script output to the logfile

Prerequisites:
 * config file /etc/nginx-sync.conf
 * set up ssh key authentication between nodes

Config variables define a list of values, one per line:
NODES - list of the slave nodes
CONFPATHS - paths to directories and files to be synchronized
EXCLUDE - patterns to be excluded from synchronization
POSTSYNC - filename|sed_expression to be run after synchronization

To setup ssh key authentication it is required:
 * to generate key pair on the master node run
   'ssh-keygen -t rsa -b 2048' command from the root user
 * copy public key /root/.ssh/id_rsa.pub to the slave nodes as
   /root/.ssh/authorized_keys
 * add directive 'PermitRootLogin without-password', that allows
   only key authentication to log in with root credentials, to the
   /etc/ssh/sshd_config on the slave nodes and reload sshd
 * to ensure key authentication works run from the master node
   ssh  echo test
   command, where  is slave node's name or ip address

 Sample config file content:

NODES="node2.example.com
node3.example.com"
CONFPATHS="/etc/nginx
/etc/ssl/nginx"
EXCLUDE="default.conf"
2.3.4 创建测试配置文件
In rproxy01,
vim /etc/nginx/conf.d/www.cmdschool.org_80.conf
配置如下虚拟服务器,
server {
    listen       80;
    server_name  www.cmdschool.org;

    location / {
        root   /var/www/www.cmdschool.org;
        index  index.html index.htm  index.php;
    }

    error_page   500 502 503 504  /50x.html;
    location = /50x.html {
        root   /usr/share/nginx/html;
    }
}
2.3.5 对比主服务器与其他服务器的配置差异
In rproxy01,
nginx-sync.sh -C
可见如下提示,
 * Synchronization started at Tue Oct 22 16:06:03 UTC 2019

 * Checking prerequisites

 * Comparing local and remote configs

 * Comparing configs on master node and rproxy02:

Only in local:/etc/nginx/conf.d: www.cmdschool.org_80.conf
 * Comparing local and remote configs

 * Comparing configs on master node and rproxy03:

Only in local:/etc/nginx/conf.d: www.cmdschool.org_80.conf

 * Synchronization ended at Tue Oct 22 16:06:29 UTC 2019
以上提示意思为配置文件只存在于本地,你可以使用如下命令验证,
ssh rproxy02 ls /etc/nginx/conf.d/www.cmdschool.org_80.conf
ssh rproxy03 ls /etc/nginx/conf.d/www.cmdschool.org_80.conf
可见如提示,
ls: cannot access /etc/nginx/conf.d/www.cmdschool.org_80.conf: No such file or directory
另外,如果要单台对比,请使用如下命令,
nginx-sync.sh -c rproxy02
nginx-sync.sh -c rproxy03
2.3.6 同步并重载其他主机的配置
In rproxy01,
nginx-sync.sh
可见如提示,
 * Synchronization started at Tue Oct 22 16:33:20 UTC 2019

 * Checking prerequisites

 * Testing local nginx configuration file

nginx: the configuration file /etc/nginx/nginx.conf syntax is ok
nginx: configuration file /etc/nginx/nginx.conf test is successful
nginx version: nginx/1.17.3 (nginx-plus-r19)
 * Deleting remote backup directory

 * Backing up configuration on rproxy02

 * Updating configuration on rproxy02

 * Testing nginx config on rproxy02

nginx: the configuration file /etc/nginx/nginx.conf syntax is ok
nginx: configuration file /etc/nginx/nginx.conf test is successful
Redirecting to /bin/systemctl status nginx.service
Redirecting to /bin/systemctl reload nginx.service
nginx version: nginx/1.17.3 (nginx-plus-r19)
 * Deleting remote backup directory

 * Backing up configuration on rproxy03

 * Updating configuration on rproxy03

 * Testing nginx config on rproxy03

nginx: the configuration file /etc/nginx/nginx.conf syntax is ok
nginx: configuration file /etc/nginx/nginx.conf test is successful
Redirecting to /bin/systemctl status nginx.service
Redirecting to /bin/systemctl reload nginx.service

 * Synchronization ended at Tue Oct 22 16:35:04 UTC 2019
你可以使用如下命令验证,
ssh rproxy02 ls /etc/nginx/conf.d/www.cmdschool.org_80.conf
ssh rproxy03 ls /etc/nginx/conf.d/www.cmdschool.org_80.conf
可见如提示,
/etc/nginx/conf.d/www.cmdschool.org_80.conf
2.3.7 创建测试配置
In rproxy01,
mkdir -p /var/www/www.cmdschool.org
ssh rproxy02 mkdir -p /var/www/www.cmdschool.org
ssh rproxy03 mkdir -p /var/www/www.cmdschool.org
echo rproxy01.cmdschool.org > /var/www/www.cmdschool.org/index.html
ssh rproxy02 'echo rproxy02.cmdschool.org > /var/www/www.cmdschool.org/index.html'
ssh rproxy03 'echo rproxy03.cmdschool.org > /var/www/www.cmdschool.org/index.html'
请使用如下命令验证配置,
cat /var/www/www.cmdschool.org/index.html
ssh rproxy02 cat /var/www/www.cmdschool.org/index.html
ssh rproxy03 cat /var/www/www.cmdschool.org/index.html
可见如下输出,
rproxy01.cmdschool.org
rproxy02.cmdschool.org
rproxy03.cmdschool.org
2.3.8 测试配置
In client,
vim /etc/hosts
加入如下配置,
10.168.0.81 www.cmdschool.org
命令行测试访问,
curl http://www.cmdschool.org
可见如下显示,
rproxy01.cmdschool.org
然后,再次修改以下配置文件,
vim /etc/hosts
配置修改如下,
# 10.168.0.81 www.cmdschool.org
10.168.0.82 www.cmdschool.org
命令行测试访问,
curl http://www.cmdschool.org
可见如下显示,
rproxy02.cmdschool.org
然后,再次修改以下配置文件,
vim /etc/hosts
配置修改如下,
# 10.168.0.81 www.cmdschool.org
# 10.168.0.82 www.cmdschool.org
10.168.0.83 www.cmdschool.org
命令行测试访问,
curl http://www.cmdschool.org
可见如下显示,
rproxy03.cmdschool.org
2.4 配置集群状态共享
2.4.1 增加区域同步配置
In rproxy01,
vim /etc/nginx/nginx.conf
加入如下配置,
stream {
    resolver 127.0.0.1 valid=20s;

    server {
        listen 127.0.0.1:9000;

        zone_sync;
        zone_sync_server rproxy01.cmdschool.org:9000;
        zone_sync_server rproxy02.cmdschool.org:9000;
        zone_sync_server rproxy03.cmdschool.org:9000;
    }
}
注:由于前面使用host代替名称解析,所以“resolver”配置可以指向本机或注解掉
2.4.2 测试区域同步配置
In rproxy01,
nginx -t
2.4.3 同步并重载其他主机的配置
In rproxy01,
nginx-sync.sh
2.4.3 检查倾听的端口
In rproxy0[1-3],
netstat -antp | grep nginx
可见如下显示,
tcp        0      0 0.0.0.0:9000            0.0.0.0:*               LISTEN      4742/nginx: master
tcp        0      0 0.0.0.0:80              0.0.0.0:*               LISTEN      4742/nginx: master
注:注意到“rproxy01”的“9000”端口没有启用,所以也无需开放他的“9000”端口
2.4.4 配置的防火墙
In rproxy0[2-3],
firewall-cmd --permanent --add-port 9000/tcp
firewall-cmd --reload
firewall-cmd --list-all
参阅文档
========================
配置文件同步
————-
https://docs.nginx.com/nginx/admin-guide/high-availability/configuration-sharing/
配置同步模块
————–
http://nginx.org/en/docs/stream/ngx_stream_zone_sync_module.html
会话持久的概念
—————
https://docs.nginx.com/nginx/admin-guide/load-balancer/http-load-balancer/#sticky
https://blog.csdn.net/agangdi/article/details/41087921
资源限制
———————
https://docs.nginx.com/nginx/admin-guide/security-controls/controlling-access-proxied-http/#limit_req
https://www.jb51.net/article/143682.htm
键值存储数据
————
https://nginx.org/en/docs/http/ngx_http_keyval_module.html?&_ga=2.127248910.224040967.1571884787-1953014643.1569045545#keyval_zone
https://blog.csdn.net/kikajack/article/details/79339632
没有评论