1 MQTT基础知识
1.1 MQTT的概念
– MQTT即英文“Message Queuing Telemetry Transport”的缩写,中文翻译为“消息队列遥测传输”
– MQTT协议通过轻量级的消息发布和订阅的模型实现消息传递
– MQTT协议适用于物联网的消息传递(低功率传感器或移动设备,如电话、嵌入式计算机或微控制器)
1.2 MQTT架构的原理
– MQTT协议基于消息发布和订阅主题(pub和sub)的模型实现
– 多个客户端连接到代理并订阅他们感兴趣的主题
– 多个客户端可订阅相同的主题并根据自己的需求处理信息
– 客户端亦可连接到代理并将消息发布到主题
– 代理(broker)与MQTT充当连接所有内容的简单通用接口
关于以上的特性,意味着,
– 如果将订阅的消息转存储到数据库、Twitter、Cosm或简单文本文件的客户端
– 那么将新传感器或其他数据添加到数据库、Twiter等将变得十分简单
1.3 MQTT主题的层次结构
sensors/COMPUTER_NAME/temperature/HARDDRIVE_NAME
如上所示,
– 主题是通过“/”来分隔的体现父子之间的层次关系(类似文件夹的层次结构)
– 以上层次结构可体现不同Computer的不同的硬盘温度
1.4 MQTT订阅消息的匹配方式
1.4.1 显式主题匹配
由于显式主题的订阅是完全匹配的,所以该订阅仅接收到完全匹配的主题消息
1.4.2 模式主题匹配
– 即主题可使用通配符(“+”或者“#”)来模糊匹配主题
– “+”可用于单层次结构的通配符
– “#”可用于剩余层次结构的通配符(注意,必须是订阅主题最后面的层次结构才能匹配)
1.4.3 单层次结构的通配符使用
使用范例1,
sensors/+/temperature/+
如上所示,
– 通过“COMPUTER_NAME”与“HARDDRIVE_NAME”层使用单层次的通配符“+”
– 该模式可获取包含任意计算机名称和任意硬盘驱动器名称的主题消息
使用范例2,
a/b/c/d
如上所示,该主题可以通过以下任意一种模式匹配成功,
+/b/c/d
a/+/c/d
a/+/+/d
+/+/+/+
以下模式的任意一种不能匹配成功,
a/b/c
b/+/c/d
+/+/+
1.4.4 剩余层次结构的通配符使用
使用范例,
a/b/c/d
如上所示,该主题可以通过以下任意一种模式匹配成功,
#
a/#
a/b/#
a/b/c/#
+/b/c/#
1.5 MQTT的QoS
1.5.1 QoS的概念
– QoS即Quality of service的英文缩写,中文翻译服务质量
– QoS用于定义代理与客户端尝试确保接收消息的难度级别
1.5.2 QoS的级别
– MQTT的QoS分三个级别的,分别用QoS 0、QoS 1和QoS2表示
– 更高级别的QoS意味着需要更低的延迟和更高的带宽
– QoS 0,代理与客户端将只传递一次消息且不确认消息是否接受成功
– QoS 1,代理与客户端将只传递一次消息并且确认消息是否接受成功
– QoS 2,代理与客户端将使用四步握手的方式进行一次性消息传递
1.5.3 QoS的接收规则
– 如果以QoS 2发布的消息,客户端以QoS 0订阅,消息以QoS 0传递给客户端
– 如果以QoS 2发布的消息,客户端以QoS 2订阅,消息以QoS 2传递给客户端
– 如果以QoS 0发布的消息,客户端以QoS 2订阅,消息以QoS 0传递给客户端
注:笔者通过以上实例注意到就低原则
1.6 MQTT的消息性能
– MQTT支持将所有消息设置为保留
– 设置保留后,消息发送给所有当前订阅者后,代理将保留该消息
– 如果新订阅与保留消息匹配,则消息将发送到客户端
– 保留设置适用于不经常更新的主题
– 相对于没有保留消息的设置,客户端将需要等待更长的时间才能接收到消息
1.7 MQTT的会话模式
– 建立连接时,客户端设置“clean session”标志(也称“clean start”)
– 如果“clean session”设置为“false”,则建立持久连接
– 如果“clean session”设置为“true”,则建立非持久连接
– 持久连接模式下,客户端断开连接,则保留客户端的所有订阅并存储后续的QoS 1或2消息,直到再次连接
– 非持久连接模式下,客户端断开连接,则删除客户端的所有订阅
1.8 MQTT的消息嘱咐
– 客户端可以向代理申请嘱咐
– 代理在客户端意外断开时发送具有与任何其他消息相同的主题、QoS和保留状态
2 Eclipse Mosquitto的基础知识
2.1 Mosquitto的介绍
– Mosquitto是一个开源消息代理
– Mosquitto基于MQTT协议的5.0、3.1.1和3.1版
– Mosquitto从低功率的单板计算机到服务器都适用
– Mosquitto是Eclipse Foundation的一部分
– Mosquitto是一个iot.eclipse.org项目
2.2 Mosquitto的客户端
– Mosquitto提供用户实现MQTT客户端的C库
– Mosquitto提供流行的命令行MQTT客户端(即mosquitto_pub和mosquitto_sub)
3 最佳实践
3.1 系统环境
3.1.1 系统信息
OS = CentOS 8.2 x86_64
IP Address = 10.168.0.91
HostName = mosquitto.cmdschool.org
3.1.2 安装常用的工具
dnf install -y wget vim
3.2 软件环境
3.2.1 软装编译工具
dnf -y install gcc gcc-c++ make cmake
3.2.2 下载软件包
cd ~
wget https://mosquitto.org/files/source/mosquitto-2.0.9.tar.gz
如果你需要其他版本,请从以下链接下载,
https://mosquitto.org/files/source/
3.2.3 解压软件包
cd ~
tar -xf mosquitto-2.0.9.tar.gz
3.3 编译软件包
3.3.1 预编译软件包
cd ~/mosquitto-2.0.9.tar.gz
cmake . -DCMAKE_INSTALL_BINDIR=/usr/bin \
        -DCMAKE_INSTALL_SBINDIR=/usr/sbin \
        -DCMAKE_INSTALL_LIBEXECDIR=/usr/libexec \
        -DCMAKE_INSTALL_SYSCONFDIR=/etc \
        -DCMAKE_INSTALL_LOCALSTATEDIR=/var \
        -DCMAKE_INSTALL_LIBDIR=/usr/lib64 \
        -DCMAKE_INSTALL_INCLUDEDIR=/usr/include \
        -DCMAKE_INSTALL_DATAROOTDIR=/usr/share \
        -DCMAKE_INSTALL_INFODIR=/usr/share/info \
        -DCMAKE_INSTALL_LOCALEDIR=/usr/share/locale \
        -DCMAKE_INSTALL_MANDIR=/usr/share/man \
        -DCMAKE_INSTALL_DOCDIR=/usr/share/doc/mosquitto
如果遇到如下错误提示,
CMake Error at /usr/share/cmake/Modules/FindPackageHandleStandardArgs.cmake:108 (message):
  Could NOT find OpenSSL, try to set the path to OpenSSL root folder in the
  system variable OPENSSL_ROOT_DIR (missing: OPENSSL_LIBRARIES
  OPENSSL_INCLUDE_DIR)
Call Stack (most recent call first):
  /usr/share/cmake/Modules/FindPackageHandleStandardArgs.cmake:315 (_FPHSA_FAILURE_MESSAGE)
  /usr/share/cmake/Modules/FindOpenSSL.cmake:313 (find_package_handle_standard_args)
  CMakeLists.txt:32 (find_package)


-- Configuring incomplete, errors occurred!
See also "/root/mosquitto-2.0.9/CMakeFiles/CMakeOutput.log".
See also "/root/mosquitto-2.0.9/CMakeFiles/CMakeError.log".
你可能需要安装以下包解决依赖关系,
dnf install -y openssl-devel
如果遇到如下错误提示,
-- Found OpenSSL: /usr/lib64/libcrypto.so (found version "1.1.1c")
-- WITH_DLT = OFF
-- Could NOT find cJSON (missing: CJSON_INCLUDE_DIR CJSON_LIBRARY)
-- Optional dependency cJSON not found. Some features will be disabled.
-- Looking for getaddrinfo_a in anl
-- Looking for getaddrinfo_a in anl - found
-- Configuring done
-- Generating done
-- Build files have been written to: /root/mosquitto-2.0.9
你可能需要安装以下包解决依赖关系,
dnf install -y epel-release
dnf install -y cjson-devel
3.3.2 编译并安装软件包
cd ~/mosquitto-2.0.9
make
make install
3.4 配置软件包
3.4.1 创建运行用户
groupadd -g 309 mosquitto
useradd -u 309 -g 309 -d /var/lib/mosquitto/ -s /sbin/nologin mosquitto
配置完毕后,我们建议你使用如下命令验证安装,
mosquitto -v
正常情况下,进程启动你可以看到如下提示,
1642608235: mosquitto version 2.0.9 starting
1642608235: Using default config.
1642608235: Starting in local only mode. Connections will only be possible from clients running on this machine.
1642608235: Create a configuration file which defines a listener to allow remote access.
1642608235: Opening ipv4 listen socket on port 1883.
1642608235: Opening ipv6 listen socket on port 1883.
1642608235: mosquitto version 2.0.9 running
注:按下【Ctrl+C】结束进程启动
3.4.2 定义配置文件
vim /etc/mosquitto/mosquitto.conf
定义如下参数,
pid_file /var/run/mosquitto/mosquitto.pid
persistence true
persistence_location /var/lib/mosquitto/
log_dest file /var/log/mosquitto.log
include_dir /etc/mosquitto/conf.d/
bind_address 0.0.0.0
password_file /etc/mosquitto/pwfile
根据配置文件的声明,我们需要增加如下认证账号和密码,
cat /etc/mosquitto/pwfile.example > /etc/mosquitto/pwfile
cat /dev/null > /etc/mosquitto/pwfile
mosquitto_passwd -b /etc/mosquitto/pwfile client01 pwd
具体的账号管理非本章重点,请参阅如下章节,
https://mosquitto.org/documentation/authentication-methods/
修改完以上配置后,你还需要创建配置文件定义的目录或文件,
mkdir /var/run/mosquitto
chown mosquitto:mosquitto /var/run/mosquitto
chmod 775 /var/run/mosquitto
mkdir -p /etc/mosquitto/conf.d/
touch /var/log/mosquitto.log
chown mosquitto:mosquitto /var/log/mosquitto.log
3.4.3 手动运行测试启动
mosquitto -d -c /etc/mosquitto/mosquitto.conf
关于异常参数,
-d参数,声明mosquitto以守护进程的方式启动
-c参数,声明mosquitto守护进程的配置文件路径
运行完毕后,我们建议你通过如下命令确认mosquitto的启动,
pgrep -a -u mosquitto mosquitto
如果你看到如下输出侧启动正常,
10242 mosquitto -d -c /etc/mosquitto/mosquitto.conf
另外,我们还建议你使用如下命令观察守护进程倾听的端口,
netstat -antp | grep mosquitto
如果你看到如下输出侧启动正常,
tcp        0      0 0.0.0.0:1883            0.0.0.0:*               LISTEN      10242/mosquitto
tcp6       0      0 :::1883                 :::*                    LISTEN      10242/mosquitto
如果你需要手动结束退出以上守护进程,我建议你使用如下命令,
kill 2 `pgrep -u mosquitto mosquitto`
3.4.4 创建服务控制脚本
vim /usr/lib/systemd/system/mosquitto.service
加入如下配置,
[Unit]
Description=Eclipse Mosquitto manager
Wants=network.target
Before=network.target
After=network-pre.target
ConditionPathExists=/etc/mosquitto/mosquitto.conf
Documentation=man:mosquitto

[Service]
Type=forking
PIDFile=/var/run/mosquitto/mosquitto.pid
ExecStartPre=/usr/bin/mkdir -p /var/run/mosquitto
ExecStartPre=/usr/bin/chown mosquitto:mosquitto /var/run/mosquitto
ExecStartPre=/usr/bin/chmod 775 /var/run/mosquitto
ExecStart=/usr/sbin/mosquitto -d -c /etc/mosquitto/mosquitto.conf
Restart=on-abort

[Install]
WantedBy=multi-user.target
修改完毕后,你需要重新载入脚本,
systemctl daemon-reload
3.4.5 测试启动脚本
systemctl start mosquitto.service
systemctl stop mosquitto.service
systemctl restart mosquitto.service
systemctl status mosquitto.service
3.4.6 配置服务自启动
systemctl enable mosquitto.service
3.4.7 配置防火墙
firewall-cmd --permanent --add-port=1883/tcp
firewall-cmd --reload
firewall-cmd --list-all
3.5 测试服务
3.5.1 订阅主题
mosquitto_sub -t 'test/topic' -v
mosquitto_sub -h 10.168.0.91 -p 1883 -u client01 -P pwd -t 'test/topic' -v
注:以上命令启动后会一直倾听,请不要按【Ctrl+C】等键关闭
3.5.2 发布消息
mosquitto_pub -t 'test/topic' -m 'hello world'
mosquitto_pub -h 10.168.0.91 -p 1883 -u client01 -P pwd -t 'test/topic' -m 'hello world'
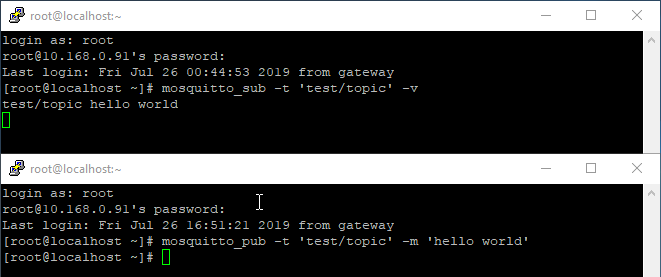
以上需要另外开一个终端,命令执行后,之前订阅主题的终端会接收到发布的消息,具体效果请参阅如下截图,

参阅文档
===================
Mosquitto的GitHub
—————–
https://github.com/eclipse/mosquitto
下载页面
———–
https://mosquitto.org/download/
版本日志
———–
https://mosquitto.org/blog/
官方首页
———-
https://mosquitto.org/
MQTT的官方首页
————-
http://mqtt.org/
MQTT手册
————-
https://mosquitto.org/man/mqtt-7.html
用于测试的Demo
————-
https://test.mosquitto.org/
cmake的目录配置选项
——————
https://cmake.org/cmake/help/v2.8.12/cmake.html#module:GNUInstallDirs
Mosquitto的守护进程使用手册与配置文件
—————————
https://mosquitto.org/man/mosquitto-8.html
https://mosquitto.org/man/mosquitto-conf-5.html
推荐的UID与GID
——————
https://slackbuilds.org/uid_gid.txt
没有评论