如何部署RHCS高可用架构?
- By : Will
- Category : Highly available
- Tags: HA, Redhat, RHCS

1 基础理论
1.1 群集的概念
群集由两个或多个计算机(节点或成员)组成一起执行任务的系统
1.2 群集的分类
1.2.1 存储型(Storage)
提供一致的文件系统映象,允许服务器同步读写单个文件系统(通过Red Hat GFS提供存储群集功能)
1.2.2 高可用型(High Availability)
消除单点故障并将故障自动恢复(服务自动迁移到一个正常的节点),提供服务可持续的服务。
1.2.3 负载均衡型(Load balancing)
将网络服务请求分摊到多个群集节点来分摊负载,并提供单点失效检测并平滑将服务转移至正常节点。
1.2.4 高性能型(High performance)
群集通过多节点执行并行运算来提高应用程序性能。
1.3 群集的基础结构
1.3.1 群集管理
Cluster Manager简称CMAN
– CMAN是一个分布式群集管理工具
– CMAN用于管理群集的成员、消息和通知
– CMAN监控每个节点的运行状态来了解节点成员之间的关系
– CMAN负责通知底层进而做出相应的调整
Quorum
– 以太网消息决定(由节点票vote的50%加1组成)
– 以太网消息和quorum磁盘决定(由用户指定的条件组成)
1.3.2 锁管理
Distributed Lock Manager(DLM)分布式锁管理器
– DLM运行于集群中的每个节点
– GFS通过锁管理器的锁机制来同步访问文件系统元数据
– CLVM通过锁管理器来同步更新数据到LVM卷和卷组
1.3.3 Fencing
当CMAN认为某个节点已经发生故障,他将告知其他集群基础构件并在收到通知后对故障设备进行保护
保护方法:
– Power fencing(电源保护),控制电源关闭不可用节点
– Fibre Channel switch fencing(光钎通道开关保护),禁用不可用节点的光钎通道端口
– GNBD fencing
– 其他保护,禁I/O或不可用节点电源(IBM Bladecenters,PAP,DRAC/MC,HP ILO,IPMI,IBM RSAII等)
1.3.4 配置文件管理
Cluster Configuration System(CCS),用于群集配置文件管理与配置文件在个节点之间同步。
监控的配置文件(XML文件):
/etc/cluster/cluster.conf
配置文件属性如下:
– 群集名,显示群集的名字、群集配置文件版本、当节点加入群集和被保护锁使用的基本保护时间属性
– 群集,显示群集的每个节点,指定节点名、节点ID、quorum vote的数量和其保护方法
– 保护设备,显示群集的保护设备和保护设备的具体参数
– 被管理的资源,显示创建群集所需要的资源(含故障切换与的定义、资源)
1.4 高可用性管理服务
1.4.1 rgmanager守护进程
实现off-the-shelf应用程序冷失效恢复(控制应用程序和群集资源来组成高可用性群集服务)
1.4.2 群集资源
如IP地址、应用程序初始化脚本或GFS共享分区等
1.4.3 故障切换域
有资格运行特定群集服务的节点子集(群集服务可运行和可迁移的节点称为一个切换域)
1.5 GFS
GFS是允许群集节点同时访问某个共享的块设备的群集文件系统
1.5.1 GFS的特点
– GFS是一个原生的文件系统
– GFS直接与Linux内核文件系统接口VFS层通讯
– GFS使用分布式元数据和多个日志来优化群集操作
– GFS使用锁管理器来协调I/O
– GFS节点中数据被修改,其他节点立马可见
– GFS提供配合(quota)和多重日子和多路径支持
– GFS提供良好的性能、灵活性和经济性
1.5.2 作用
– GFS提供节点间的数据共享
– GFS提供群集GFS节点单一和一致的文件系统命名空间视图
– GFS允许安装和运行应用程序而无需了解底层的存储基础结构
1.5.3 CLVM的守护进程
/etc/init.d/clvmd
1.6 群集逻辑卷管理器
Cluster Logical Volume Manager(CLVM),卷管理通过群集逻辑卷管理器进行管理
– clvmd,群集逻辑卷管理器守护进程
– HA-LVM,高可用性逻辑卷管理代理
1.7 全局网络块设备
Global Network Block Device(GNBD),提供通过TCP/IP访问GFS块设备的功能
1.7.1 GNBD client
GNBD客户端运行于GFS的节点上并提供基于光钎通道或single-initiator SCSI通道从GNBD服务导入块级别的设备
1.7.2 GNBD server
GNBD服务端允许从本地存储(直接附加存储或SAN存储)导出块级别设备
1.8 LVS
LVS提供两台以上的服务器之间的IP负载均衡能力(虚拟IP)
– 提供负载均衡能力
– 提供服务状态检测能力
1.8.1 LVS的工作原理
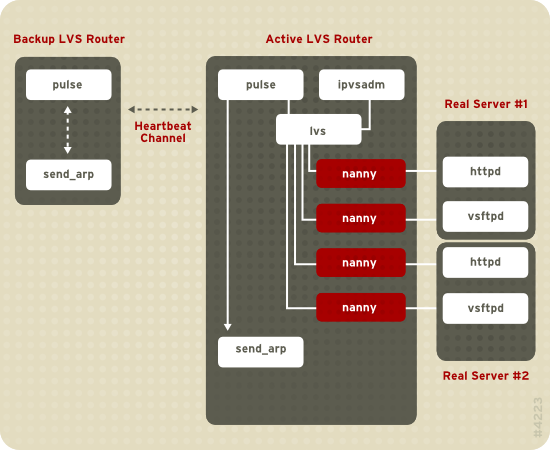
– pulse守护进程运行于活动或备份的LVS路由器上
– pulse定时发送heartbeat到活动路由器公共接口,确保路由器正常工作
– pulse启动lvs守护进程响应备份lvs路由的heartbeat查询
– lvs守护进程调用ipvsadm工具配置和维护内核的IPVS(IP虚拟服务器)路由表
– lvs为每台服务器配置的虚拟服务器启动一个nanny进程
– nanny进程检查一台真实服务器上的一个配置好的服务状态,并通告lvs守护进程服务器的当前状态
– lvs检测到真实服务器nanny进程通告的故障则会指引ipvsadm从ipvs路由表中删除真实的服务器条目
– 备份路由没有收到lvs路由的响应,执行初始化故障切换
– 备份路由调用send_arp将所有虚拟IP地址重新分配给备份LVS路由的MAC地址
– 备份路由通过专用或公用的接口向活动LVS路由器发送关闭lvs守护进程命令
– 备份路由通过启动lvs守护进程来接受虚拟服务器的请求
1.8.2 LVS的架构
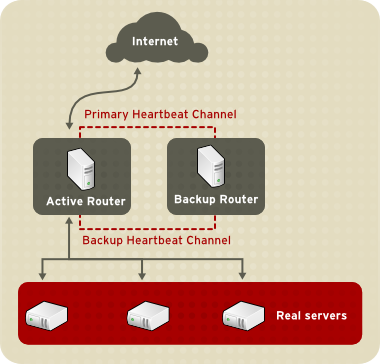
– LVS路由层(含活动路由和备用路由,连接公共网络和专用网络)
– 真实服务器层(连接专用网络)
1.8.3 负载均衡算法
– Round-Robin Scheduling(轮询调度),按顺序分发请求到各真实服务器
– Weighted Round-Robin Scheduling(加权轮询调度),按权重给予性能好服务器更多请求处理机会
– Least-Connection Scheduling(最小连接调度),给予请求处理较少的服务器分配跟多的请求
– Weighted Least-connection(权重最小连接调度),基于负载数按权重调整给性能好服务器更多的请求
– Locality-Based Least-Connection Scheduling(基于局部性的最小连接调度) ,
根据请求的单台服务器目的IP少的给予更多分配
– Locality-Based Least-Connection Scheduling with Replication Scheduling
(带复制的基于局部最小连接调度),
同上,但使用IP地址服务器子集管理,超载服务器从子集删除,服务器池中连接少的加入子集。
– Source Hash Scheduling(源此地址散列调度),
按静态散列表查找源IP地址将请求发送到服务器池
1.8.4 服务器状态检测
– 调用send/expect scripts动态检测服务器状态
– 调用外部程序检测服务器状态
1.8.5 路由方法
– Network Address Translation(NAT),网络地址转换(有瓶颈问题)
– 直接路由(只处理转入的数据包)
1.8.6 持久性和防火墙标记
– persistence,lvs指定时间内记住最后的连接,并把请求定位到最后一次连接的服务器
– firewall mask,比较适合处理ftp这种根据端口进行连接分组情况
1.9 群集管理工具
1.9.1 Conga
提供WEB界面配置和管理群集和存储的软件组件
Conga的组件:
– luci,运行于管理端,通过ricci与多个群集和机器通讯,包含三个功能
– homebase,提供添加、删除机器和用户及配置用户权限的工具
– cluster,提供创建和配置群集的工具
– storage,提供远程管理存储设备的工具
– ricci,运行于群集中的每台机器
1.9.2 群集的管理图形界面
Cluster Configuration Tool以分层结构的形式在面板左边显示配置文件(/etc/cluster/cluster.conf)的群集配置
– Cluster Nodes,显示群集节点
– Fence Devices,显示保护设备
– Managed Resources,显示故障切换与、资源和服务
– Failover Domains,配置一个或多个群集节点子集
– Resource,配置用于高可用性服务的共享资源
– Services,创建和配置高可用服务
1.9.3 群集的命令行工具
– ccs_tool,群集配置工具
– cman_tool,群集管理工具
– fence_tool,保护工具
– clustat,群集状态工具
– clusvcadm,群集用户服务管理工具
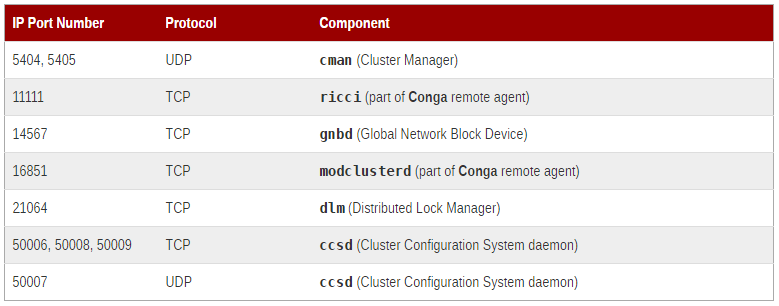
1.10 服务的端口
2 实践部分
2.1 环境信息
2.1.1 业务与管理网络
2.1 环境信息
2.1.1 业务与管理网络
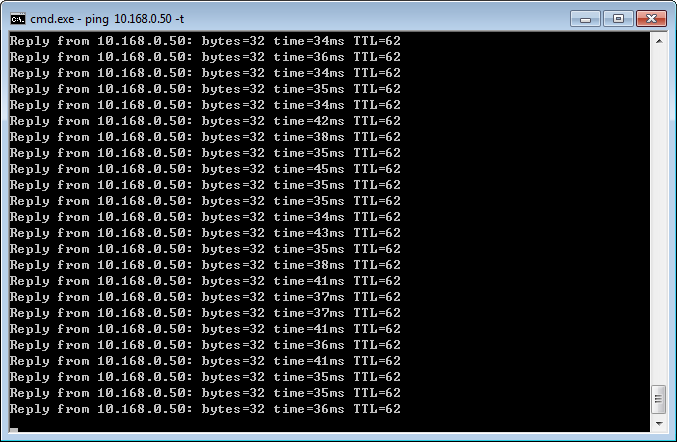
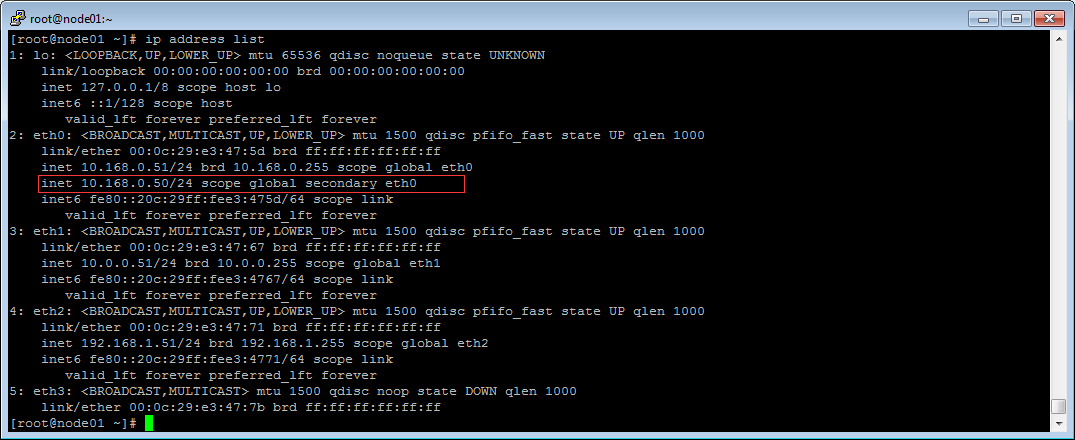
vip=10.168.0.50
rhcsh01:
ipaddress=10.168.0.51/24
gateway=10.168.0.1
device=eth0
hostname=node01.cmdschool.org
OS=CentOS 6.8
rhcsh02:
ipaddress=10.168.0.52/24
gateway=10.168.0.1
device=eth0
hostname=node02.cmdschool.org
OS=CentOS 6.8
rhcsm:
ipaddress=10.168.0.59
gateway=10.168.0.1
device=eth0
hostname=rhcsm.cmdschool.org
OS=CentOS 6.8
storage:
ipaddress=10.168.0.200
gateway=10.168.0.1
device=eth0
hostname=storage01.cmdschool.org
OS=CentOS 7.1
2.1.2 存储网络
node01(rhcsh01):
ipaddress=10.0.0.51/24
device=eth1
node02(rhcsh02):
ipaddress=10.0.0.52/24
device=eth1
storage:
ipaddress=10.0.0.200/24
device=eth1
2.1.3 心跳网络
node01(rhcsh01):
ipaddress=192.168.1.51/24
device=eth2
node02(rhcsh02):
ipaddress=192.168.1.52/24
device=eth2
rhcsm:
ipaddress=192.168.1.59/24
device=eth2
2.2 环境配置
2.2.1 关闭selinux
In rhcsh0[1-2] & rhcsm:
getenforce
如显示如下:
Enforcing
则执行
setenforce 0
sed -i 's/SELINUX=enforcing/SELINUX=disabled/g' /etc/selinux/config
2.2.2 关闭防火墙
In rhcsh0[1-2] & rhcsm
/etc/init.d/iptables stop
chkconfig iptables off
2.2.3 名称解析配置
In rhcsh0[1-2] & rhcsm & storage:
vim /etc/hosts
输入如下内容:
192.168.1.51 node01.cmdschool.org
192.168.1.52 node02.cmdschool.org
192.168.1.59 rhcsm.cmdschool.org
2.2.4 时间与时区配置
In rhcsh0[1-2] & rhcsm & storage:
1)时区配置
cp /usr/share/zoneinfo/Asia/Shanghai /etc/localtime
2)安装ntp同步服务
yum install -y chrony
3)启动ntp服务
#CentOS 6
/etc/init.d/chronyd start
chkconfig chronyd on
#CentOS 7
systemctl start chronyd
systemctl enable chronyd
4)同步时间
chronyc sources
2.3 存储服务配置
In storage:
2.3.1 创建存储分区(200G)
fdisk /dev/sdb
详细向导如下:
Welcome to fdisk (util-linux 2.23.2).

Changes will remain in memory only, until you decide to write them.
Be careful before using the write command.

Device does not contain a recognized partition table
Building a new DOS disklabel with disk identifier 0xe381cdb3.

Command (m for help): n
Partition type:
   p   primary (0 primary, 0 extended, 4 free)
   e   extended
Select (default p): p
Partition number (1-4, default 1):
First sector (2048-419430399, default 2048):
Using default value 2048
Last sector, +sectors or +size{K,M,G} (2048-419430399, default 419430399):
Using default value 419430399
Partition 1 of type Linux and of size 200 GiB is set

Command (m for help): w
The partition table has been altered!

Calling ioctl() to re-read partition table.
Syncing disks.
检查新建的分区
partprobe
ll /dev/sdb*
2.3.2 安装iscsi服务端相关包
yum -y install targetcli
2.3.3 启动服务并配置默认启动
systemctl enable target
systemctl restart target
2.3.4 配置存储服务
targetcli
详细向导如下:
/>help
/>ls
/> /backstores/block create dev=/dev/sdb1 name=scan1
/>ls
/> /iscsi create wwn=iqn.2014-11.org.cmdschool:storage01
/>ls
/>cd /iscsi/iqn.2014-11.org.cmdschool:storage01/tpg1/
/iscsi/iqn.20...:storage01/tpg1>ls
/iscsi/iqn.20...:storage01/tpg1>acls/ create wwn=iqn.2014-11.org.cmdschool:node
/iscsi/iqn.20...:storage01/tpg1>ls
/iscsi/iqn.20...:storage01/tpg1>luns/ create /backstores/block/san1
/iscsi/iqn.20...:storage01/tpg1>cd /
/>ls
/>saveconfig
/>exit
检查配置
vim /etc/target/saveconfig.json
2.3.5 防火墙配置
firewall-cmd --permanent --add-port=3260/tcp
firewall-cmd --reload
2.4 节点链接iscsi存储
In rhcsh0[1-2]:
2.4.1 安装基础包
yum install -y iscsi* tree
2.4.2 配置服务默认启动
chkconfig iscsid on
2.4.3 修改配置
vim /etc/iscsi/initiatorname.iscsi
输入如下内容:
InitiatorName=iqn.2014-11.org.cmdschool:node
2.4.4 发现scsi存储
iscsiadm -m discovery node -t st -p 10.0.0.200:3260
校验
tree /var/lib/iscsi/
显示如下:
/var/lib/iscsi/
├── ifaces
├── isns
├── nodes
│   └── iqn.2014-11.org.cmdschool:storage01
│       └── 10.0.0.200,3260,1
│           └── default
├── send_targets
│   └── 10.0.0.200,3260
│       ├── iqn.2014-11.org.cmdschool:storage01,10.0.0.200,3260,1,default -> /var/lib/iscsi/nodes/iqn.2014-11.org.cmdschool:storage01/10.0.0.200,3260,1
│       └── st_config
├── slp
└── static
2.4.5 检查存储发现情况
fdisk -l
可发现新增加的硬盘
[...]
Disk /dev/sdb: 214.7 GB, 214747316224 bytes
255 heads, 63 sectors/track, 26108 cylinders
Units = cylinders of 16065 * 512 = 8225280 bytes
Sector size (logical/physical): 512 bytes / 512 bytes
I/O size (minimum/optimal): 512 bytes / 4194304 bytes
Disk identifier: 0x00000000
注:如果无法发现请执行重启操作
2.4.6 分区并格式化存储(单节点做即可)
1)存储分区
fdisk /dev/sdb
向导如下:
Device contains neither a valid DOS partition table, nor Sun, SGI or OSF disklabel
Building a new DOS disklabel with disk identifier 0x62b02e8b.
Changes will remain in memory only, until you decide to write them.
After that, of course, the previous content won't be recoverable.

Warning: invalid flag 0x0000 of partition table 4 will be corrected by w(rite)

WARNING: DOS-compatible mode is deprecated. It's strongly recommended to
         switch off the mode (command 'c') and change display units to
         sectors (command 'u').

Command (m for help): n
Command action
   e   extended
   p   primary partition (1-4)
p
Partition number (1-4): 1
First cylinder (1-26108, default 1):
Using default value 1
Last cylinder, +cylinders or +size{K,M,G} (1-26108, default 26108):
Using default value 26108

Command (m for help): w
The partition table has been altered!

Calling ioctl() to re-read partition table.
Syncing disks.
2)存储格式化
mkfs.ext4 /dev/sdb1
2.4.7 删除iscsi存储(无需执行)
iscsiadm -m session -i /dev/sdb
iscsiadm -m node --logoutall=all
iscsiadm -m node -o delete -T iqn.2014-11.org.cmdschool:storage01 -p 10.0.0.200
iscsiadm -m session
2.5 节点配置
In rhcsh0[1-2]
2.5.1 安装yum源
yum groupinstall "High Availability" "Resilient Storage"
2.5.2 配置认证密码
passwd ricci
2.5.3 启动服务并配置默认启动
/etc/init.d/ricci start
chkconfig ricci on
2.6 MySQL安装配置
2.6.1 yum源安装
In rhcsh0[1-2]:
yum install -y mysql mysql-devel mysql-server
2.6.2 配置数据库
1)修改数据库目录
In rhcsh0[1-2]:
vim /etc/my.cnf
加入如下参数
[mysqld]
bind-address=10.168.0.50
datadir=/data
2)修改目录权限
In rhcsh0[1-2]:
chown -R mysql:mysql /data/
3)启动服务
In rhcsh01:
/etc/init.d/mysqld start
4)初始化服务
In rhcsh01:
mysql_secure_installation
向导如下:
[...]
Set root password? [Y/n] y
New password:
Re-enter new password:
Password updated successfully!
Reloading privilege tables..
 ... Success!
[...]
Remove anonymous users? [Y/n] y
 ... Success!
[...]
Disallow root login remotely? [Y/n] n
 ... skipping.
[...]
Remove test database and access to it? [Y/n] y
 - Dropping test database...
 ... Success!
 - Removing privileges on test database...
 ... Success!
[...]
Reload privilege tables now? [Y/n] y
 ... Success!

Cleaning up...
[...]
5)停止服务
In rhcsh01:
/etc/init.d/mysqld stop
2.7 集群luci管理器配置
In rhcsm:
2.7.1 安装yum源
yum groupinstall -y "High Availability Management"
2.7.2 启动luci管理器并配置开机启动
/etc/init.d/luci start
chkconfig luci on
2.7.3 浏览器测试
https://10.168.0.59:8084
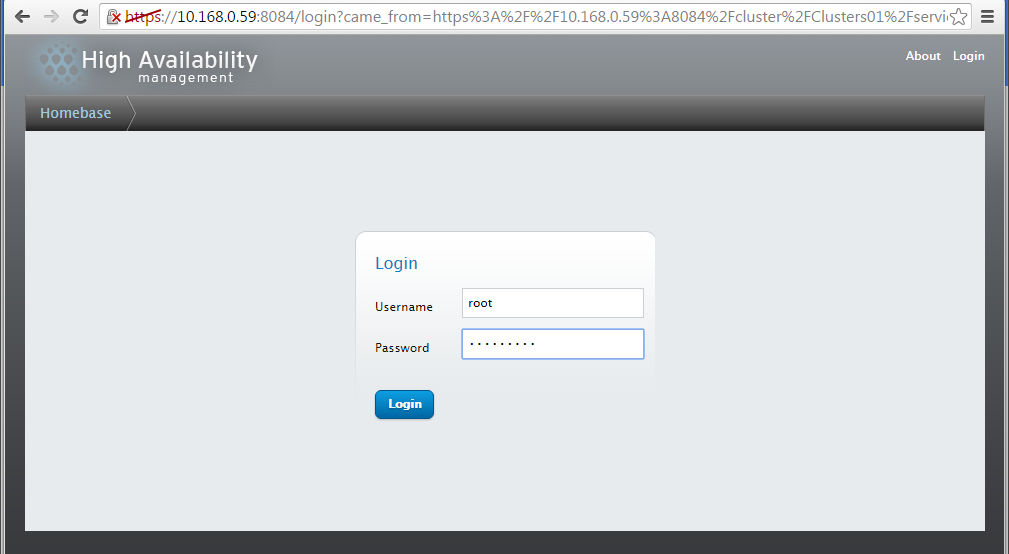
注:以上使用系统帐号登录
2.8 luci管理器操作
In client:
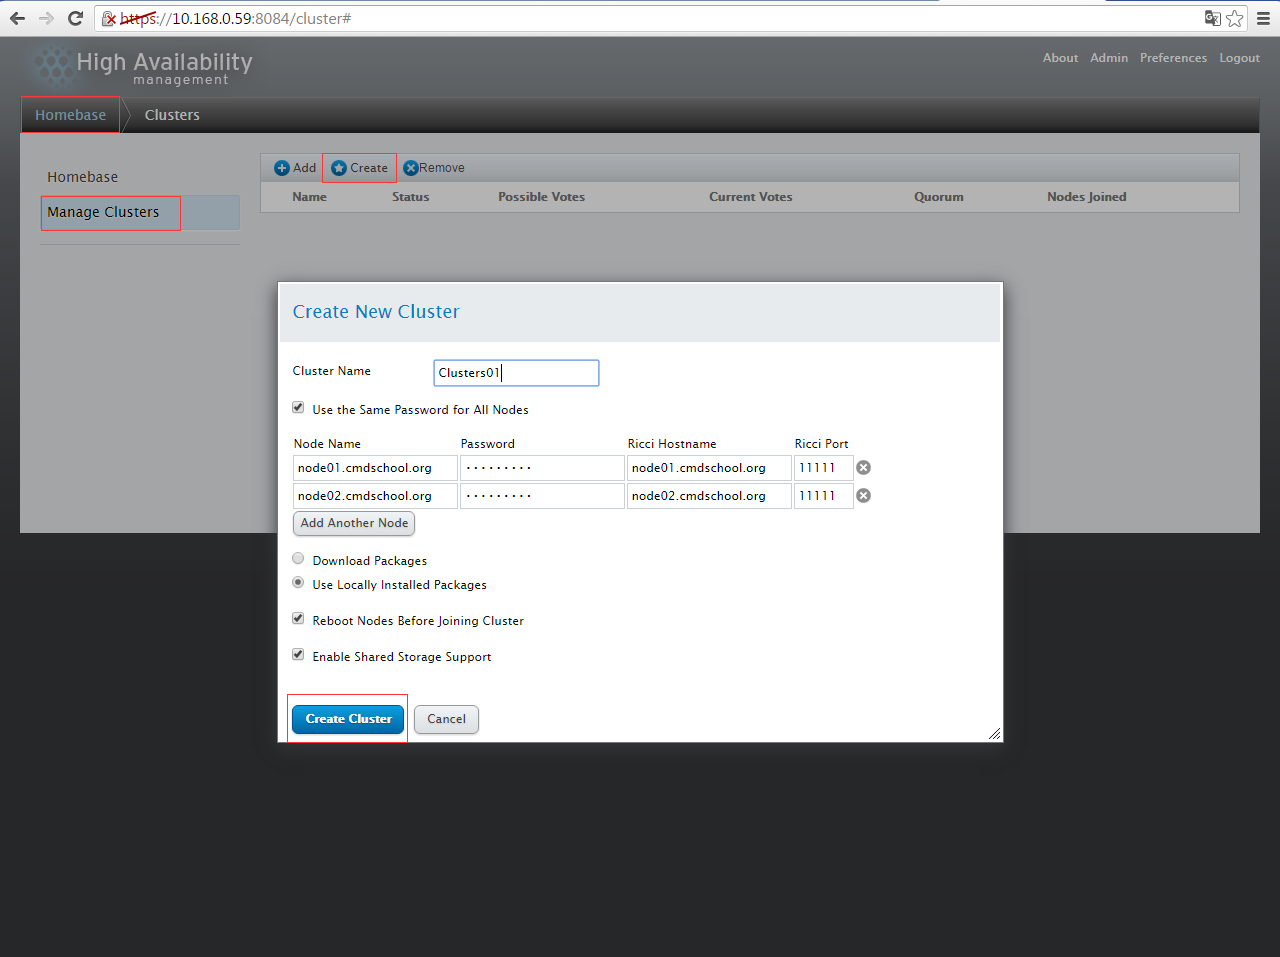
2.8.1 创建群集并添加节点
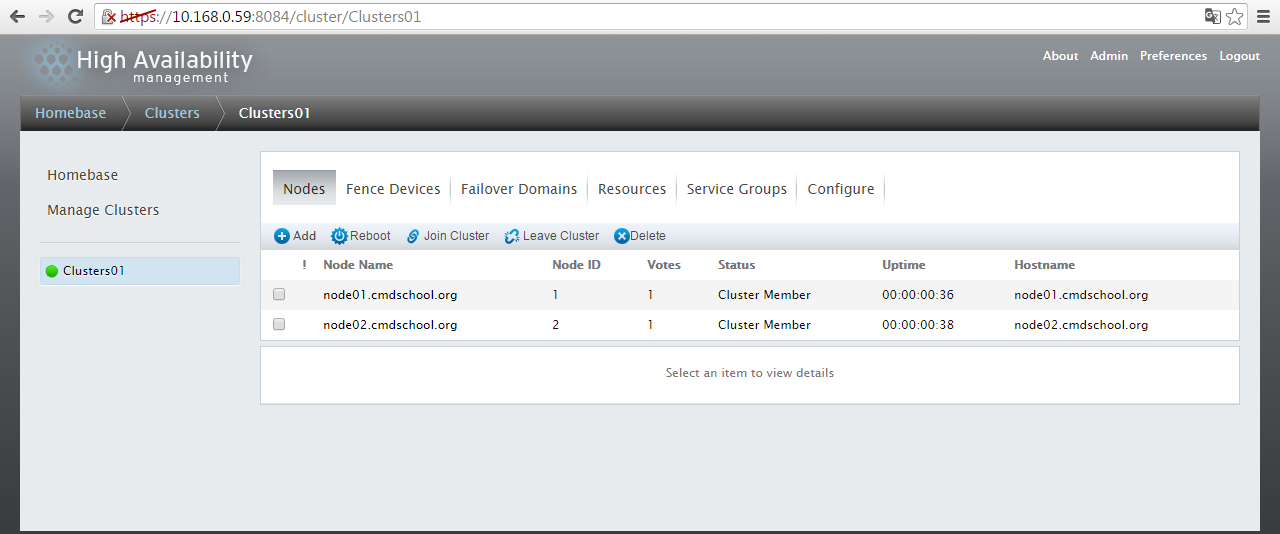
1)创建群集
2)创建完成
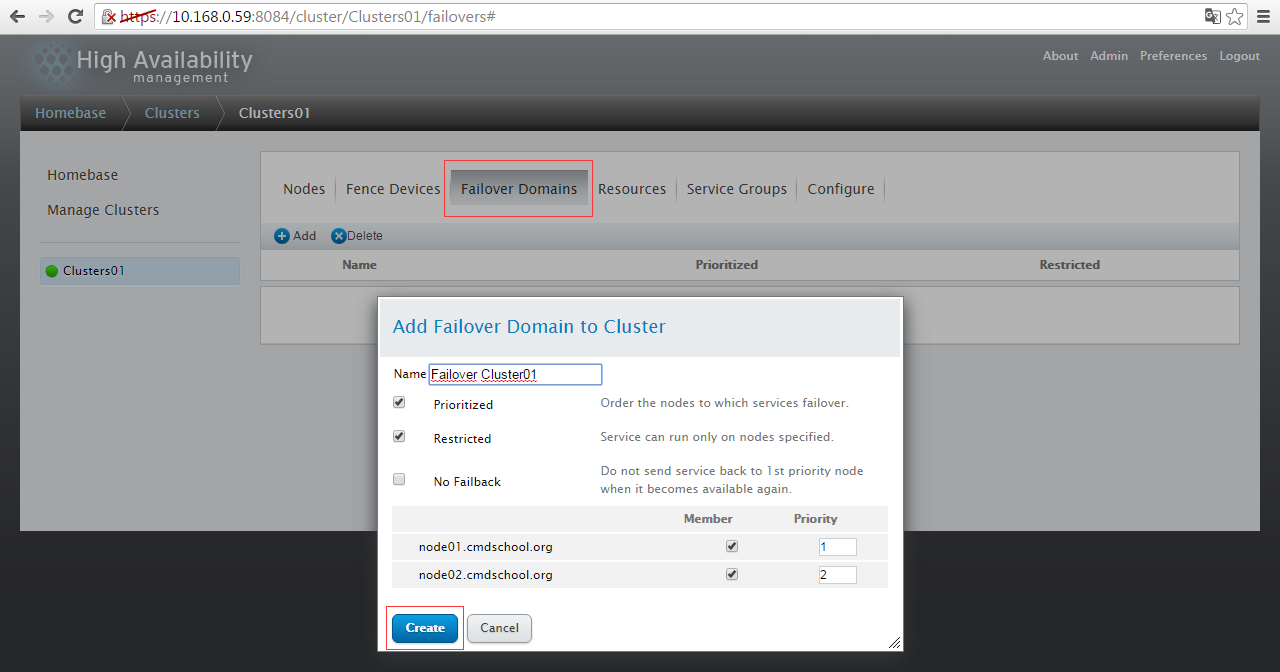
2.8.2 创建故障域
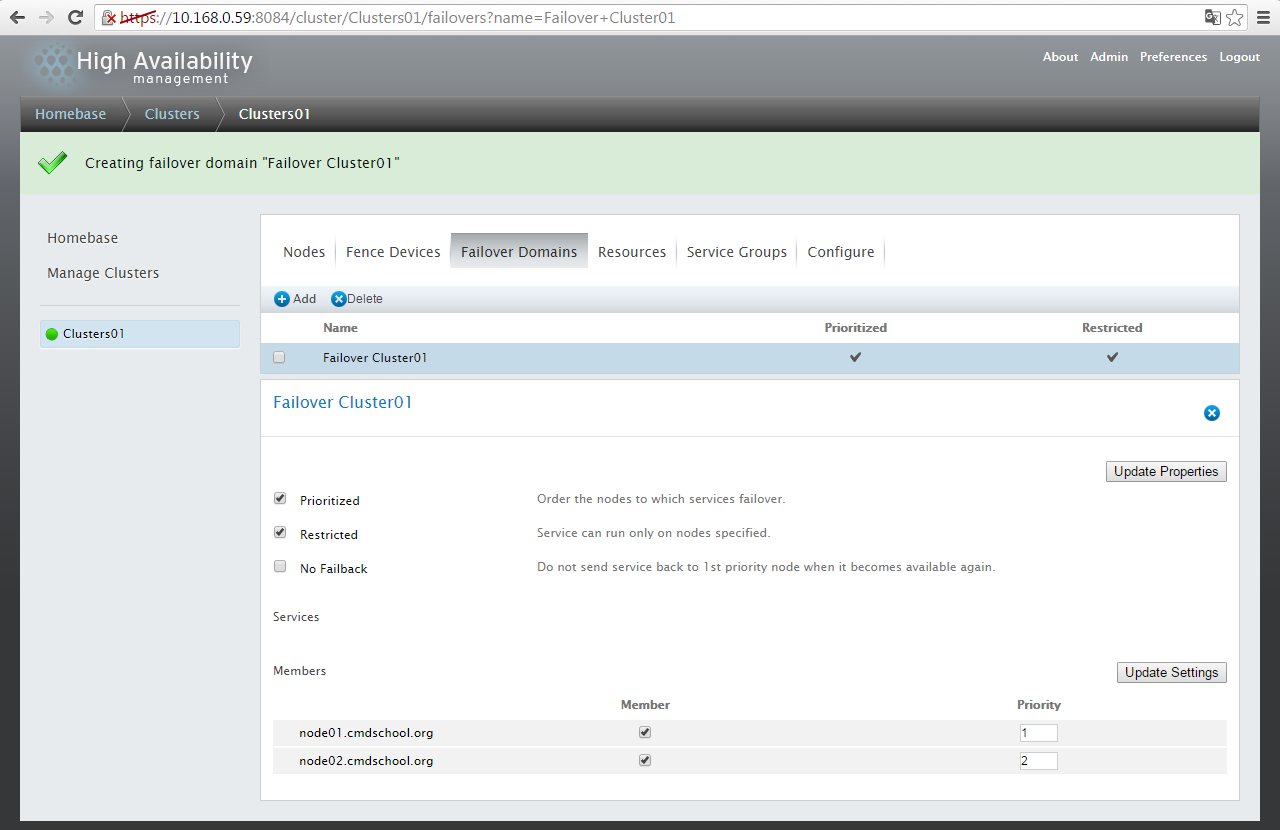
1)创建故障域
2)创建完成
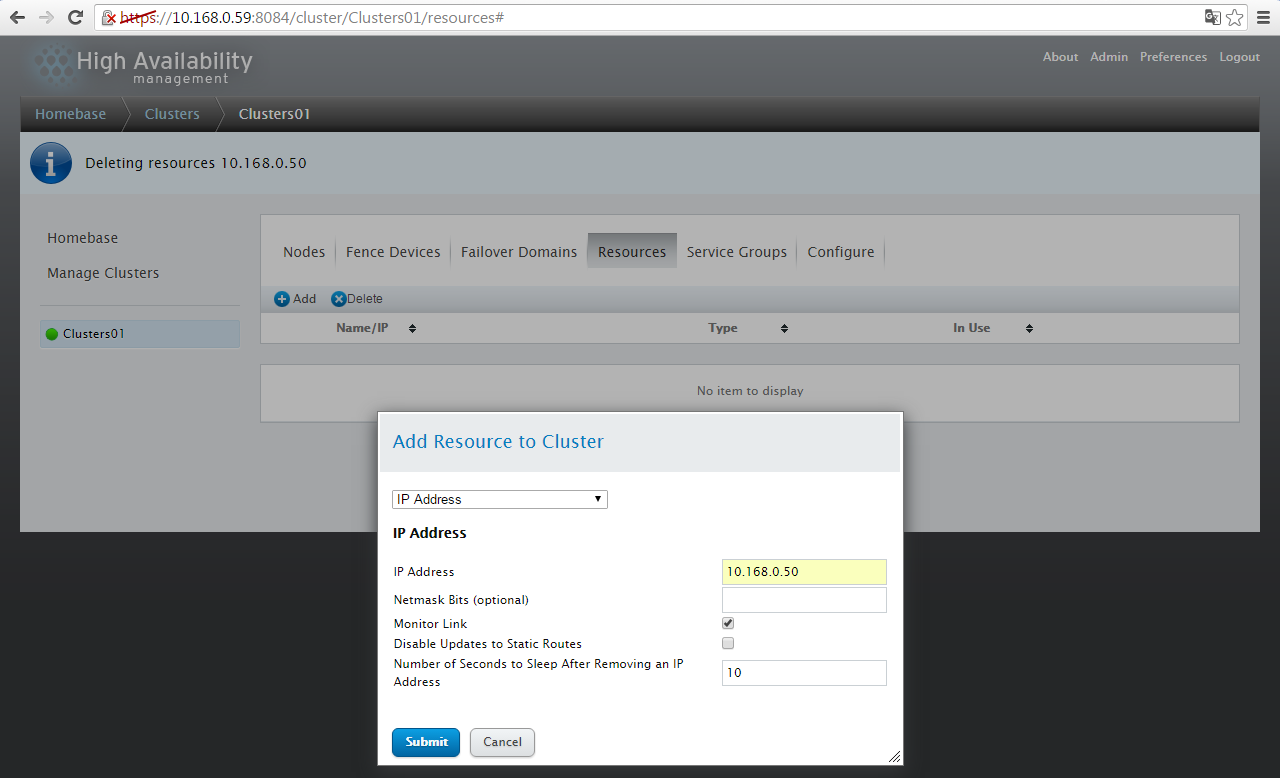
2.8.3 添加资源-虚拟IP
1)添加虚拟IP
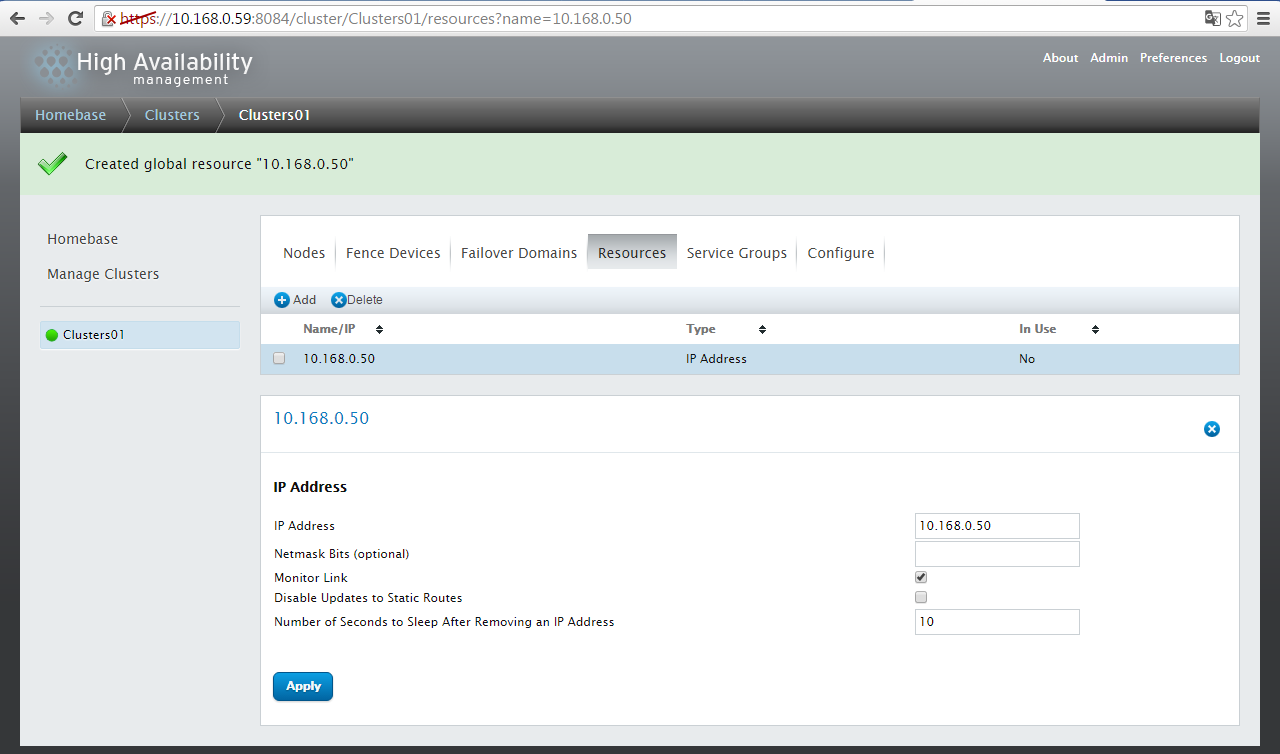
2)添加完成
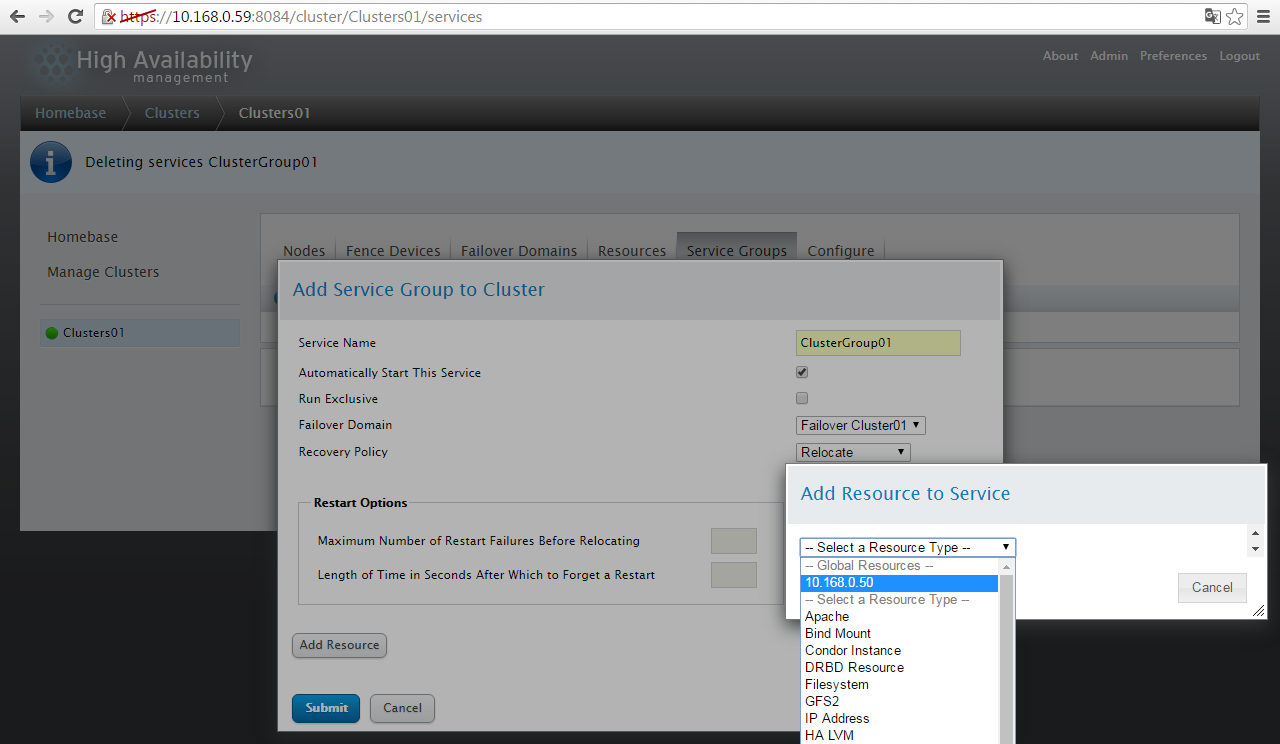
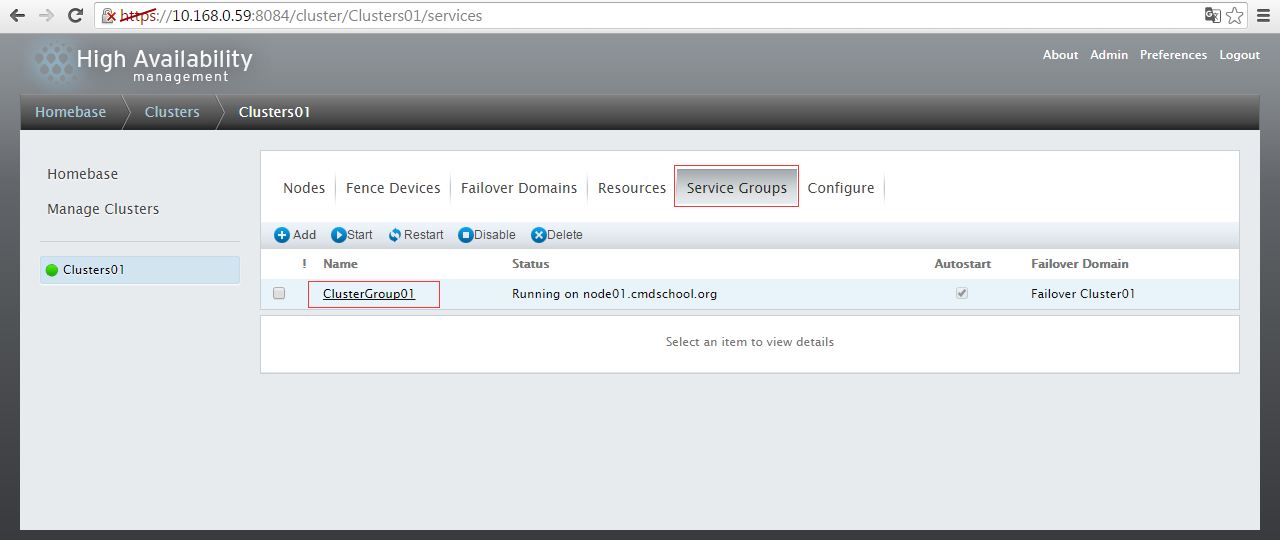
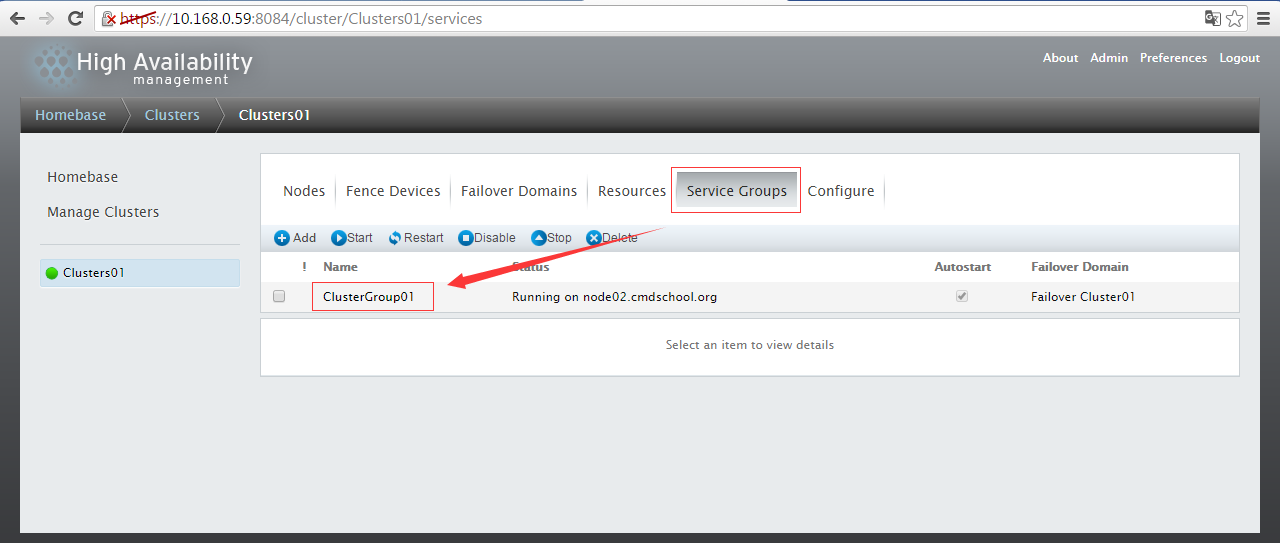
2.8.4 集群的服务组-添加虚拟IP资源
1)添加虚拟IP资源到群集服务组
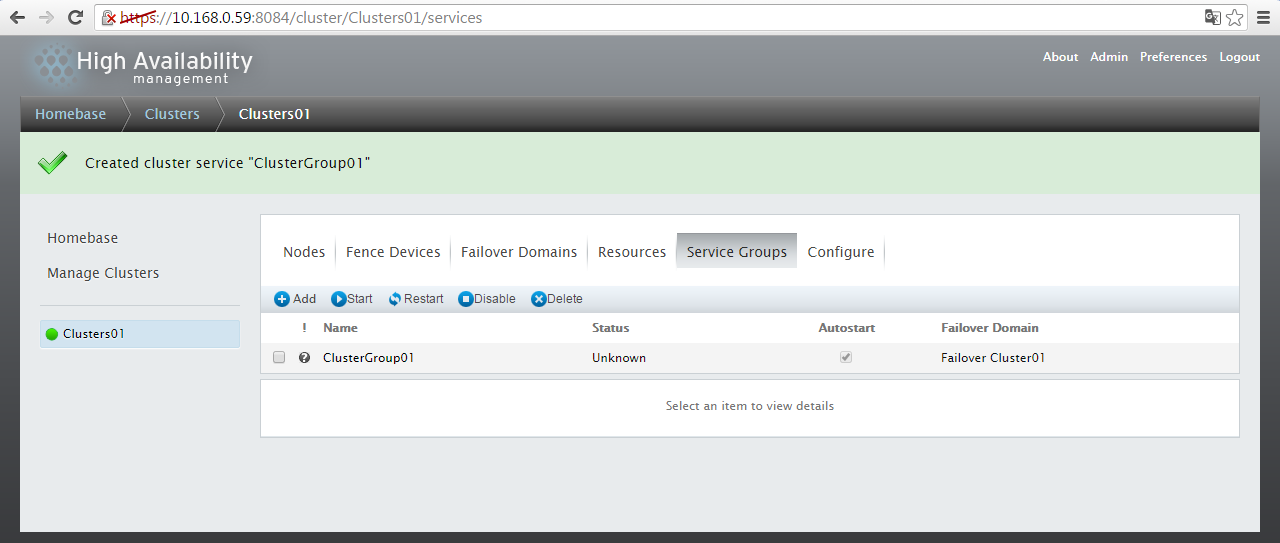
2)添加完成
3)客户端验证
4)节点验证
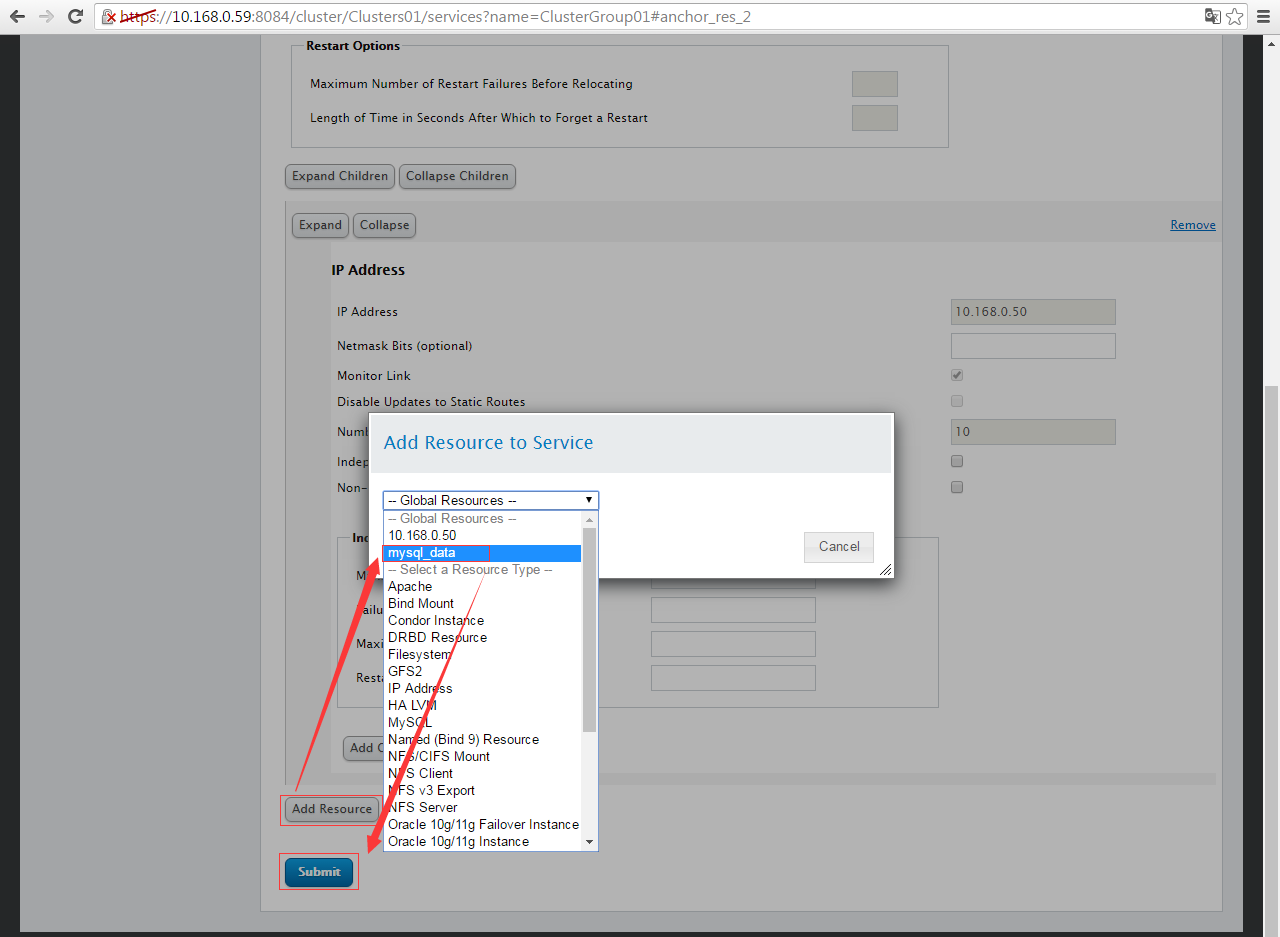
2.8.5 集群的服务组-添加共享硬盘资源
1)添加共享硬盘资源
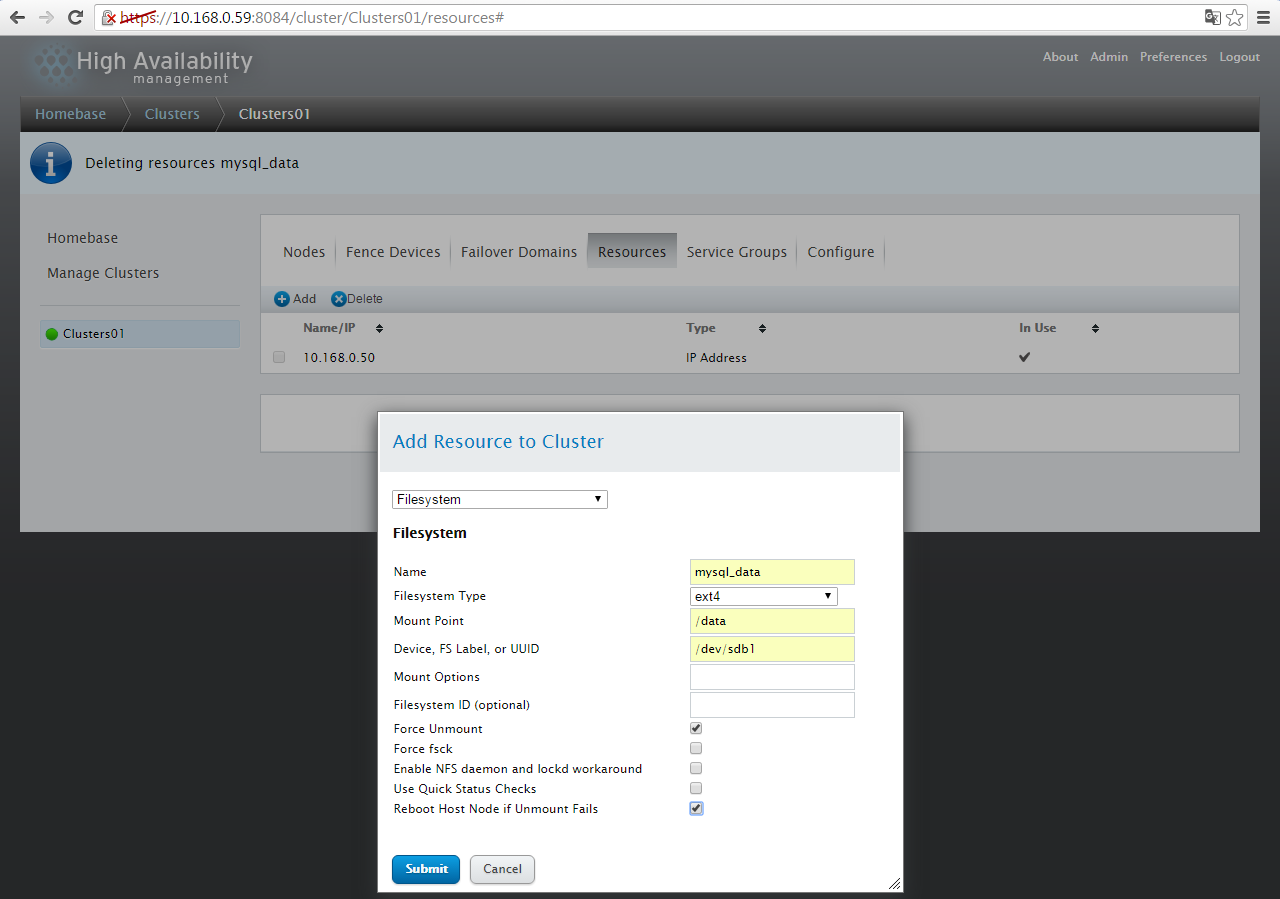
2)选择集群服务组
3)往集群组添加共享磁盘
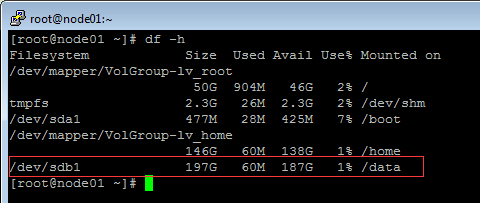
4)验证共享磁盘挂载
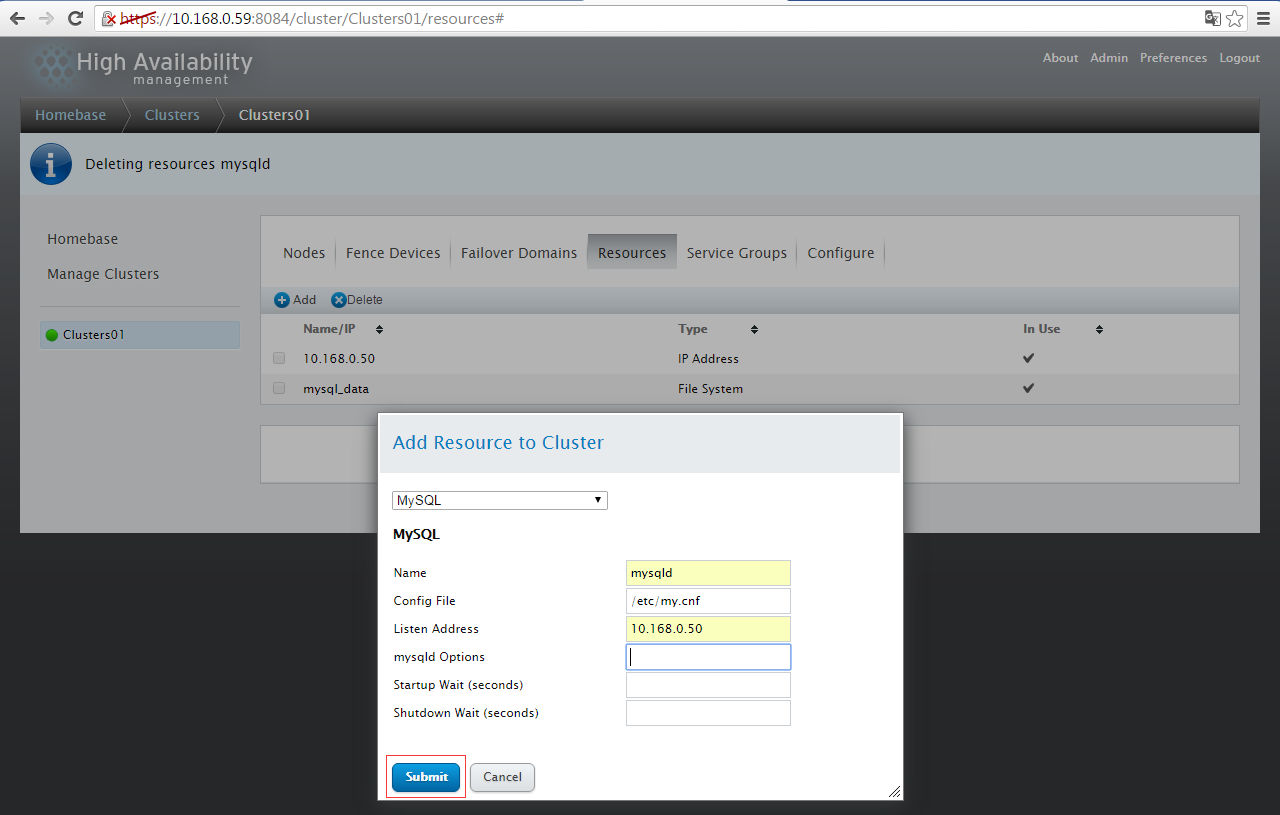
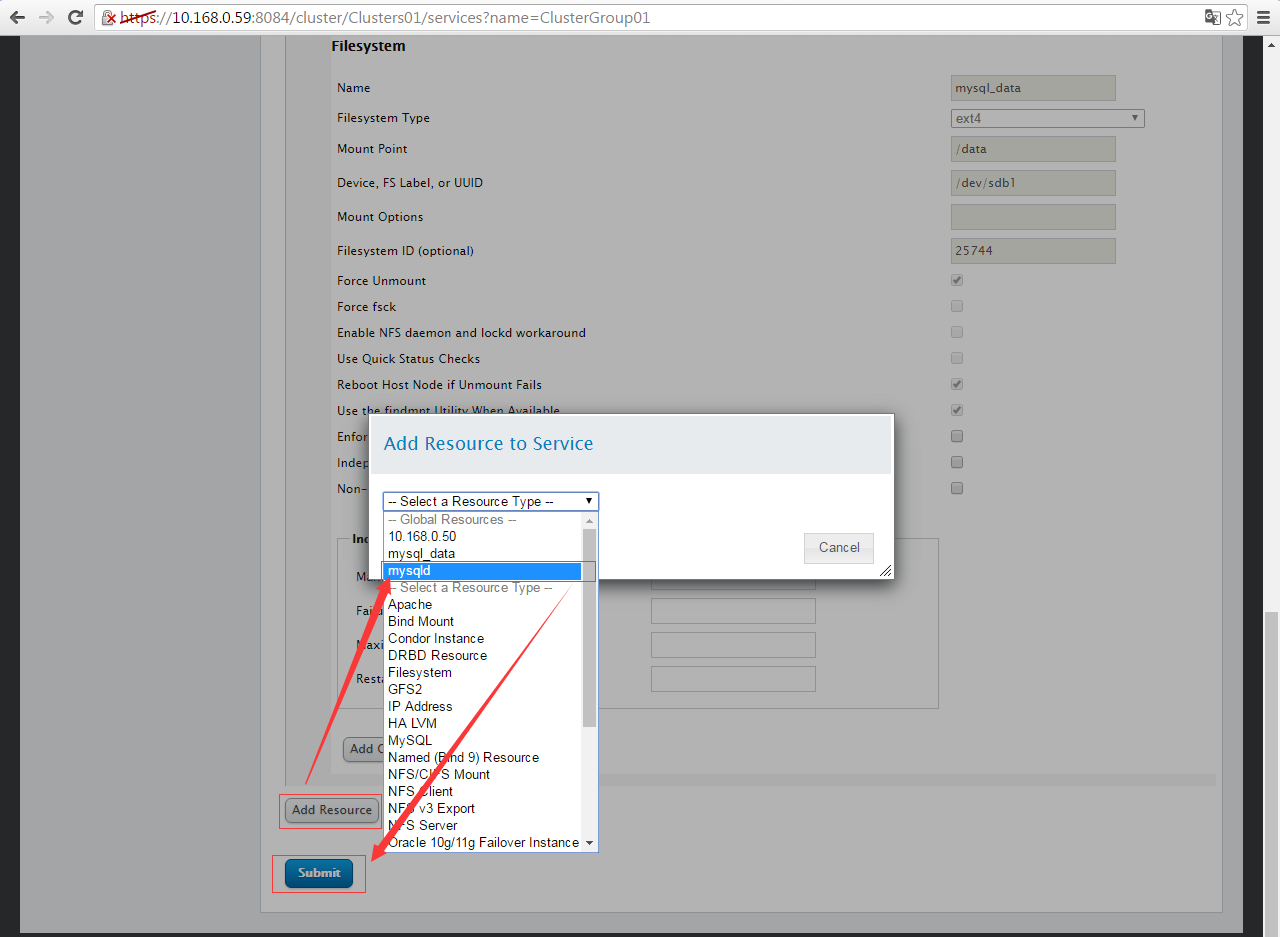
2.8.6 集群的服务组-添加数据库服务资源
1)添加MySQL服务到资源
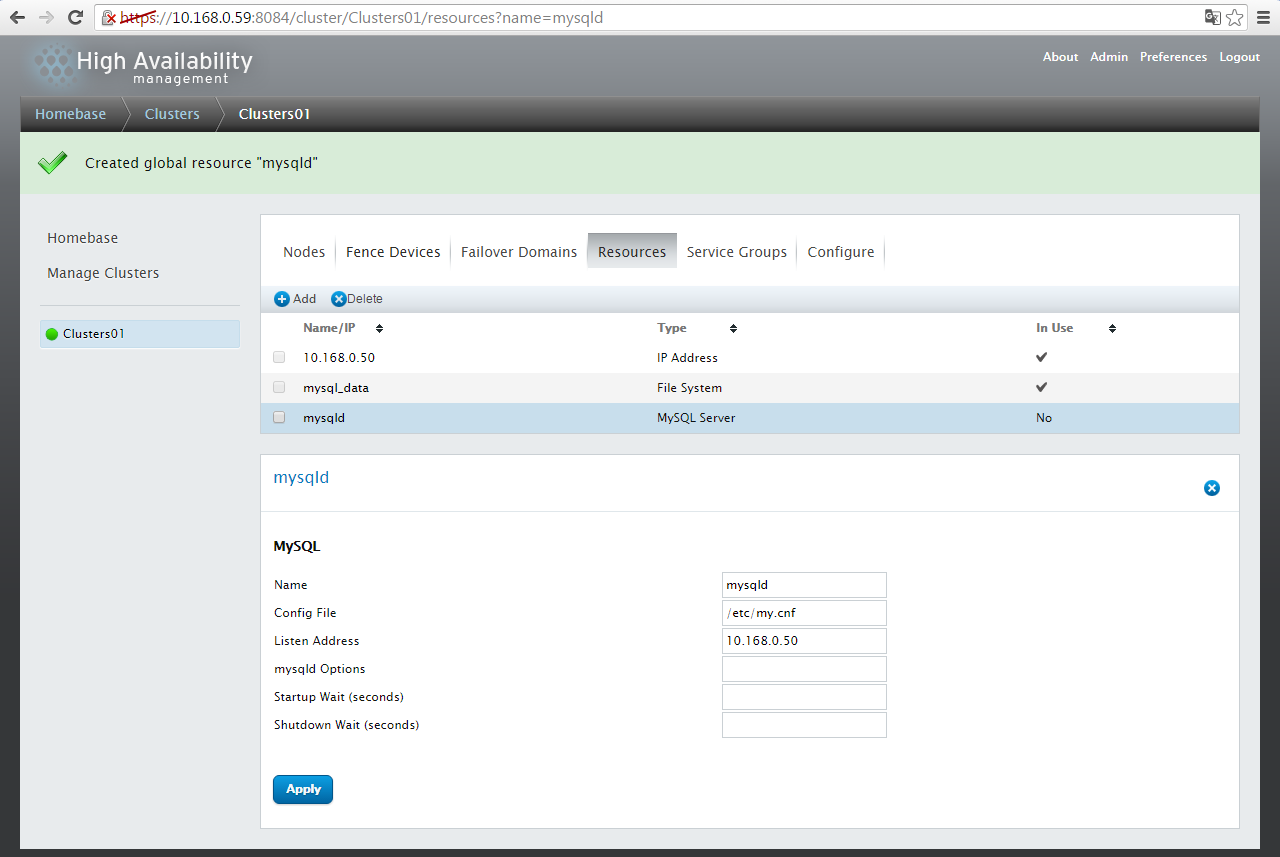
2)添加完成显示
3)选择群组
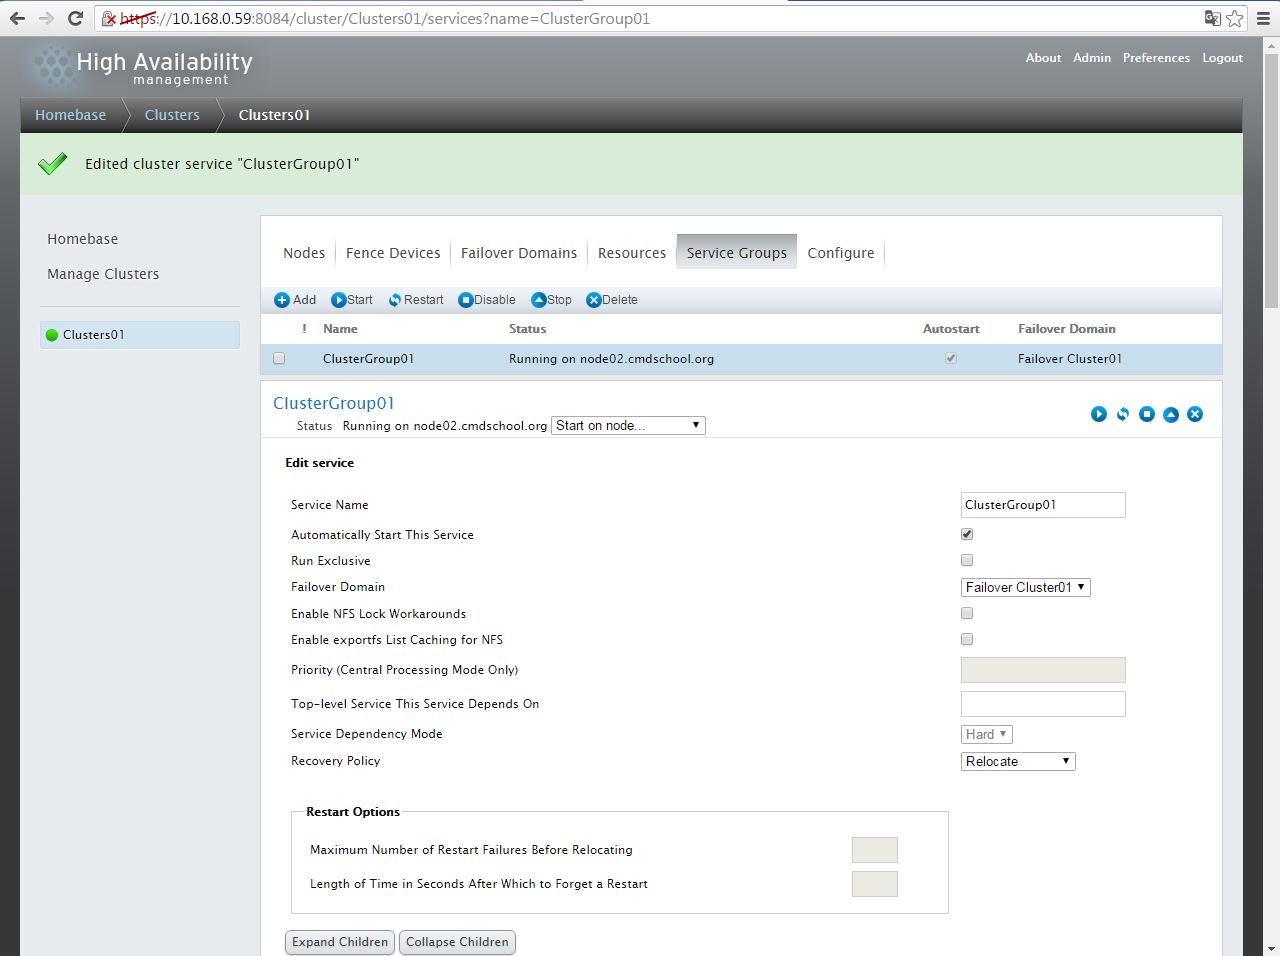
4)往群集组添加资源-MySQL服务
5)添加完毕显示
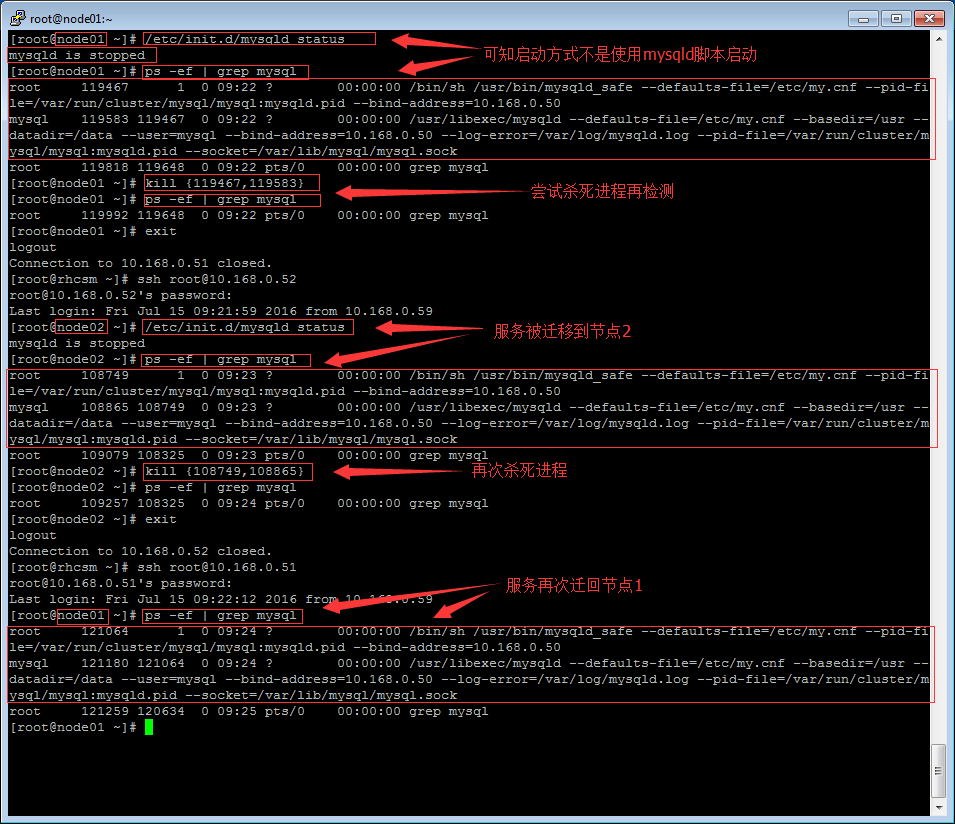
6)验证
————————————————————————-
参阅文献:
官方文档
———
集群管理
https://access.redhat.com/documentation/en-US/Red_Hat_Enterprise_Linux/6/html/Cluster_Administration/index.html
https://access.redhat.com/documentation/en-US/Red_Hat_Enterprise_Linux/6/html-single/Cluster_Administration/index.html
https://access.redhat.com/documentation/en-US/Red_Hat_Enterprise_Linux/5/html-single/Cluster_Administration/index.html
集群管理中文版
https://access.redhat.com/documentation/zh-CN/Red_Hat_Enterprise_Linux/6/html-single/Cluster_Administration/index.html
集群套件概述
https://access.redhat.com/documentation/en-US/Red_Hat_Enterprise_Linux/5/html/Cluster_Suite_Overview/index.html
集群管理员
https://access.redhat.com/documentation/en-US/Red_Hat_Enterprise_Linux/5/html/Cluster_Administration/index.html
基于集群套件的Oracle HA
https://access.redhat.com/documentation/en-US/Red_Hat_Enterprise_Linux/5/html/Configuration_Example_-_Oracle_HA_on_Cluster_Suite/index.html
Conga的配置使用
https://access.redhat.com/documentation/zh-CN/Red_Hat_Enterprise_Linux/6/html-single/Cluster_Administration/index.html#ch-config-conga-CA
非官方文档
———-
http://www.limingit.com/sitecn/itjq/1645_1694.html
http://linux.it.net.cn/e/cluster/qun/2015/0226/13496.html
http://www.linuxidc.com/Linux/2013-08/89166.htm
http://blog.chinaunix.net/uid-26931379-id-3558604.html
http://blog.chinaunix.net/uid-26931379-id-3558613.html
www.tuicool.com/articles/JjqUve
http://wangziyin.blog.51cto.com/6948950/1303239/
ISCSI资料:
http://linux-iscsi.org/wiki/Targetcli
http://czmmiao.iteye.com/blog/2055805
IBM多路径软件
http://blog.chinaunix.net/uid-316679-id-384033.html


没有评论