如何部署基于Nginx部署NextCloud?
- By : Will
- Category : Cloud storage

1 前言
一个问题,一篇文章,一出故事。
以往使用LAMP环境部署的NextCloud已经工作良久,但是发现内存消耗非常巨大,想着切换到LNMP环境,于是整理本章。
2 最佳实践
2.1 环境部署
2.1.1 安装部署Nginx
2.1.2 安装部署PHP-FPM
2.1.3 安装部署MariaDB
2.1.4 准备安装包
cd ~
wget https://download.nextcloud.com/server/releases/nextcloud-29.0.0.tar.bz2
2.2 部署NextCloud
2.2.1 解压软件包
cd ~
tar -xf nextcloud-29.0.0.tar.bz2
mkdir -p /var/www
mv nextcloud /var/www/nextcloud
chown apache: -R /var/www/nextcloud
2.2.2 修改Nginx配置
vim /etc/nginx/conf.d/nextcloud.conf
加入如下配置,
upstream php-handler {
    server 127.0.0.1:9000;
    #server unix:/var/run/php/php7.4-fpm.sock;
}

# Set the `immutable` cache control options only for assets with a cache busting `v` argument
map $arg_v $asset_immutable {
    "" "";
    default "immutable";
}


server {
    listen 80;
    #listen [::]:80;
    server_name nextcloud.cmdschool.org;

    # Prevent nginx HTTP Server Detection
    server_tokens off;

    # Enforce HTTPS
    return 301 https://$server_name$request_uri;
}

server {
    listen 443      ssl;
    #listen [::]:443 ssl;
    server_name nextcloud.cmdschool.org;

    # Path to the root of your installation
    root /var/www/nextcloud;

    # Use Mozilla's guidelines for SSL/TLS settings
    # https://mozilla.github.io/server-side-tls/ssl-config-generator/
    ssl_certificate     /etc/ssl/nextcloud.cmdschool.org_bundle.crt;
    ssl_certificate_key /etc/ssl/nextcloud.cmdschool.org.key;

    # Prevent nginx HTTP Server Detection
    server_tokens off;

    # HSTS settings
    # WARNING: Only add the preload option once you read about
    # the consequences in https://hstspreload.org/. This option
    # will add the domain to a hardcoded list that is shipped
    # in all major browsers and getting removed from this list
    # could take several months.
    #add_header Strict-Transport-Security "max-age=15768000; includeSubDomains; preload" always;

    # set max upload size and increase upload timeout:
    client_max_body_size 512M;
    client_body_timeout 300s;
    fastcgi_buffers 64 4K;

    # Enable gzip but do not remove ETag headers
    gzip on;
    gzip_vary on;
    gzip_comp_level 4;
    gzip_min_length 256;
    gzip_proxied expired no-cache no-store private no_last_modified no_etag auth;
    gzip_types application/atom+xml text/javascript application/javascript application/json application/ld+json application/manifest+json application/rss+xml application/vnd.geo+json application/vnd.ms-fontobject application/wasm application/x-font-ttf application/x-web-app-manifest+json application/xhtml+xml application/xml font/opentype image/bmp image/svg+xml image/x-icon text/cache-manifest text/css text/plain text/vcard text/vnd.rim.location.xloc text/vtt text/x-component text/x-cross-domain-policy;

    # Pagespeed is not supported by Nextcloud, so if your server is built
    # with the `ngx_pagespeed` module, uncomment this line to disable it.
    #pagespeed off;

    # The settings allows you to optimize the HTTP2 bandwitdth.
    # See https://blog.cloudflare.com/delivering-http-2-upload-speed-improvements/
    # for tunning hints
    client_body_buffer_size 512k;

    # HTTP response headers borrowed from Nextcloud `.htaccess`
    add_header Referrer-Policy                   "no-referrer"       always;
    add_header X-Content-Type-Options            "nosniff"           always;
    add_header X-Frame-Options                   "SAMEORIGIN"        always;
    add_header X-Permitted-Cross-Domain-Policies "none"              always;
    add_header X-Robots-Tag                      "noindex, nofollow" always;
    add_header X-XSS-Protection                  "1; mode=block"     always;

    # Remove X-Powered-By, which is an information leak
    fastcgi_hide_header X-Powered-By;

    # Add .mjs as a file extension for javascript
    # Either include it in the default mime.types list
    # or include you can include that list explicitly and add the file extension
    # only for Nextcloud like below:
    include mime.types;
    types {
        text/javascript js mjs;
    }

    # Specify how to handle directories -- specifying `/index.php$request_uri`
    # here as the fallback means that Nginx always exhibits the desired behaviour
    # when a client requests a path that corresponds to a directory that exists
    # on the server. In particular, if that directory contains an index.php file,
    # that file is correctly served; if it doesn't, then the request is passed to
    # the front-end controller. This consistent behaviour means that we don't need
    # to specify custom rules for certain paths (e.g. images and other assets,
    # `/updater`, `/ocs-provider`), and thus
    # `try_files $uri $uri/ /index.php$request_uri`
    # always provides the desired behaviour.
    index index.php index.html /index.php$request_uri;

    # Rule borrowed from `.htaccess` to handle Microsoft DAV clients
    location = / {
        if ( $http_user_agent ~ ^DavClnt ) {
            return 302 /remote.php/webdav/$is_args$args;
        }
    }

    location = /robots.txt {
        allow all;
        log_not_found off;
        access_log off;
    }

    # Make a regex exception for `/.well-known` so that clients can still
    # access it despite the existence of the regex rule
    # `location ~ /(\.|autotest|...)` which would otherwise handle requests
    # for `/.well-known`.
    location ^~ /.well-known {
        # The rules in this block are an adaptation of the rules
        # in `.htaccess` that concern `/.well-known`.

        location = /.well-known/carddav { return 301 /remote.php/dav/; }
        location = /.well-known/caldav  { return 301 /remote.php/dav/; }

        location /.well-known/acme-challenge    { try_files $uri $uri/ =404; }
        location /.well-known/pki-validation    { try_files $uri $uri/ =404; }

        # Let Nextcloud's API for `/.well-known` URIs handle all other
        # requests by passing them to the front-end controller.
        return 301 /index.php$request_uri;
    }

    # Rules borrowed from `.htaccess` to hide certain paths from clients
    location ~ ^/(?:build|tests|config|lib|3rdparty|templates|data)(?:$|/)  { return 404; }
    location ~ ^/(?:\.|autotest|occ|issue|indie|db_|console)                { return 404; }

    # Ensure this block, which passes PHP files to the PHP process, is above the blocks
    # which handle static assets (as seen below). If this block is not declared first,
    # then Nginx will encounter an infinite rewriting loop when it prepends `/index.php`
    # to the URI, resulting in a HTTP 500 error response.
    location ~ \.php(?:$|/) {
        # Required for legacy support
        rewrite ^/(?!index|remote|public|cron|core\/ajax\/update|status|phpinfo|ocs\/v[12]|updater\/.+|ocs-provider\/.+|.+\/richdocumentscode\/proxy) /index.php$request_uri;

        fastcgi_split_path_info ^(.+?\.php)(/.*)$;
        set $path_info $fastcgi_path_info;

        try_files $fastcgi_script_name =404;

        include fastcgi_params;
        fastcgi_param SCRIPT_FILENAME $document_root$fastcgi_script_name;
        fastcgi_param PATH_INFO $path_info;
        fastcgi_param HTTPS on;

        fastcgi_param modHeadersAvailable true;         # Avoid sending the security headers twice
        fastcgi_param front_controller_active true;     # Enable pretty urls
        fastcgi_pass php-handler;

        fastcgi_intercept_errors on;
        fastcgi_request_buffering off;

        fastcgi_max_temp_file_size 0;

        fastcgi_send_timeout 600s;
        fastcgi_read_timeout 600s;
    }

    # Serve static files
    location ~ \.(?:css|js|mjs|svg|gif|png|jpg|ico|wasm|tflite|map)$ {
        try_files $uri /index.php$request_uri;
        add_header Cache-Control "public, max-age=15778463, $asset_immutable";
        access_log off;     # Optional: Don't log access to assets

        location ~ \.wasm$ {
            default_type application/wasm;
        }
    }

    location ~ \.woff2?$ {
        try_files $uri /index.php$request_uri;
        expires 7d;         # Cache-Control policy borrowed from `.htaccess`
        access_log off;     # Optional: Don't log access to assets
    }

    # Rule borrowed from `.htaccess`
    location /remote {
        return 301 /remote.php$request_uri;
    }

    location / {
        try_files $uri $uri/ /index.php$request_uri;
    }
}
然后,使用如下命令重载服务是配置生效,
systemctl reload nginx.service
2.2.3 部署SSL证书
cd ~
unzip nextcloud.cmdschool.org_nginx.zip
mv nextcloud.cmdschool.org_nginx/* /etc/ssl/
证书请自行准备,建议你通过以下链接申请(使用nginx证书即可)
https://cloud.tencent.com/product/ssl
2.2.4 测试并安装模块
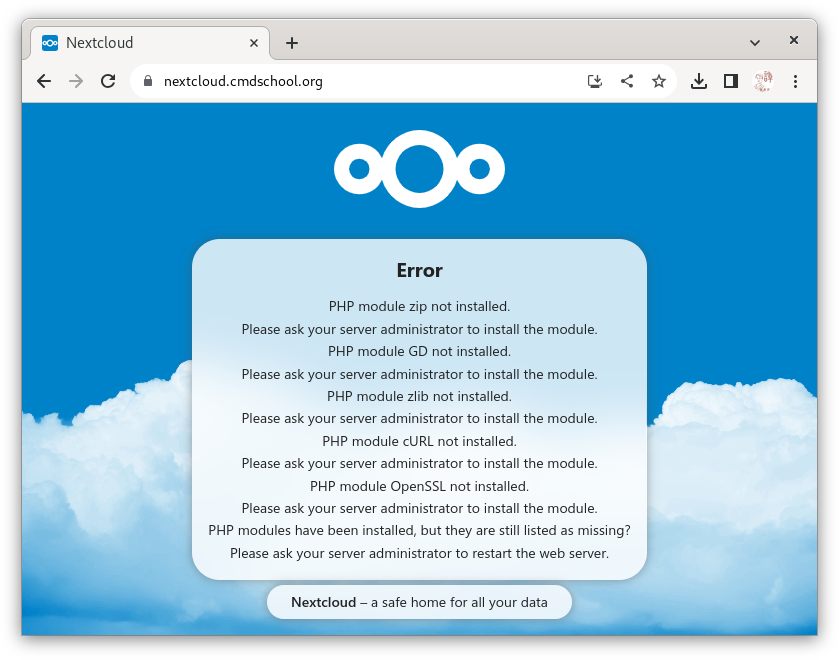
https://nextcloud.cmdschool.org/

根据以上提示,我们使用如下命令编译安装zip模块,
cd ~/php-8.3.7/ext/zip
phpize
./configure
make
make install
rsync -avP /usr/lib64/extensions/no-debug-zts-20230831/ /usr/lib64/php-zts/modules/
echo 'extension=zip' > /etc/php.d/zip.ini
systemctl reload php-fpm
如果有以下错误提示,
configure: error: Package requirements (libzip >= 0.11 libzip != 1.3.1 libzip != 1.7.0) were not met:

Package 'libzip', required by 'virtual:world', not found
你需要使用如下命令解决依赖关系,
dnf install -y libzip-devel
根据以上提示,我们使用如下命令编译安装mbstring模块,
cd ~/php-8.3.7/ext/mbstring
phpize
./configure
make
make install
rsync -avP /usr/lib64/extensions/no-debug-zts-20230831/ /usr/lib64/php-zts/modules/
echo 'extension=mbstring' > /etc/php.d/mbstring.ini
systemctl reload php-fpm
根据以上提示,我们使用如下命令编译安装gd模块,
cd ~/php-8.3.7/ext/gd/
phpize
./configure \
--enable-shared \
--disable-static \
--enable-gd \
--with-external-gd \
--with-webp \
--with-jpeg \
--with-xpm \
--with-freetype \
--with-gnu-ld
make
make install
rsync -avP /usr/lib64/extensions/no-debug-zts-20230831/ /usr/lib64/php-zts/modules/
echo 'extension=gd' > /etc/php.d/gd.ini
systemctl reload php-fpm
如果有以下错误提示,
configure: error: Package requirements (libpng) were not met:

Package 'libpng', required by 'virtual:world', not found
你需要使用如下命令解决依赖关系,
yum install -y libpng-devel
如果有以下错误提示,
configure: error: Package requirements (gdlib >= 2.1.0) were not met:

Package 'gdlib', required by 'virtual:world', not found
你需要使用如下命令解决依赖关系,
yum install -y gd-devel
根据以上提示,我们使用如下命令编译安装zlib模块,
cd ~/php-8.3.7/ext/zlib
cp config0.m4 config.m4
phpize
./configure
make
make install
rsync -avP /usr/lib64/extensions/no-debug-zts-20230831/ /usr/lib64/php-zts/modules/
echo 'extension=zlib' > /etc/php.d/zlib.ini
systemctl reload php-fpm
根据以上提示,我们使用如下命令编译安装curl模块,
cd ~/php-8.3.7/ext/curl
phpize
./configure
make
make install
rsync -avP /usr/lib64/extensions/no-debug-zts-20230831/ /usr/lib64/php-zts/modules/
echo 'extension=curl' > /etc/php.d/curl.ini
systemctl reload php-fpm
如果有以下错误提示,
configure: error: Package requirements (libcurl >= 7.29.0) were not met:

Package 'libcurl', required by 'virtual:world', not fou
你需要使用如下命令解决依赖关系,
yum install -y libcurl-devel
如果有以下错误提示,
configure: error: Package requirements (openssl) were not met:

Package 'openssl', required by 'virtual:world', not found
你需要使用如下命令解决依赖关系,
yum install -y openssl-devel
根据以上提示,我们使用如下命令编译安装openssl模块,
cd ~/php-8.3.7/ext/openssl/
cp config0.m4 config.m4
phpize
./configure
make
make install
rsync -avP /usr/lib64/extensions/no-debug-zts-20230831/ /usr/lib64/php-zts/modules/
echo 'extension=openssl' > /etc/php.d/openssl.ini
systemctl reload php-fpm
2.3 配置NextCloud
2.3.1 创建数据库
mysql -uroot -p
输入如下配置:
create database if not exists nextcloud character set utf8;
grant all privileges on nextcloud.* TO 'nextcloud'@'localhost' IDENTIFIED BY 'nextcloudpwd';
flush privileges;
2.3.2 准备数据目录
mkdir -p /data/nextcloud
chown apache: /data/nextcloud/
2.3.1 配置连接
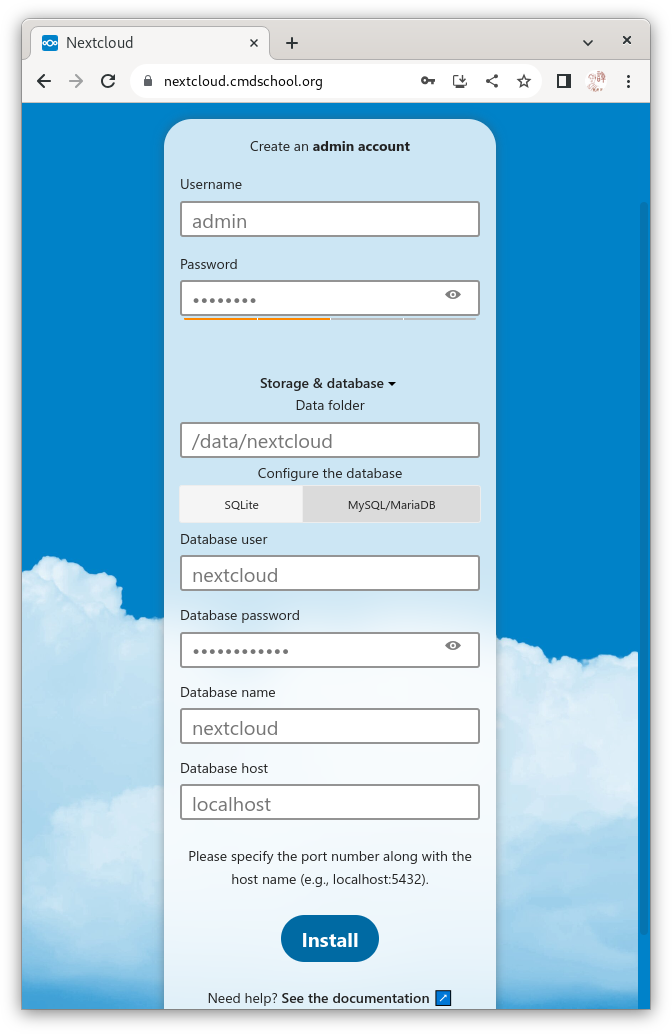
通过访问连接可发现所有模块安装好后即可进行数据库连接等操作,详细请参考下图,

需要注意的是,
– 如果无法连接请将“localhost”改为“127.0.0.1”
– 界面操作不再详述,请自行摸索
参阅文档
===================
支持文档
——————-
https://nextcloud.com/support/
Nginx
——————-
https://docs.nextcloud.com/server/latest/admin_manual/installation/nginx.html
安装包下载地址
—————–
https://download.nextcloud.com/server/releases/

没有评论