1 理论基础
1.1 简介
1.1 简介
Seafile 是一个开源的文件云存储平台,更注重于隐私保护和对团队文件协作的支持。
Seafile 通过“资料库”来分类管理文件,每个资料库可单独同步,用户可加密资料库, 且密码不会保存在服务器端,所以即使是服务器管理员也无权访问你的文件。
Seafile 允许用户创建“群组”,在群组内同步文件、创建维基、发起讨论等,方便团队内协同工作
1.2 软件许可协议
Seafile 及其桌面、移动客户端遵循 GPLv3。
Seahub(Seafile 服务器的 web 端)遵循 Apache License。
1.3 部署的要求
要求安装以下组件:
python 2.7 (从 Seafile 5.1 开始,python 版本最低要求为2.7)
python-setuptools
python-imaging
python-mysqldb
python-ldap
python-urllib3
python-memcache (或者 python-memcached)
1.4 Seafile的系统架构
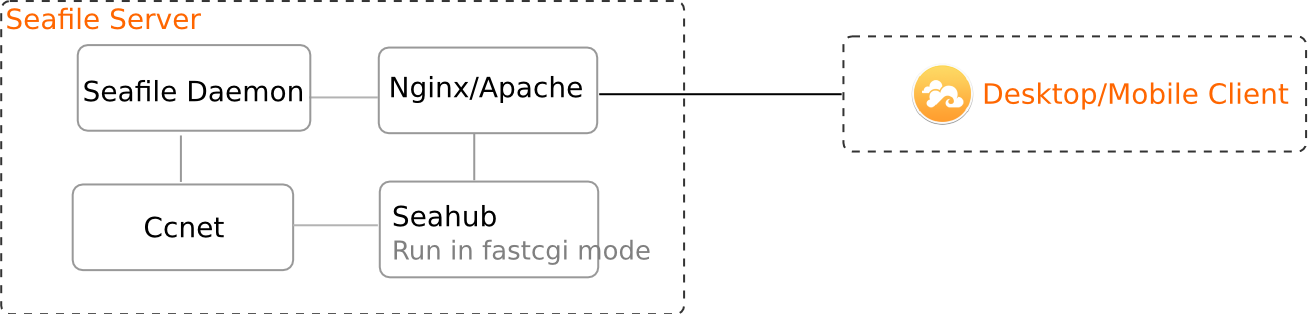
如上图所示,Seafile 包含以下系统组件:
Seahub – 网站界面,供用户管理自己在服务器上的数据和账户信息。Seafile服务器通过”gunicorn”(一个轻量级的Python HTTP服务器)来提供网站支持。Seahub作为gunicorn的一个应用程序来运行。
Seafile server (seaf-server) – 数据服务进程, 处理原始文件的上传/下载/同步。
Ccnet server (ccnet-server) – 内部 RPC 服务进程,连接多个组件。
Controller – 监控 ccnet 和 seafile 进程,必要时会重启进程。
注:
所有 Seafile 服务都可以配置在 Nginx/Apache 后面,由 Nginx/Apache 提供标准的 http(s) 访问。
当用户通过 seahub 访问数据时,seahub 通过 ccnet 提供的内部 RPC 来从 seafile server 获取数据。
2 实践部分
2.1 环境信息
2.1.1 主机信息
2.1 环境信息
2.1.1 主机信息
hostname=seafile.cmdschool.org
ip address=10.168.0.53
os type=CentOS Linux release 7.2
2.1.2 域名解析
配置dns解析或配置host解析,host解析配置如下(客户端和服务端):
vim /etc/hosts
加入如下内容:
10.168.0.53 seafile.cmdschool.org
2.1.3 关闭selinux
setenforce 0
sed -i 's/SELINUX=enforcing/SELINUX=disabled/g' /etc/selinux/config
2.2 yum源和安装包
2.2.1 更新系统
yum update
2.2.2 数据库的安装
yum install -y mariadb-server mariadb-devel mariadb
2.2.3 安装脚本运行环境
yum install -y python-setuptools python-imaging python-ldap MySQL-python python-memcached python-urllib3
2.2.4 安装nginx
yum install -y http://nginx.org/packages/centos/7/noarch/RPMS/nginx-release-centos-7-0.el7.ngx.noarch.rpm
yum install -y nginx
2.2.5 其他配置工具
yum install -y net-tools vim wget tree
2.2.6 下载安装包
cd ~
wget https://bintray.com/artifact/download/seafile-org/seafile/seafile-server_5.1.3_x86-64.tar.gz
2.3 配置数据库
2.3.1 启动数据库并配置数据库开机默认启动
systemctl start mariadb
systemctl enable mariadb
2.3.2 初始化数据库
mysql_secure_installation
向导如下:
[...]
Set root password? [Y/n] y
New password:
Re-enter new password:
Password updated successfully!
Reloading privilege tables..
 ... Success!
[...]
Remove anonymous users? [Y/n] y
 ... Success!
[...]
Disallow root login remotely? [Y/n] n
 ... skipping.
[...]
Remove test database and access to it? [Y/n] y
 - Dropping test database...
 ... Success!
 - Removing privileges on test database...
 ... Success!
[...]
Reload privilege tables now? [Y/n] y
 ... Success!
[...]
2.4 安装主程序
2.4.1建立目录结构
mkdir /home/cmdschool.org
cp seafile-server_5.1.3_x86-64.tar.gz /home/cmdschool.org
2.4.2 解压并备份安装包
cd /home/cmdschool.org
tar -xf seafile-server_5.1.3_x86-64.tar.gz
mkdir installed
mv seafile-server_5.1.3_x86-64.tar.gz installed/
检查目录
cd /home/cmdschool.org
tree -L 2
显示如下:
.
├── installed
│   └── seafile-server_5.1.3_x86-64.tar.gz
└── seafile-server-5.1.3
    ├── check_init_admin.py
    ├── reset-admin.sh
    ├── runtime
    ├── seaf-fsck.sh
    ├── seaf-fuse.sh
    ├── seaf-gc.sh
    ├── seafile
    ├── seafile.sh
    ├── seahub
    ├── seahub.sh
    ├── setup-seafile-mysql.py
    ├── setup-seafile-mysql.sh
    ├── setup-seafile.sh
    └── upgrade

6 directories, 11 files
2.4.3 运行安装向导
cd seafile-server-5.1.3
./setup-seafile-mysql.sh
显示如下:
Checking python on this machine ...
  Checking python module: setuptools ... Done.
  Checking python module: python-imaging ... Done.
  Checking python module: python-mysqldb ... Done.

-----------------------------------------------------------------
This script will guide you to setup your seafile server using MySQL.
Make sure you have read seafile server manual at

        https://github.com/haiwen/seafile/wiki

Press ENTER to continue
-----------------------------------------------------------------


What is the name of the server? It will be displayed on the client.
3 - 15 letters or digits
[ server name ] seafile

What is the ip or domain of the server?
For example: www.mycompany.com, 192.168.1.101
[ This server's ip or domain ] seafile.cmdschool.org

Where do you want to put your seafile data?
Please use a volume with enough free space
[ default "/home/cmdschool.org/seafile-data" ]

Which port do you want to use for the seafile fileserver?
[ default "8082" ]

-------------------------------------------------------
Please choose a way to initialize seafile databases:
-------------------------------------------------------

[1] Create new ccnet/seafile/seahub databases
[2] Use existing ccnet/seafile/seahub databases

[ 1 or 2 ] 1

What is the host of mysql server?
[ default "localhost" ]

What is the port of mysql server?
[ default "3306" ]

What is the password of the mysql root user?
[ root password ]

verifying password of user root ...  done

Enter the name for mysql user of seafile. It would be created if not exists.
[ default "root" ] seafile

Enter the password for mysql user "seafile":
[ password for seafile ]

verifying password of user seafile ...  done

Enter the database name for ccnet-server:
[ default "ccnet-db" ]

Enter the database name for seafile-server:
[ default "seafile-db" ]

Enter the database name for seahub:
[ default "seahub-db" ]

---------------------------------
This is your configuration
---------------------------------

    server name:            seafile
    server ip/domain:       seafile.cmdschool.org

    seafile data dir:       /home/cmdschool.org/seafile-data
    fileserver port:        8082

    database:               create new
    ccnet database:         ccnet-db
    seafile database:       seafile-db
    seahub database:        seahub-db
    database user:          seafile


---------------------------------
Press ENTER to continue, or Ctrl-C to abort
---------------------------------

Generating ccnet configuration ...

done
Successly create configuration dir /home/cmdschool.org/ccnet.
Generating seafile configuration ...

Done.
done
Generating seahub configuration ...

----------------------------------------
Now creating seahub database tables ...

----------------------------------------

creating seafile-server-latest symbolic link ...  done


-----------------------------------------------------------------
Your seafile server configuration has been finished successfully.
-----------------------------------------------------------------

run seafile server:     ./seafile.sh { start | stop | restart }
run seahub  server:     ./seahub.sh  { start  | stop | restart  }

-----------------------------------------------------------------
If you are behind a firewall, remember to allow input/output of these tcp ports:
-----------------------------------------------------------------

port of seafile fileserver:   8082
port of seahub:               8000

When problems occur, Refer to

        https://github.com/haiwen/seafile/wiki

for information.
2.4.4 确认安装
cd /home/cmdschool.org
tree -L 2
显示如下:
.
├── ccnet
│   ├── mykey.peer
│   └── seafile.ini
├── conf
│   ├── ccnet.conf
│   ├── seafdav.conf
│   ├── seafile.conf
│   └── seahub_settings.py
├── installed
│   └── seafile-server_5.1.3_x86-64.tar.gz
├── seafile-data
│   └── library-template
├── seafile-server-5.1.3
│   ├── check_init_admin.py
│   ├── reset-admin.sh
│   ├── runtime
│   ├── seaf-fsck.sh
│   ├── seaf-fuse.sh
│   ├── seaf-gc.sh
│   ├── seafile
│   ├── seafile.sh
│   ├── seahub
│   ├── seahub.sh
│   ├── setup-seafile-mysql.py
│   ├── setup-seafile-mysql.sh
│   ├── setup-seafile.sh
│   └── upgrade
├── seafile-server-latest -> seafile-server-5.1.3
└── seahub-data
    └── avatars

13 directories, 17 files
2.4.5 启动Seafile
/home/cmdschool.org/seafile-server-5.1.3/seafile.sh start
显示如下:
[06/19/16 13:23:55] ../common/session.c(132): using config file /home/cmdschool.org/conf/ccnet.conf
Starting seafile server, please wait ...
Seafile server started

Done.
2.4.6 启动Seahub
/home/cmdschool.org/seafile-server-5.1.3/seahub.sh start
向导如下:
LC_ALL is not set in ENV, set to en_US.UTF-8
Starting seahub at port 8000 ...

----------------------------------------
It's the first time you start the seafile server. Now let's create the admin account
----------------------------------------

What is the email for the admin account?
[ admin email ] will@cmdschool.org

What is the password for the admin account?
[ admin password ]

Enter the password again:
[ admin password again ]


----------------------------------------
Successfully created seafile admin
----------------------------------------


Seahub is started

Done.
2.4.7 配置防护墙
firewall-cmd --permanent --add-port=8000/tcp
firewall-cmd --permanent --add-port=8082/tcp
firewall-cmd --reload
firewall-cmd --list-all
2.4.8 浏览器测试
http://seafile.cmdschool.org:8000
2.5 配置nginx的http代理
注:以下配置基于2.4章节
2.5.1 配置虚拟服务
vim /etc/nginx/conf.d/seafile.com
输入如下内容:
erver {
    listen 80;
    server_name seafile.cmdschool.org;

    proxy_set_header X-Forwarded-For $remote_addr;

    location / {
        fastcgi_pass    127.0.0.1:8000;
        fastcgi_param   SCRIPT_FILENAME     $document_root$fastcgi_script_name;
        fastcgi_param   PATH_INFO           $fastcgi_script_name;

        fastcgi_param    SERVER_PROTOCOL        $server_protocol;
        fastcgi_param   QUERY_STRING        $query_string;
        fastcgi_param   REQUEST_METHOD      $request_method;
        fastcgi_param   CONTENT_TYPE        $content_type;
        fastcgi_param   CONTENT_LENGTH      $content_length;
        fastcgi_param    SERVER_ADDR         $server_addr;
        fastcgi_param    SERVER_PORT         $server_port;
        fastcgi_param    SERVER_NAME         $server_name;
        fastcgi_param   REMOTE_ADDR         $remote_addr;

        access_log      /var/log/nginx/seahub.access.log;
        error_log       /var/log/nginx/seahub.error.log;
    }

    location /seafhttp {
        rewrite ^/seafhttp(.*)$ $1 break;
        proxy_pass http://127.0.0.1:8082;
        client_max_body_size 0;
        proxy_connect_timeout  36000s;
        proxy_read_timeout  36000s;
    }

    location /media {
        root /home/cmdschool.org/seafile-server-latest/seahub;
    }
}
2.5.2 修改SERVICE_URL和FILE_SERVER_ROOT
界面中单击“系统管理”->“设置”修改如下参数为:
SERVICE_URL: http://seafile.cmdschool.org
FILE_SERVER_ROOT: http://seafile.cmdschool.org/seafhttp
2.5.3 配置启动脚本
vim /home/cmdschool.org/seafile-server-5.1.3/seafiled.sh
修改启动参数如下:
#!/bin/sh

# 请将 user 改为你的Linux用户名
user=seafile

# 请将 script_dir 改为你的 Seafile 文件安装路径
seafile_dir=/home/cmdschool.org
script_path=${seafile_dir}/seafile-server-latest
seafile_init_log=${seafile_dir}/logs/seafile.init.log
seahub_init_log=${seafile_dir}/logs/seahub.init.log

# 若使用 Nginx/Apache, 请将其设置为true, 否者为 false
fastcgi=true
# fastcgi 端口, 默认为 8000.
fastcgi_port=8000

case "$1" in
        start)
                sudo -u ${user} ${script_path}/seafile.sh start >> ${seafile_init_log}
                if [  $fastcgi = true ];
                then
                        sudo -u ${user} ${script_path}/seahub.sh start-fastcgi ${fastcgi_port} >> ${seahub_init_log}
                else
                        sudo -u ${user} ${script_path}/seahub.sh start >> ${seahub_init_log}
                fi
        ;;
        restart)
                sudo -u ${user} ${script_path}/seafile.sh restart >> ${seafile_init_log}
                if [  $fastcgi = true ];
                then
                        sudo -u ${user} ${script_path}/seahub.sh restart-fastcgi ${fastcgi_port} >> ${seahub_init_log}
                else
                        sudo -u ${user} ${script_path}/seahub.sh restart >> ${seahub_init_log}
                fi
        ;;
        stop)
                sudo -u ${user} ${script_path}/seafile.sh $1 >> ${seafile_init_log}
                sudo -u ${user} ${script_path}/seahub.sh $1 >> ${seahub_init_log}
        ;;
        *)
                echo "Usage: /etc/init.d/seafile-server {start|stop|restart}"
                exit 1
        ;;
esac
2.5.4 添加执行用户和配置目录权限
useradd seafile -s /sbin/nologin -d /home/cmdschool.org/
chown -R seafile:seafile /home/cmdschool.org/
chown -R seafile:seafile /tmp/seahub_cache/
2.5.5 配置启动服务
vim /lib/systemd/system/seafile.service
输入如下内容:
[Unit]
Description=seafile
After=mariadb.service

[Service]
Type=forking
ExecStart=/home/cmdschool.org/seafile-server-5.1.3/seafiled.sh start
ExecReload=/home/cmdschool.org/seafile-server-5.1.3/seafiled.sh restart
ExecStop=/home/cmdschool.org/seafile-server-5.1.3/seafiled.sh stop
PrivateTmp=true

[Install]
WantedBy=multi-user.target
2.5.6 修改sudo
visudo
注释掉如下行:
Defaults requiretty
注:不修改可能使用systemctl命令启动服务时会出错
2.5.7 停止管理员身份运行的主程序
/home/cmdschool.org/seafile-server-5.1.3/seafile.sh stop
/home/cmdschool.org/seafile-server-5.1.3/seahub.sh stop
2.5.8 测试服务并配置开机启动
systemctl start seafile.service
systemctl restart seafile.service
systemctl stop seafile.service
systemctl start seafile.service
systemctl enable seafile.service
2.5.9 启动服务并配置开机启动
systemctl restart nginx
systemctl enable nginx
2.5.10 配置防火墙
firewall-cmd --permanent --remove-port=8000/tcp
firewall-cmd --permanent --remove-port=8082/tcp
firewall-cmd --permanent --add-service http
firewall-cmd --reload
firewall-cmd --list-all
2.5.11 浏览器测试
http://seafile.cmdschool.org
2.6 配置nginx的https代理
注:以下配置基于2.5章节
2.6.1 生成私钥
openssl genrsa -out privkey.pem 2048
生成如下私钥:
privkey.pem
2.6.2 生成公钥
openssl req -new -x509 -key privkey.pem -out cacert.pem -days 1095
向导如下:
You are about to be asked to enter information that will be incorporated
into your certificate request.
What you are about to enter is what is called a Distinguished Name or a DN.
There are quite a few fields but you can leave some blank
For some fields there will be a default value,
If you enter '.', the field will be left blank.
-----
Country Name (2 letter code) [XX]:CN
State or Province Name (full name) []:GD
Locality Name (eg, city) [Default City]:DG
Organization Name (eg, company) [Default Company Ltd]:cmdschool.org
Organizational Unit Name (eg, section) []:it
Common Name (eg, your name or your server's hostname) []:seafile.cmdschool.org
Email Address []:will@cmdschool.org
2.6.3 复制公钥和私钥到指定路径
cp cacert.pem privkey.pem /etc/ssl/
2.6.4 修改配置文件
vim /etc/nginx/conf.d/seafile.conf
修改配置文件如下:
server {
      listen       80;
      server_name  seafile.cmdschool.org;
      rewrite ^ https://$http_host$request_uri? permanent;    #强制将http重定向到https
    }
    server {
      listen 443;
      ssl on;
      ssl_certificate /etc/ssl/cacert.pem;            #cacert.pem 文件路径
      ssl_certificate_key /etc/ssl/privkey.pem;    #privkey.pem 文件路径
      server_name seafile.cmdschool.org;
      proxy_set_header X-Forwarded-For $remote_addr;
      location / {
          fastcgi_pass    127.0.0.1:8000;
          fastcgi_param   SCRIPT_FILENAME     $document_root$fastcgi_script_name;
          fastcgi_param   PATH_INFO           $fastcgi_script_name;

          fastcgi_param   SERVER_PROTOCOL    $server_protocol;
          fastcgi_param   QUERY_STRING        $query_string;
          fastcgi_param   REQUEST_METHOD      $request_method;
          fastcgi_param   CONTENT_TYPE        $content_type;
          fastcgi_param   CONTENT_LENGTH      $content_length;
          fastcgi_param   SERVER_ADDR         $server_addr;
          fastcgi_param   SERVER_PORT         $server_port;
          fastcgi_param   SERVER_NAME         $server_name;
          fastcgi_param   HTTPS               on;
          fastcgi_param   HTTP_SCHEME         https;

          access_log      /var/log/nginx/seahub.access.log;
          error_log       /var/log/nginx/seahub.error.log;
      }
      location /seafhttp {
          rewrite ^/seafhttp(.*)$ $1 break;
          proxy_pass http://127.0.0.1:8082;
          client_max_body_size 0;
          proxy_connect_timeout  36000s;
          proxy_read_timeout  36000s;
      }
      location /media {
          root /home/cmdschool.org/seafile-server-latest/seahub;
      }
    }
2.6.5 修改SERVICE_URL和FILE_SERVER_ROOT
界面中单击“系统管理”->“设置”修改如下参数为:
SERVICE_URL: https://seafile.cmdschool.org
FILE_SERVER_ROOT: https://seafile.cmdschool.org/seafhttp
2.6.7 重新启动服务
systemctl restart seafile.service
2.6.8 配置防火墙
firewall-cmd --permanent --remove-service http
firewall-cmd --permanent --add-service https
firewall-cmd --reload
firewall-cmd --list-all
2.6.9 浏览器测试
https://seafile.cmdschool.org
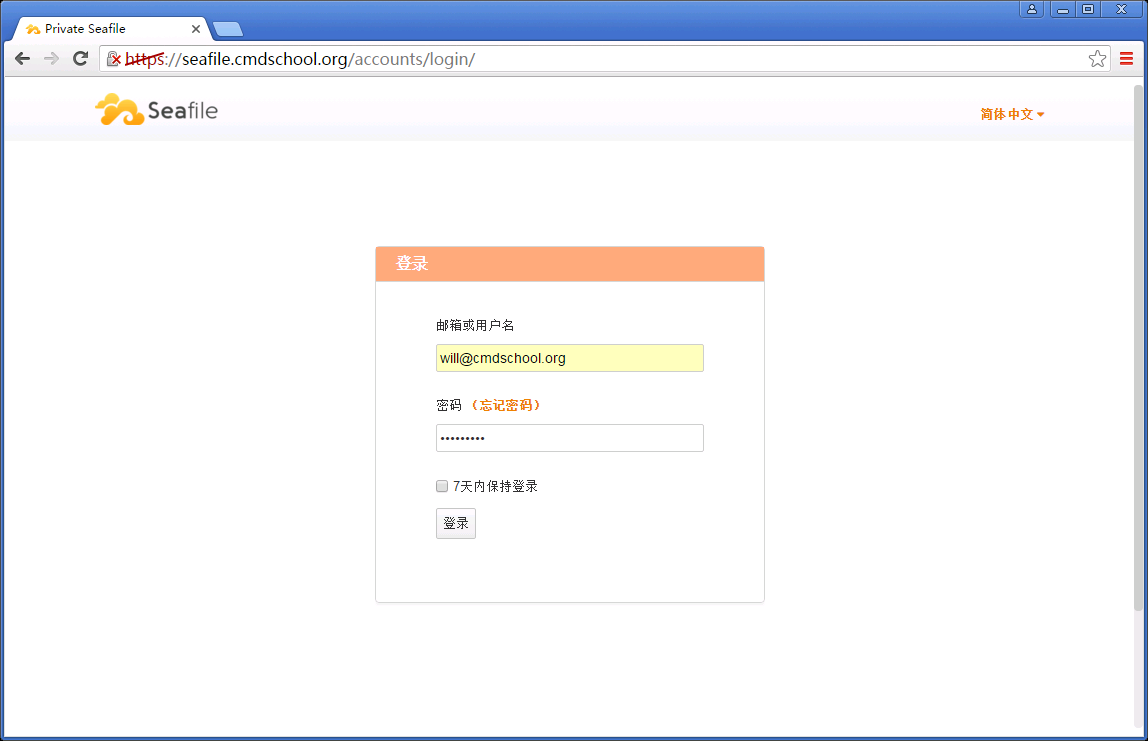
注:登录帐号和密码(详见2.4.6章节的配置向导生成)
——————————————————————————
参阅资料:
官方首页
https://www.seafile.com/en/home/
下载地址
https://www.seafile.com/en/download/
安装文档
http://manual-cn.seafile.com
http://manual.seafile.com/
非官方文档
http://www.centoscn.com/CentOS/config/2015/0507/5374.html
http://blog.sina.com.cn/s/blog_43b39e250102v4zt.html
http://www.linuxidc.com/Linux/2015-04/116648.htm
http://www.linuxidc.com/Linux/2012-11/75153.htm
没有评论