如何OVS配置Proxmox VE双活Trunk线上联思科交换?
- By : Will
- Category : Virtualization
Virtualization
1 前言
一个问题,一篇文章,一出故事。
本章将总结Proxmox VE的网卡以Trunk模式上联思科交换机。
由于Trunk允许多个VLAN通讯,因此Trunk是一种适合虚拟机灵活横跨多个网段的方案。
2 最佳实践
2.1 节点上联交换机设置
2.1.1 设置线路聚合虚拟接口
Switch(config)# interface Port-channel1
Switch(config-if)# switchport trunk encapsulation dot1q
Switch(config-if)# switchport mode trunk
Switch(config-if)# switchport trunk allowed vlan all
Switch(config-if)# no shutdown
2.1.2 设置线路聚合物理Trunk口
Switch(config)# interface range GigabitEthernet0/1 - 2
Switch(config-if)# switchport trunk encapsulation dot1q
Switch(config-if)# switchport mode trunk
Switch(config-if)# channel-protocol lacp
Switch(config-if)# channel-group 1 mode active
2.1.3 避免配置过程中环路的操作(可选)
Switch(config)# interface GigabitEthernet0/2
Switch(config-if)# shutdown
如果是交换机已经配置STP,自己自动避免环路,此步骤可以跳过,后面恢复操作如下,
Switch(config)# interface GigabitEthernet0/2
Switch(config-if)# no shutdown
2.2 Proxmox VE虚拟服务设置
2.2.1 安装配置openVSwitch
2.3.2 配置OVSBridge
vim /etc/network/interfaces
修改如下配置,
auto enp5s1f1
iface enp5s1f1 inet manual
        ovs_type OVSPort
        ovs_bridge vmbr0

auto enp5s1f0
iface enp5s1f0 inet manual
        ovs_type OVSPort
        ovs_bridge vmbr0

auto vmbr0
iface vmbr0 inet manual
        ovs_type OVSBridge
        ovs_ports enp5s1f0 enp5s1f1
界面设置参考,
Proxmox PE中的节点单击【系统】->【网络】->【创建】->【OVS Bridge】,并参考下图设置参数,
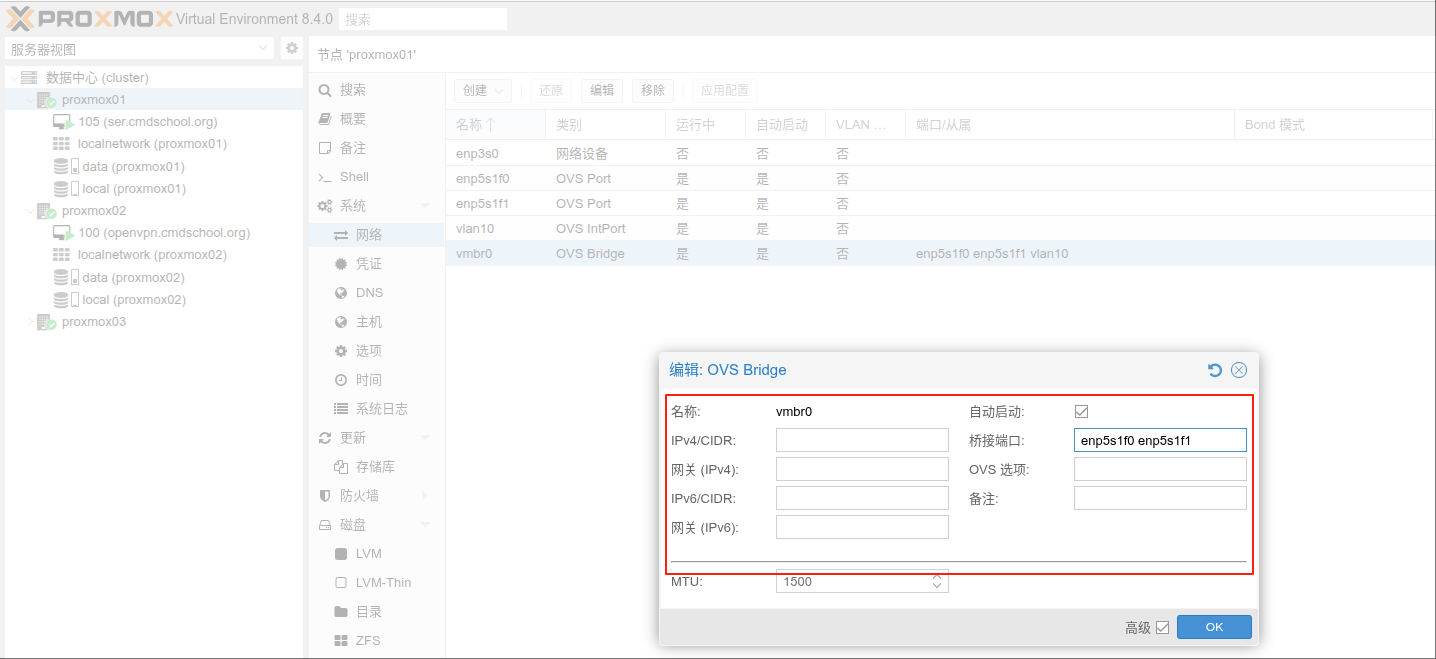
单击【应用配置】完成配置
2.3.4 配置服务器管理IP地址
vim /etc/network/interfaces
修改如下配置,
auto vlan10
iface vlan10 inet static
        address 10.168.0.229/24
        gateway 10.168.0.1
        ovs_type OVSIntPort
        ovs_bridge vmbr0
        ovs_options tag=10
同时“vmbr0”也需要增加vlan10接口的声明,即修改如下,
auto vmbr0
iface vmbr0 inet manual
        ovs_type OVSBridge
        ovs_ports enp5s1f0 enp5s1f1 vlan10
界面设置参考,
Proxmox PE中的节点单击【系统】->【网络】->【创建】->【OVS IntPort】,并参考下图设置参数,
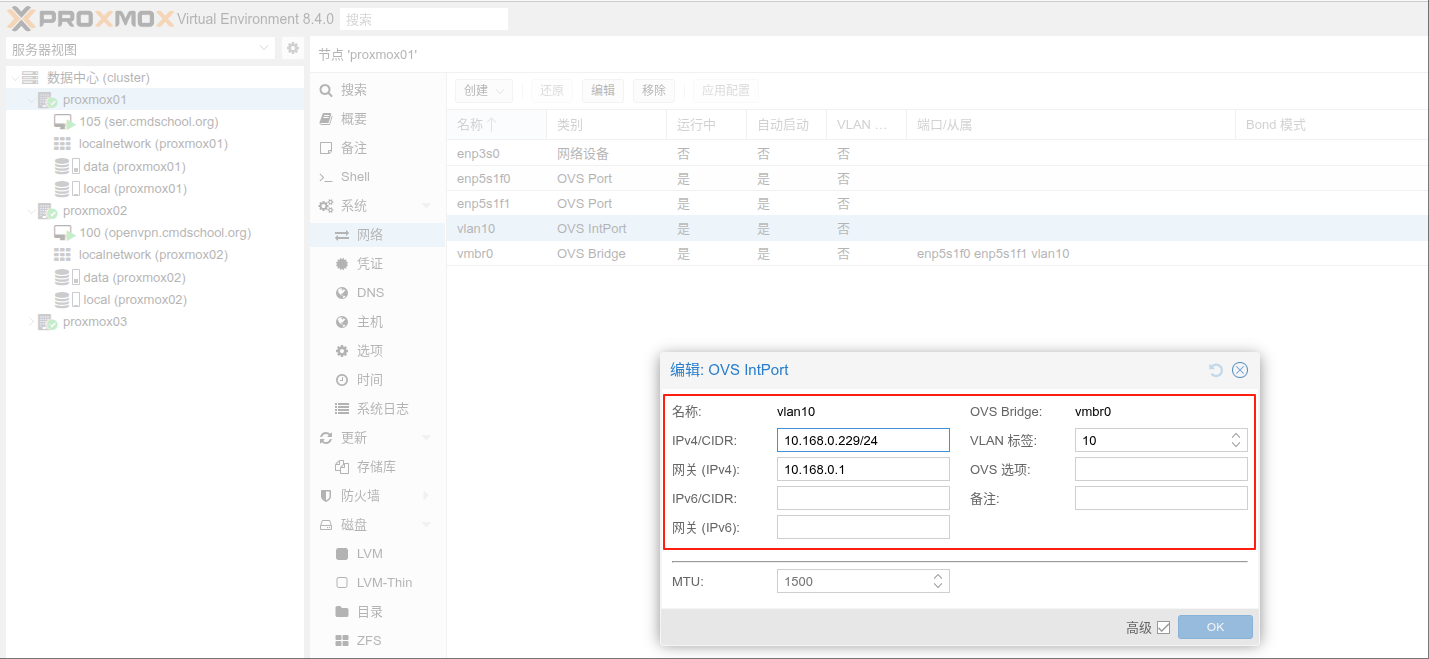
单击【应用配置】完成配置
注:这里默认你的VLan 10已经存在并已经设置网关。
2.3.5 重启服务使配置生效
systemctl restart networking.service
如果是界面设置,请点击【应用设置】则有同等效果。
2.3.6 配置负载均衡端口
ovs-vsctl del-port vmbr0 enp5s1f0
ovs-vsctl del-port vmbr0 enp5s1f1
#ovs-vsctl add-bond vmbr0 bond0 enp5s1f0 enp5s1f1 lacp=active bond_mode=balance-tcp vlan_mode=trunk trunks=10,20,30
ovs-vsctl add-bond vmbr0 bond0 enp5s1f0 enp5s1f1 lacp=active bond_mode=balance-tcp vlan_mode=trunk
ovs-vsctl set port bond0 other_config:lacp-time=fast
如果需要启动生效,请将配置写入“/etc/rc.local”,启用他请参阅如下文档,
详细如下操作如下,
vim /etc/rc.local
加入如下配置,
ovs-vsctl del-port vmbr0 enp5s1f0
ovs-vsctl del-port vmbr0 enp5s1f1
#ovs-vsctl add-bond vmbr0 bond0 enp5s1f0 enp5s1f1 lacp=active bond_mode=balance-tcp vlan_mode=trunk trunks=10,20,30
ovs-vsctl add-bond vmbr0 bond0 enp5s1f0 enp5s1f1 lacp=active bond_mode=balance-tcp vlan_mode=trunk
ovs-vsctl set port bond0 other_config:lacp-time=fast
至此,如果你如果有禁用启用一个端口,请到思科交换机中恢复。
没有评论