如何二进制部署CMAK?
- By : Will
- Category : Apache-Hadoop

1 基础知识
1.1 CMAK
1.1.1 CMAK的介绍
– CMAK原称Kafka Manager
– CMAK用于管理Apache Kafka集群
1.1.2 CMAK的功能
– 支持管理多个集群
– 支持集群状态检查(主题、消费者、偏移量、代理、副本分布、分区分布)
1.1.3 安装要求
– Kafka 0.8..或0.9..或0.10..或0.11..
– Java 11+
2 最佳实践
2.1 系统环境
2.1.1 系统环境信息
hostname = cmak.cmdschool.org
ipaddress = 10.168.0.8
OS = centOS 7.x x86_64
2.1.2 配置名称解析
echo "10.168.0.119 hd19 hd19.cmdschool.org" >> /etc/hosts
echo "10.168.0.120 hd20 hd20.cmdschool.org" >> /etc/hosts
echo "10.168.0.121 hd21 hd21.cmdschool.org" >> /etc/hosts
注:以上仅用于测试,生产环境请使用DNS代替
2.1.3 安装所需的工具包
yum install -y unzip
2.2 软件环境
2.2.1 Kafka集群环境
如果你尚未部署Kafka集群环境,请参阅如下链接,
2.2.2 部署JDK环境
请参阅以下方法安装openJDK 11以上版本,
https://www.cmdschool.org/archives/13105
安装完成后,请使用如下命令检查JDK的安装,
java -version
命令显示如下,
openjdk version "11.0.2" 2019-01-15
OpenJDK Runtime Environment 18.9 (build 11.0.2+9)
OpenJDK 64-Bit Server VM 18.9 (build 11.0.2+9, mixed mode)
2.3 安装前的准备
2.3.1 下载软件包
cd ~
wget https://github.com/yahoo/CMAK/releases/download/3.0.0.5/cmak-3.0.0.5.zip
如果需要其他版本,请从以下链接下载,
https://github.com/yahoo/CMAK/releases
2.3.2 解压软件包
cd ~
unzip cmak-3.0.0.5.zip
2.4 部署软件包
2.4.1 配置运行用户
groupadd cmak
useradd -g cmak -d /var/lib/cmak cmak
2.4.2 部署软件包到目录
cd ~
mv cmak-3.0.0.5 /usr/
chown cmak:cmak -R /usr/cmak-3.0.0.5/
chmod 775 -R /usr/cmak-3.0.0.5/
ln -s /usr/cmak-3.0.0.5/conf/ /etc/cmak
ln -s /usr/cmak-3.0.0.5/logs/ /var/log/cmak
2.4.3 配置环境变量
vim /etc/profile.d/cmak.sh
2.4.1 配置运行用户
groupadd cmak useradd -g cmak -d /var/lib/cmak cmak
2.4.2 部署软件包到目录
cd ~ mv cmak-3.0.0.5 /usr/ chown cmak:cmak -R /usr/cmak-3.0.0.5/ chmod 775 -R /usr/cmak-3.0.0.5/ ln -s /usr/cmak-3.0.0.5/conf/ /etc/cmak ln -s /usr/cmak-3.0.0.5/logs/ /var/log/cmak
2.4.3 配置环境变量
vim /etc/profile.d/cmak.sh
输入如下配置,
export CMAK_HOME=/usr/cmak-3.0.0.5
export PATH=${CMAK_HOME}/bin:$PATH
配置完成后,可使用如下命令导入环境变量,
source /etc/profile
然后可以使用如下命令检查环境变量的配置,
cmak -h
可见如下显示,
Usage:  [options]

  -h | -help         print this message
  -v | -verbose      this runner is chattier
  -d | -debug        enable debug output for the launcher script
  -no-version-check  Don't run the java version check.
  -main   Define a custom main class
  -jvm-debug   Turn on JVM debugging, open at the given port.

  # java version (default: java from PATH, currently java version "1.8.0_121")
  -java-home          alternate JAVA_HOME

  # jvm options and output control
  JAVA_OPTS          environment variable, if unset uses ""
  -Dkey=val          pass -Dkey=val directly to the java runtime
  -J-X               pass option -X directly to the java runtime
                     (-J is stripped)

  # special option
  --                 To stop parsing built-in commands from the rest of the command-line.
                     e.g.) enabling debug and sending -d as app argument
                     $ ./start-script -d -- -d

In the case of duplicated or conflicting options, basically the order above
shows precedence: JAVA_OPTS lowest, command line options highest except "--".
Available main classes:
        kafka.manager.utils.one10.LogConfig
        kafka.manager.utils.two00.LogConfig
        kafka.manager.utils.two40.LogConfig
        kafka.manager.utils.zero10.LogConfig
        kafka.manager.utils.zero11.LogConfig
        kafka.manager.utils.zero90.LogConfig
2.4 配置软件包
2.4.1 修改配置文件
cp /etc/cmak/application.conf /etc/cmak/application.conf.default
vim /etc/cmak/application.conf
修改如下参数,
kafka-manager.zkhosts="hd19.cmdschool.org:2181,hd20.cmdschool.org:2181,hd21.cmdschool.org:2181"
#kafka-manager.zkhosts=${?ZK_HOSTS}
cmak.zkhosts="hd19.cmdschool.org:2181,hd20.cmdschool.org:2181,hd21.cmdschool.org:2181"
#cmak.zkhosts=${?ZK_HOSTS}
2.4.2 测试服务运行
su - cmak
cd /usr/cmak-3.0.0.5/
/usr/cmak-3.0.0.5/bin/cmak -Dconfig.file=/etc/cmak/application.conf -Dhttp.port=8080
如果看到如下信息,则启动成功,
#...
2022-01-27 13:26:19,553 - [INFO] play.api.Play - Application started (Prod)
2022-01-27 13:26:20,723 - [INFO] p.c.s.AkkaHttpServer - Listening for HTTP on /0:0:0:0:0:0:0:0:8080
#...
看到以上提示后,如果需要结束程序请按下【CTRL+C】即可结束程序,另外,可以使用如下命令查看PDI文件,
ls /usr/cmak-3.0.0.5/RUNNING_PID
如果需要排错,可以使用如下命令查看日志文件,
tail -f /var/log/cmak/application.log
可使用如下命令查看倾听的端口,
netstat -anp | grep `pgrep -u cmak java`
可见如下显示,
tcp6       0      0 :::8080                 :::*                    LISTEN      4095/java
tcp6       0      0 10.10.200.174:48080     10.10.200.174:2181      ESTABLISHED 4095/java
unix  2      [ ]         STREAM     CONNECTED     114363   4095/java
unix  2      [ ]         STREAM     CONNECTED     114256   4095/java
2.4.3 开放应用端口
firewall-cmd --permanent --add-port 8080/tcp
firewall-cmd --reload
firewall-cmd --list-all
2.4.4 配置服务启动
vim /etc/systemd/system/cmak.service
加入如下脚本,
[Unit]
Description=CMAK Service
After=syslog.target network.target

[Service]
Type=simple
User=cmak
WorkingDirectory=/usr/cmak-3.0.0.5
PermissionsStartOnly=true
ExecStart=/bin/sh -c '. /etc/profile;/usr/cmak-3.0.0.5/bin/cmak -Dconfig.file=/etc/cmak/application.conf -Dhttp.port=8080'
PIDFile=/usr/cmak-3.0.0.5/RUNNING_PID

[Install]
WantedBy=multi-user.target
保存配置后,你需要重载服务使配置生效,
systemctl daemon-reload
然后,请使用如下命令控制服务并设置自启动,
systemctl start cmak.service
systemctl stop cmak.service
systemctl restart cmak.service
systemctl status cmak.service
systemctl enable cmak.service
2.4.5 配置Windows客户端名称解析
notepad \Windows\System32\drivers\etc\hosts
加入如下配置,
10.168.0.8 cmak.cmdschool.org
注:生产环境建议使用DNS,以上仅用于测试。
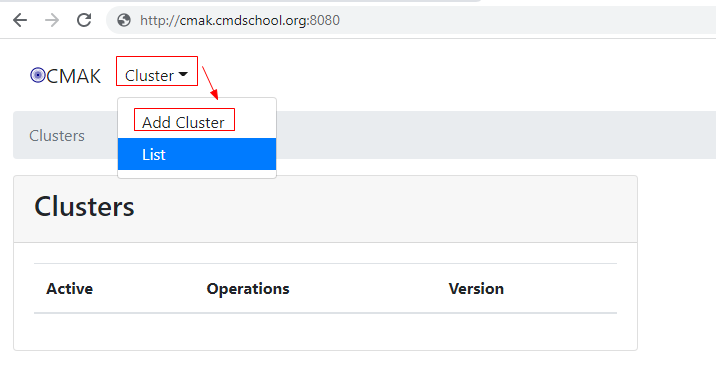
2.4.6 登录管理页面
http://cmak.cmdschool.org:8080

注:由于界面配置相对简单,详细的配置请自行摸索,本章不再详述。
参阅文档
===================
https://github.com/yahoo/CMAK
没有评论