1. 理论基础
1.1 Solr简介
Solr是一个独立的企业级搜索应用服务器,它对外提供类似于Web-service的API接口。用户可以通过http请求,向搜索引擎服务器提交一定格式的XML文件,生成索引;也可以通过Http Get操作提出查找请求,并得到XML格式的返回结果。
1.2 Solr特点
– 高度可靠性、可扩展性和容错性
– 可提供分布式索引,复制和负载平衡查询
– 自动故障转移和恢复
– 集中式配置等功能
– 支持世界上大多的互联网站点的搜索和导航功能。
1.3 Solr的模式
– Solr的模式是由一个单独的XML文件控制
– 该文件存储有关Solr理解的字段和字段类型
– 另外定义索引前的标注化(例如,标注化后搜索ABC与abc可得到相同的结果)
2 实操部分
2.1 系统环境配置
2.1.1 系统环境信息
IP Address = 10.168.0.27
OS = CentOS 7.3 x86_64
2.1.2 安装常用的工具
yum install -y wget vim unzip
2.1.3 时间相关配置
2.1.3.1 安装ntp客户端
yum install -y chrony
2.1.3.2 启动NTP客户端
systemctl start chronyd
systemctl enable chronyd
2.1.4 配置SELinux
setenforce 0
sed -i 's/SELINUX=enforcing/SELINUX=disabled/g' /etc/selinux/config
2.1.3.3 配置时区
timedatectl set-timezone Asia/Shanghai
2.2 安装JDK
2.2.1 准备安装环境
2.2.1.1 下载JDK二进制安装包
cd ~
wget http://download.oracle.com/otn-pub/java/jdk/8u161-b12/2f38c3b165be4555a1fa6e98c45e0808/jdk-8u161-linux-x64.tar.gz?AuthParam=1519347929_57bfb44c70a559c46d9d010f18391706 -O jdk-8u161-linux-x64.tar.gz
注:如果不能下载,是以上认证信息失效,请重新获通过JDK下载页面获取,
http://www.oracle.com/technetwork/java/javase/downloads/jdk8-downloads-2133151.html
2.2.1.2 部署Java目录
mkdir /usr/java
tar -xf jdk-8u161-linux-x64.tar.gz
mv jdk1.8.0_161/ /usr/java/
2.2.2 配置安装包
2.2.2.1 配置环境变量
vim /etc/profile.d/jdk.sh
输入如下配置:
export JAVA_HOME=/usr/java/jdk1.8.0_161
export JRE_HOME=${JAVA_HOME}/jre
export CLASSPATH=.:${JAVA_HOME}/lib:${JRE_HOME}/lib
export PATH=${JAVA_HOME}/bin:$PATH
导入环境变量:
source /etc/profile
2.2.2.2 测试JDK安装
java -version
显示信息如下:
java version "1.8.0_161"
Java(TM) SE Runtime Environment (build 1.8.0_161-b17)
Java HotSpot(TM) 64-Bit Server VM (build 25.161-b01, mixed mode)
2.3 部署Solr
2.3.1 准备部署环境
2.3.1.1 添加运行用户
groupadd  -g 889 solr
useradd -u 889 -g 889 -d /usr/solr  -s /bin/bash solr
2.3.1.2 下载Solr二进制安装包
su - solr
wget http://mirror.bit.edu.cn/apache/lucene/solr/7.2.1/solr-7.2.1.tgz
注:其他版本下载
http://mirror.bit.edu.cn/apache/lucene/solr/
2.3.1.3 解压安装包
tar -xf solr-7.2.1.tgz
exit
2.3.1.4 配置环境变量
vim /etc/profile.d/solr.sh
加入如下配置:
export SOLR_HOME=/usr/solr/solr-7.2.1
export PATH=${SOLR_HOME}/bin:$PATH
2.3.2 配置Solr
2.3.2.1 Solr Cloud方式配置Solr
su - solr
solr start -e cloud
注:以上启动的是Solr的分布模式
向导显示如下:
Welcome to the SolrCloud example!

This interactive session will help you launch a SolrCloud cluster on your local workstation.
To begin, how many Solr nodes would you like to run in your local cluster? (specify 1-4 nodes) [2]:

Ok, let's start up 2 Solr nodes for your example SolrCloud cluster.
Please enter the port for node1 [8983]:

Please enter the port for node2 [7574]:

Creating Solr home directory /usr/solr/solr-7.2.1/example/cloud/node1/solr
Cloning /usr/solr/solr-7.2.1/example/cloud/node1 into
   /usr/solr/solr-7.2.1/example/cloud/node2

Starting up Solr on port 8983 using command:
"/usr/solr/solr-7.2.1/bin/solr" start -cloud -p 8983 -s "solr-7.2.1/example/cloud/node1/solr"

Warning: Available entropy is low. As a result, use of the UUIDField, SSL, or any other features that require
RNG might not work properly. To check for the amount of available entropy, use 'cat /proc/sys/kernel/random/entropy_avail'.

NOTE: Please install lsof as this script needs it to determine if Solr is listening on port 8983.

Started Solr server on port 8983 (pid=27456). Happy searching!


Starting up Solr on port 7574 using command:
"/usr/solr/solr-7.2.1/bin/solr" start -cloud -p 7574 -s "solr-7.2.1/example/cloud/node2/solr" -z localhost:9983

Warning: Available entropy is low. As a result, use of the UUIDField, SSL, or any other features that require
RNG might not work properly. To check for the amount of available entropy, use 'cat /proc/sys/kernel/random/entropy_avail'.

NOTE: Please install lsof as this script needs it to determine if Solr is listening on port 7574.

Started Solr server on port 7574 (pid=27601). Happy searching!

INFO  - 2018-03-08 22:30:42.150; org.apache.solr.client.solrj.impl.ZkClientClusterStateProvider; Cluster at localhost:9983 ready

Now let's create a new collection for indexing documents in your 2-node cluster.
Please provide a name for your new collection: [gettingstarted]

How many shards would you like to split gettingstarted into? [2]

How many replicas per shard would you like to create? [2]

Please choose a configuration for the gettingstarted collection, available options are:
_default or sample_techproducts_configs [_default]
sample_techproducts_configs
Created collection 'gettingstarted' with 2 shard(s), 2 replica(s) with config-set 'gettingstarted'

Enabling auto soft-commits with maxTime 3 secs using the Config API

POSTing request to Config API: http://localhost:8983/solr/gettingstarted/config
{"set-property":{"updateHandler.autoSoftCommit.maxTime":"3000"}}
Successfully set-property updateHandler.autoSoftCommit.maxTime to 3000


SolrCloud example running, please visit: http://localhost:8983/solr
注:请注意集合名称(collection name)“gettingstarted”,下面还要用到
2.3.2.2 确认Solr的启动
查找启动的进程号:
pgrep -u solr java
显示如下:
26523
26686
查看进程相关的端口:
netstat -antp | egrep "26523|26686" | grep -i listen
可见如下信息:
tcp6       0      0 127.0.0.1:6574          :::*                    LISTEN      26686/java
tcp6       0      0 127.0.0.1:7983          :::*                    LISTEN      26523/java
tcp6       0      0 :::7574                 :::*                    LISTEN      26686/java
tcp6       0      0 :::8983                 :::*                    LISTEN      26523/java
tcp6       0      0 :::9983                 :::*                    LISTEN      26523/java
2.3.2.3 配置防火墙
firewall-cmd --permanent --add-port=8983/tcp
firewall-cmd --permanent --add-port=7574/tcp
firewall-cmd --reload
firewall-cmd --list-all
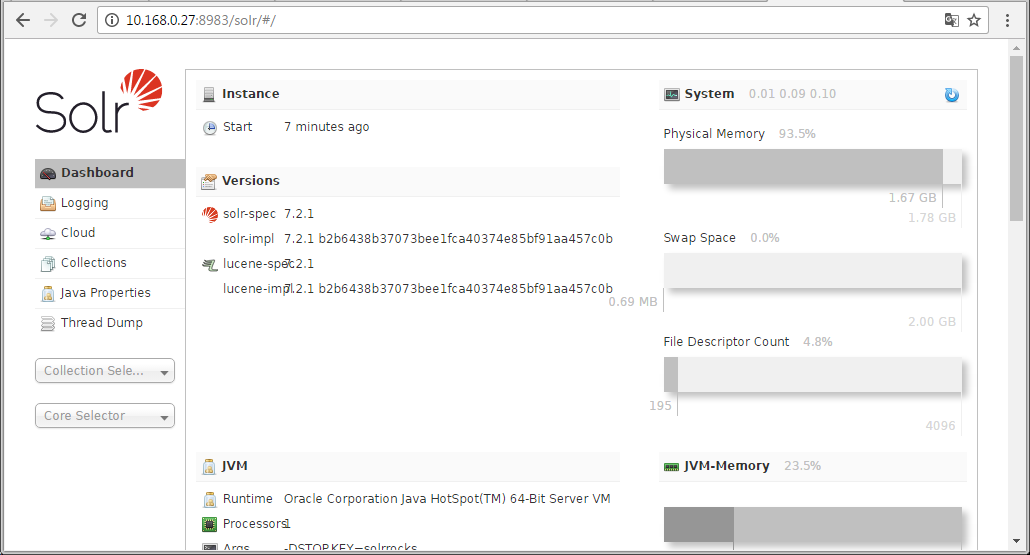
2.3.2.4 登录Solr管理界面
http://10.168.0.27:8983

注:默认没有任何验证
2.3.3 准备Solr索引
post -c gettingstarted solr-7.2.1/example/exampledocs/*
向导如下:
/usr/java/jdk1.8.0_161/bin/java -classpath /usr/solr/solr-7.2.1/dist/solr-core-7.2.1.jar -Dauto=yes -Dc=gettingstar                                          ted -Ddata=files org.apache.solr.util.SimplePostTool solr-7.2.1/example/exampledocs/books.csv solr-7.2.1/example/ex                                          ampledocs/books.json solr-7.2.1/example/exampledocs/gb18030-example.xml solr-7.2.1/example/exampledocs/hd.xml solr-                                          7.2.1/example/exampledocs/ipod_other.xml solr-7.2.1/example/exampledocs/ipod_video.xml solr-7.2.1/example/exampledo                                          cs/manufacturers.xml solr-7.2.1/example/exampledocs/mem.xml solr-7.2.1/example/exampledocs/money.xml solr-7.2.1/exa                                          mple/exampledocs/monitor2.xml solr-7.2.1/example/exampledocs/monitor.xml solr-7.2.1/example/exampledocs/more_books.                                          jsonl solr-7.2.1/example/exampledocs/mp500.xml solr-7.2.1/example/exampledocs/post.jar solr-7.2.1/example/exampledo                                          cs/sample.html solr-7.2.1/example/exampledocs/sd500.xml solr-7.2.1/example/exampledocs/solr-word.pdf solr-7.2.1/exa                                          mple/exampledocs/solr.xml solr-7.2.1/example/exampledocs/test_utf8.sh solr-7.2.1/example/exampledocs/utf8-example.x                                          ml solr-7.2.1/example/exampledocs/vidcard.xml
SimplePostTool version 5.0.0
Posting files to [base] url http://localhost:8983/solr/gettingstarted/update...
Entering auto mode. File endings considered are xml,json,jsonl,csv,pdf,doc,docx,ppt,pptx,xls,xlsx,odt,odp,ods,ott,o                                          tp,ots,rtf,htm,html,txt,log
POSTing file books.csv (text/csv) to [base]
POSTing file books.json (application/json) to [base]/json/docs
POSTing file gb18030-example.xml (application/xml) to [base]
POSTing file hd.xml (application/xml) to [base]
POSTing file ipod_other.xml (application/xml) to [base]
POSTing file ipod_video.xml (application/xml) to [base]
POSTing file manufacturers.xml (application/xml) to [base]
POSTing file mem.xml (application/xml) to [base]
POSTing file money.xml (application/xml) to [base]
POSTing file monitor2.xml (application/xml) to [base]
POSTing file monitor.xml (application/xml) to [base]
POSTing file more_books.jsonl (application/json) to [base]/json/docs
POSTing file mp500.xml (application/xml) to [base]
POSTing file post.jar (application/octet-stream) to [base]/extract
POSTing file sample.html (text/html) to [base]/extract
POSTing file sd500.xml (application/xml) to [base]
POSTing file solr-word.pdf (application/pdf) to [base]/extract
POSTing file solr.xml (application/xml) to [base]
POSTing file test_utf8.sh (application/octet-stream) to [base]/extract
POSTing file utf8-example.xml (application/xml) to [base]
POSTing file vidcard.xml (application/xml) to [base]
21 files indexed.
COMMITting Solr index changes to http://localhost:8983/solr/gettingstarted/update...
Time spent: 0:00:12.915
2.3.3 测试Solr搜索
2.3.3.1 基本的Solr搜索
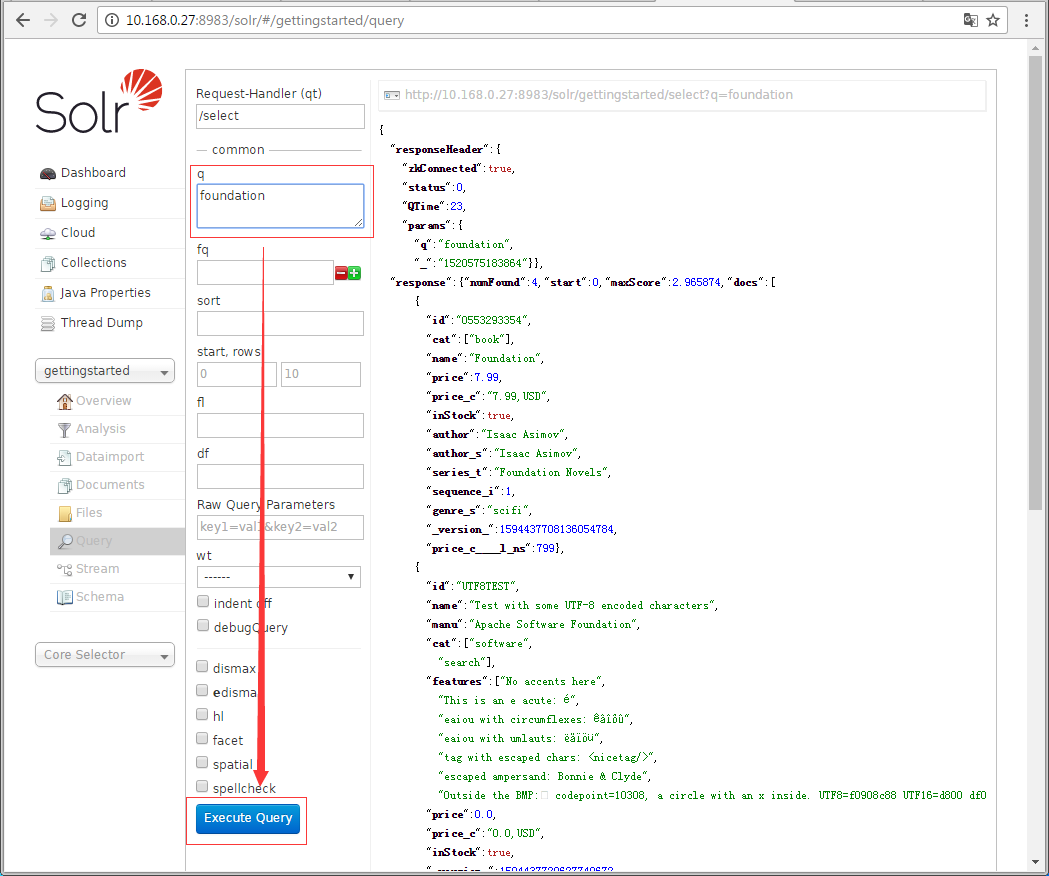
curl "http://localhost:8983/solr/gettingstarted/select?q=foundation"
注:查询关键字“foundation”
返回如下信息:
{
  "responseHeader":{
    "zkConnected":true,
    "status":0,
    "QTime":73,
    "params":{
      "q":"foundation"}},
  "response":{"numFound":4,"start":0,"maxScore":2.965874,"docs":[
      {
        "id":"0553293354",
        "cat":["book"],
        "name":"Foundation",
        "price":7.99,
        "price_c":"7.99,USD",
        "inStock":true,
        "author":"Isaac Asimov",
        "author_s":"Isaac Asimov",
        "series_t":"Foundation Novels",
        "sequence_i":1,
        "genre_s":"scifi",
        "_version_":1594437708136054784,
        "price_c____l_ns":799},
      {
        "id":"UTF8TEST",
        "name":"Test with some UTF-8 encoded characters",
        "manu":"Apache Software Foundation",
        "cat":["software",
          "search"],
        "features":["No accents here",
          "This is an e acute: é",
          "eaiou with circumflexes: êâîôû",
          "eaiou with umlauts: ëäïöü",
          "tag with escaped chars: ",
          "escaped ampersand: Bonnie & Clyde",
          "Outside the BMP:? codepoint=10308, a circle with an x inside. UTF8=f0908c88 UTF16=d800 df08"],
        "price":0.0,
        "price_c":"0.0,USD",
        "inStock":true,
        "_version_":1594437720627740672,
        "price_c____l_ns":0},
      [...]
  }}
注:
– “[…]”表示内容有节删
– 等价于页面的如下操作

2.3.3.2 多条件搜索
curl "http://localhost:8983/solr/gettingstarted/select?q=foundation&fl=id"
2.3.3.3 字段搜索
curl "http://localhost:8983/solr/gettingstarted/select?q=cat:electronics"
注:“cat”是字段名称,“electronics”是字段值
2.3.3.4 短语搜索
curl "http://localhost:8983/solr/gettingstarted/select?q=multiple terms here"
2.3.3.5 并列搜索
curl "http://localhost:8983/solr/gettingstarted/select?q=%2Belectronics%20%2Bmusic"
注:
– “%20”是空格符号的URL编码,表达分隔多个条件
– “%2B”是“+”符号的URL编码(由于curl的加号有特殊意义,所以需要转码),表达增加搜索条件
– 以上使用加号同时搜索”Belectronics”和”music”两个关键字
2.3.3.6 排除搜索
curl "http://localhost:8983/solr/gettingstarted/select?q=%2Belectronics+-music"
注:
– “%20”是空格符号的URL编码,表达增加搜索条件
– “+”符号属于curl命令的表达
– “-”符号属于搜索条件,表达排除某个条件
– 以上搜索”Belectronics”并排除”music”关键字
2.3.4 管理集合
2.3.4.1 删除集合
solr delete -c gettingstarted
2.3.4.2 创建集合
solr create -c cmdschool -s 2 -rf 2
注:
– s参数是分隔集合的分片数
– rf参数是副本的数量
2.3.4.3 停止所有Solr节点
solr stop -all
2.3.4.4 启动Solr节点
solr start -c -p 8983 -s example/cloud/node1/solr/
solr start -c -p 7574 -s example/cloud/node2/solr/ -z localhost:9983
注:第二条命令启动并连接本地的ZooKeeper
参阅文档:
======================
官方文档
———–
http://lucene.apache.org/solr/resources.html
安装范例
———-
https://devops.profitbricks.com/tutorials/install-and-configure-apache-solr-on-centos-7/

没有评论